 |
| Whole Chair Before New Vinyl |
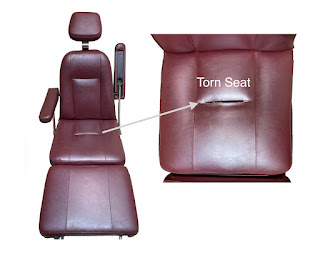
This was a first for me! Last month I received a call from a receptionist at a podiatrist’s office. She inquired if I can reupholster a torn patient chair. Since I had never done this type of upholstery, I told her the truth that “No, I haven’t done this but I’m willing to try.” I asked her a few questions and for her to send me photos.
 |
| Back and Seat After New Vinyl |
the only part of the chair that needed replacing, I realized that it was indeed something I felt that I could tackle and told her so. She asked me to quote two prices; one for just the seat and one for the entire chair. I sent her both quotes and the next day I received a response that the doctor wanted just the seat replaced. I explained to her that although I would likely be unable to match the vinyl exactly, I could come close. Since I had no idea how old the original vinyl was or where it was purchased, I could only go by the photos and order something similar.
Once she brought the torn seat to me, I got to work. The seat, it turned out, was actually connected to the back at the bottom edge with a wide piece of vinyl that was stitched and stapled in place. Replacing the torn vinyl required removing all the attaching pieces of vinyl on the upper and lower portions, as well as peeling up the lower portion of the chair’s back to reveal the sides and access the seat itself. I had to see how it was put together before I could completely take it apart.
Removing all the components of this chair proved to be quite the challenge, but once I did that, I could clearly see how it was constructed. From experience, I’ve learned to never assume I will remember how something was put together after it’s been taken apart, so I took photos of each removal step which would be repeated in reverse to re-assemble the seat sections. Once I was satisfied with my photos, I carefully marked each piece of vinyl so I would have accurate templates for the new seat. With a lot of notations and marks, the cutting process was a breeze. I kept referring to my original vinyl for accuracy (and those photos which came in handy) until all the sections were cut. I actually re-stitched the old material back together to insure everything would fit with the new vinyl since it was a finite space to attach it to and had to fit precisely. Though an extra step, this made the final new vinyl installation accurate.
The seat had badly damaged foam, which was breaking up and out of shape, so it needed to be replaced. The foam construction consisted of one larger piece of 2” foam which covered the entire chair, and a 10 x 10 cut-out section of foam that fit into the center and ended at the back, which nestled inside the larger section of foam. The sections of vinyl that were attached to this area of foam had to get an “extension” of durable fabric so they could be stapled down in between the “valley” created by the cut-out area of foam. By doing this, it created the “clinch” center portion which pulled that area down into the valley and flowed with the double-stitched top seams that tied it all together.
Once all new vinyl was in place, I recreated the tabs that held the two sections together and reattached the seat to the back. It wasn’t one of the easiest jobs I’ver ever done, but it wasn’t the most difficult either. It was nice to have an opportunity to work on a chair such as this because it gives my new industrial sewing machine and myself a good workout and great experience for future jobs like it.

No comments:
Post a Comment