 |
| New Gingham Fabric |
This chair had an outdated blue and white plaid fabric which had been popular in the 1970’s. While still in good condition, an updated look was in order, so my customer choose this lovely gingham checkered fabric which suited the style of the chair as well as the era.
This chair was quite challenging because of the many components and sections it had. Because of these many components, I had to carefully remove them all, taking good photos and tagging each one, so I could refer to them later when I put the new fabric on each section. I decided to tackle the hardest piece first and worked on the bottom cushion, then the back cushion. Unfortunately, I have no photos of the chair before I began working on it, but I did take a photo of the cushion so I knew how to put it together.
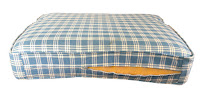 |
| Old Cushion |
Because the bottom cushion had cording on the top and bottom edges, all the way around, and wrapping around the chair’s arms, I knew this was going to be a difficult job because I had done a chair such as this before and knew what was involved. Lining up the cording to match the curves is difficult, to say the least as you have a very narrow and sharply curved area in which to create a tightly fitted, finished corded seat. This was indeed the hardest part of the cushion.
Once that was complete, I “tested” it by slipping it over the cushion and was not pleased that the brand new seat I had just spent four days on no longer fit the original cushion. I opted for not making another cover, but getting a brand new cushion, custom made to fit my cover. The Foam Factory was a life-saver! I took my fabric piece there and left it in their capable hands to make a workable cushion that would look great and be extremely comfortable and fit well. Indeed, the new cushion was perfect and all the work I did was worth it because the seat was super comfortable and fit the chair perfectly.
The wing chair portion had fabric that faced the inside and outside, so each piece had to be marked, “inside facing right, outside of fabric, inside of fabric," etc. This method of marking my photos proved to be invaluable when I put it all together. The padded armrests were yet another story. The original foam was deteriorated and had suffered “dry rot,” which happens when foam cushions basically fall apart, leaving a dusty yellow residue. I replaced them with leftover cushion from another project which worked great. I used my scroll saw to cut and shape the 3” cushion. You can use an electric knife to cut thick cushions, but since I don’t own an electric knife, my scroll saw worked wonderfully, slicing right through the foam like butter. Having the right tools is essential for any project! Finally, the chair was done with new fabric and look pretty good if I do say so myself.


