Tuesday, April 8, 2025

Antique Rocking Chair Reupholstered

Rocking Chair
Before
This was an antique rocking chair which my customer had refinished prior to my
Rocking Chair
After

receiving it to be reupholstered. The customer had selected a light weave material which looked great with the dark stain on the mahogany wood. The springs were in pretty good condition, so they didn't require to be re-tied. I covered the springs with upholstery burlap, a normal procedure for this type of chair. (The customer supplied the "before" photo since they did the refinishing and I did the upholstery only).

The wood was in great shape and the chair was sturdy and well preserved. The material was a linen weave in a light cream color, well suited to the color of the stain selected by my customer. I finished off the chair with welt cording on the front and rear seat portion for a touch of elegance and style.


Caned Chairs Repaired

Caned Chair After
w/repaired seat
Caned Chair Before
w/broken seat
Caned chairs are a nice addition to a home because they add a customized, textured touch with their hand caned seats. Unfortunately, they are easily damaged when someone tries to stand on them or can be damaged with a knee placed strategically in the center of the seat itself, which results in broken cane. 

These two caned chairs were strand caned, therefore each seat is hand woven with individual strands of very long caning, a natural product grown in warm climates, such as southeast Asia,  including Malaysia, China, Singapore and the Philippines. History shows that caning is an ancient craft dating back to Egyptian times.

This natural cane originates in the Rattan family, which is a wild creeping vine that grows freely in these countries. The outer bark is stripped away, leaving a shiny exterior bark. This is used for chair caning. The strands used in this style of caning can be up to 12 feet long. Each strand is then carefully woven through the holes on the outer edge of the chair's seat (and back) and follows a specific pattern to create the finished caned seat. The weaving process is time-consuming and can take 2-4 days to complete one chair. 

The first chair in this pair has a larger seat area than the second chair, so it took a bit longer to complete. Caned chairs can be painted or stained, but I don't recommend it because it dries out the natural caning, which ultimately makes it weaker and more apt to become damaged. 

Chair After
w/repaired seat
Chair Before
w/broken seat

Caning can also be done in a "press-in" manner, which differs because the caning is purchased as a pre-fabricated, woven section and pressed into a channel cut into the seat with a spline that secures the caning tightly into the opening. It is important to pre-soak the caning for at least an hour before it is pliable to press into the opening of the seat. 

No matter what form of caning chair you choose to furnish your home with, it is going to create a warm, inviting touch showing the natural fibers of the caning as well as the craftsmanship of the person who created it.


Thursday, April 3, 2025

Bookshelves Refinished after Fire Damage

Bookshelf 1 after
Bookshelf 1 before
This is one of four bookshelves that had been damaged in a house fire. The top had suffered smoke and water damage. The surface was charred and in need of stripping as well as deep sanding to revive the surface areas. This bookshelf was made out of oak, so luckily it sanded nicely and the damaged areas were brought to their original beauty. Jim chose Ipswich Pine stain for all the bookshelves, which proved to be a great choice. Protecting the newly refinished surface, he used satin polyurethane to give it a nice, smooth finish.

Bookshelf 2 after

Bookshelf 2 before

This is the second bookshelf that had been damaged in a fire. The top was in rough condition but the shelves weren't terrible. It too required deep sanding and a liberal application of stripper. Because of the extensive damage to the top, Jim needed to trim away the decorative top edge and leave it with flat front and sides, which gave this bookshelf a more contemporary look.

Bookshelf 3 before

Bookshelf 3 after
Jim was able to save the top of this bookshelf as well as the one below it. What a huge difference stripping and sanding makes! There is more fire damaged furniture soon for Jim to work on. As soon as it is complete, I will post it here.


Bookshelf 4 before
Bookshelf 4 after


Wednesday, April 2, 2025

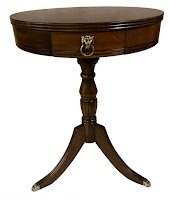
Drum Table Refinished

Drum Table After
Drum Table Before
Many people have owned or seen a drum table such as this one. Still in usable condition, this little table had seen better days. This was a smaller version of previous drum tables we have refinished and was only about 16" in diameter, a perfect size to set in a corner for an accent table which can hold a decorative item such as a vase or showpiece of art. 

The little drawer had a unique lion head brass drawer pull which had oxidized over the years so it was barely visible. Yup, this table required a bit of beautification and refinishing.

Jim carefully stripped, sanded and stained this drum table with a customized mix of blended stains to best bring out the lovely mahogany color, showing off the hidden woodgrain. Having only three legs, this table also had brass feet which were practically invisible because like the lion head drawer pull, they too had oxidized and darkened. 

The brass lion head and feet were also polished to remove the oxidation and once again showing off the beauty of the original brass which looked terrific with the newly refinished table. Once the table had been refinished and all brass work polished, it once again looked as beautiful as it had so many years ago after its original construction and will look good for another 75 or 100 years for future generations to enjoy.