 |
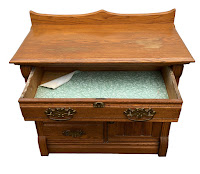
| Cabinet Before Refinishing |
 |
| Cabinet After Refinishing |
Oak is one of my favorite woods to work with. This antique
cabinet was made from solid oak, which had been previously stained in a medium golden color. While it wasn’t in terrible condition, it needed to be fleshed up, thus refinished. The first step as in most restoration jobs is to strip off the old finishes, including old stain and any lacquer or varnish.
The top of this piece had a bit of water damage as some one had left a planter on top and didn’t place anything beneath it. This is a commonly seen problem with wooden furniture if it is used to keep plants. If you don’t have something to protect the top from water, eventually even the most protected furniture will begin show signs of water damage, including a milky looking top coat to a deeper, darkening of the wood beneath the top layer which is harder to mask as it affects the fibers of the wood and is usually deeper than the surface. Either way, it’s always best to keep your plants on a porous barrier such as a plastic or aluminum pie pan or plate to properly protect your furniture from water damage.
 |
| Old Drawer Lining |
 |
| New Drawer Lining |
Once this cabinet was stripped, I chose “gunstock” stain, followed up with two coats of satin polyurethane.
The inside of the cabinet drawers and door area had been lined with outdated 1960’s era contact paper (it had to go!) I opted for wallpaper that had been used for a great replacement of headboard when we added a half bath to our upstairs. It worked well for drawer liner and mimicked the headboard front of the cabinet door. I used this for the three drawers and the shelf inside the cabinet. The final step is polishing the hardware and viola! We have a newly restored, lovely piece of oak furniture which will look great for many years.


No comments:
Post a Comment