Showing posts with label Painted. Show all posts

Tuesday, September 27, 2022

Bedroom Set Gets Updated with Paint

High Boy Dresser
After Paint

High Boy Dresser
Before Paint
This was a well-made high boy dresser which was about fifty years old. It was one of three pieces of furniture in this bedroom set (four if you include the mirror, which is not pictured). This was the high boy, there was also a low dresser and a nightstand. 

My customer had wanted an updated look, so I recommended painting as opposed to refinishing it with stain. After showing her several paint samples, she did her own research and found a lovely neutral creamy beige color, which complemented the design of the furniture, bringing out the details.

Both dressers had plenty of drawers, which each had to be painted individually, thus removed from the dressers so they can be masked off and primed, then ultimately painted. We use a high quality paint that holds up well to daily usage. It’s on the costly side, but is well worth it. Painting requires a lot of prep work, so it’s better to use high quality paint. 

Low Dresser After
Painting
Low Dresser Before
Painting
All in all there were fifteen drawers to mask off. The reason for this masking is so that the non-painted portions of the drawers remain unpainted. 

Our customer had the foresight to label each drawer so that they are easily reinstalled into their proper places in the dressers. You’d think that you could put drawers anywhere within the same dresser, but that’s not always the case. There are times when the drawers only fit in one spot, so marking them ahead of time is a great idea. Just one of those little trick you pick up along the way. A couple of the drawers had lost their bottom tracking, so Jim reinstalled them so they once again worked properly.

Nightstand After
Nightstand Before

Since my customer had opted to use the same hardware, we cleaned them up on the polishing wheel. Since they were made of brass, they polished up nicely and looked great with the newly painted furniture. Brass polishes up great, but if it’s brass plated, using the wheel exposes only the steel, not the brass.

The finished bedroom set looked terrific once it was painted. As refinishers, we love working with “real” wood, because it refinishes much better than some of the newer products which are made nowadays. The wood made a half a century ago was made really well and if preserved properly, will last another half century or more. Antique furniture is by its nature made to last as generations of these special pieces have survived many decades of everyday use with minimum wear. But when they require refinishing or updating, we make it lovely again.

Sunday, September 18, 2022

Desk and Chair Gets Fresh Paint

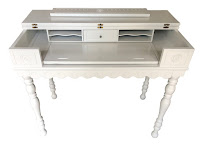
Antique Desk After Painting
 
Antique Desk Before Painting

This small lovely antique desk was in great shape, but my customer wanted it, along with a matching chair, painted white to surprise his daughter for her birthday. 

This desk had quite a bit of detail, nice features and scalloped edges on the front and rosettes on each side and the center as well as spindled legs. The wood was mahogany, but had seen some wear, so painting was a nice alternative to refinishing. Many people love the natural look of wood, but there are times when painting is a great option. My customer chose a soft white for the set which looked amazing once it was painted. I prefer white for painting furniture because it’s always a fresh, light look that will match any décor.

Antique Desk Open After
Antique Desk Open Before

The desk had an unusual feature; you could use it as is, or flip the top to
expose a hidden area which has a pull-out area and a slots which could be used for stationary storage and supplies. It’s a really unique and valuable feature of this dainty desk.

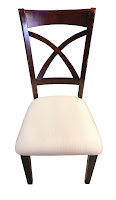
The chair was a simple school style with narrow spindles and a form fitted seat bottom. This chair was a perfect complement to the desk as it could be used for many activities. The set was adequate to provide a nice work space but small enough to fit into a tight spot or tucked into a corner of a small room. 

Chair Before
Painting
Chair After
Painting

Tuesday, February 8, 2022

Corner Chair Painted Black, New Seat Fabric


Chair Before

Chair After
This little chair is called a “corner chair,” because it can go perfectly into a  corner and you can sit on it facing either way. It’s a perfect place to sit and put your shoes on (or off) or just for additional seating. This little chair was an antique, likely made in the 1920’s or 1930’s. 

It was in great shape, but my customer wanted an updated look so she opted for satin black paint. After sanding, priming and painting, it was ready for a new upholstered seat.

The seat was covered with suede, which had seen better times, so she chose a gray tweed fabric which worked well with the black paint. The seat had been reinforced with very old, likely original metal strips on the underside and had been nailed with 2” nails! They were way to long for the 1/2 “ wood, so I had to turn the entire seat upside down and pry up the nails before removing them. 

Once that was done, I replaced them with seat webbing, weaving three rows in each direction for extra strength and support. Foam and batting added, then the new fabric was stapled in place. A black cambric finished off the underside of the chair. The black was satin, and looked fabulous with the fabric, a perfect blend of color and texture. 

Ice Cream Parlor Chair Painted and Re-Caned

Chair After
 
Chair Before

These chairs were once popular in ice cream parlors across the United States. The familiar shape is reminiscent of generations before ours sitting in an ice cream parlor, enjoying a cone of their favorite flavor. 

This chair was quite old, an antique, that had been painted a few times. It was likely part of a set but was a lone chair that needed new paint and a newly caned seat. Many caned seats either got painted with the chair, or stained, depending on the  manufacturer or whoever refinished it prior. My choice is to leave the caning natural and allow it to age which gives it a unique patina that only time can create.

Caning a round chair is a completely different process from caning a square or rectangle chair. This is because you have to go through the same hole many times and skip holes with the weaving process because of the round shape. It’s a bit tricky, but follows the same principles of basic caning in every other way. The white paint was a great choice for this little chair which matches the little table perfectly. It will eventually be used as a place for homework or other projects for a little one.

Chair with table, finished


Sunday, December 26, 2021

Dining Room Set Painted

China Cabinet Before
Wow! This was a big job. Lots of pieces and lots of work,
China Cabinet After

attention to detail and planning. A traditional dining set which was selected to be painted for an updated look to match our customer’s new home. The wood tone no longer suited and after selecting various stains in light shades, we moved into a different direction; paint. With thousands of paint colors available with as many names to match, we ended up with “Dorian Gray,” by Sherwin-Williams. It was a great color; light enough to look fresh but not super bright as white would have been.


Hutch Before

The China cabinet had a lot of curves and detail, so the doors and
Hutch After
drawers were removed and the entire cabinet was sanded, primed and painted, interior and exterior. The hardware was also painted in an accent gunmetal gray metallic, which looked splendid with the new paint in a high gloss finish. The hutch got the same treatment. The color really brought out the carving and details of the pieces.

The other challenge was the six chairs, including two armchairs. These had been re-upholstered many years ago with leather with decorative brass nail heads, but it wasn’t what our customer wanted, I suggested double welting instead of decorative nails. 

The chairs took a long time just to remove the fabric, three hours per chair. There were so many nail heads and beneath them, a million or so staples and smaller nails holding the previous leather in place. It was a very time consuming job leaving Jim and I both with sore hands and shoulders. After that each chair had to be masked off on the seat area, sanded, primed and painted. After they dried, they were ready for fabric, which was custom ordered. While waiting for the fabric, I added decorative detailing paint to the top center of each chair, to  highlight the scallop design. It tied both the light and dark gray colors together and matched the painted hardware. It’s fun adding “bling” to a project.

Armchair After
Armchair Before

The fabric our customer chose was a dark gray plush with a nap and was gorgeous for the freshly painted chairs. Cutting fabric has a sequence. First you need to cut a piece about 4” larger than the area you are covering to allow movement and positioning. 

If the fabric has a pattern, you’ll want to pay attention to the focal point and place the pattern in the center of the seat, working around it to center it prior to attaching it. You tack it in place then stretch it to center it. It’s essential to carefully cut around the arms of the chairs so that you aren’t short. You cut in a “Y” seam perpendicular to the chair’s arm. Precision is key here. Once the fabric is stretched into place, have a pneumatic stapler ready and loaded is essential to get the job done efficiently. It’s my new favorite tool. 

The dining room table had three leaves, which made it a fairly large piece. Painting large surfaces requires patience and a lot of skill. The glossy finish was perfect for this classic design. What a difference!

This was a lengthy job with many challenges, but we love how it turned out and that’s the ultimate reward.

Table Before
Table After


Chair Before
Chair After

Wednesday, December 1, 2021

Art Deco Vanity Better Than New


Vanity after w/o mirror

Vanity Before without mirror
Jim picked up this old vanity from the 1930’s, "art deco style," at an antique shop in Port Huron. It’s got the classic curvy waterfall style as we commonly see in cedar chests. It had five drawers but only four drawer pulls. I had envisioned something completely different, a
refreshing update, so I opted for paint. I chose Sherwin-Williams “Cotton White,” which is one of my favorite off-white colors. This painting preserved the antique look, but with an updated, twenty-first century functionality.

Vanity painted with mirror

Of course, as with every wood project, it’s essential to use a good primer so that the paint will adhere as it should. I actually used two coats of primer for the vanity and mirror. When Jim brought the vanity and mirror home, they were detached, so I had to take the photos separately since we didn’t put it together just for photos. Mirrors are super hard to photograph because they reflect whatever is opposite them, therefore I used a white sheet to block out the basement background (my workspace) but you get the idea. 

The mirror had some really cool design features. At the top there was an inverted curve of wood that had a carved flower motif in the center. That piece of wood, along with two metal brackets, held the mirror in place. 

To prepare the mirror for painting, I removed the mirror by removing the decorative piece of wood along with the mirror brackets, set them aside to be painted a different color. I sanded and primed the mirror and painted it to match the vanity. The bottom of the mirror had a decorative piece of wood that mimicked the front legs with an inverted curve. Both top and bottom wood accents were painted silver glitter. I opted to hand paint the flower in the center of the top mirror wood insert and it was the perfect little touch of glam. I painted the center drawer a bright tangerine and lemon yellow for the rest of the side drawers. I lined the bottom of the drawers with a super sparkly silver drawer liner. It was that perfect special touch that adds a bit of bling.

Once everything was done and the paint had dried sufficiently, Jim installed the new nickel drawer pulls which were the perfect finishing touch to this spectacular old piece of furniture.

Drawer liner center drawer
         
        Drawer liners
   
New nickel hardware

Tuesday, November 9, 2021

Amish Oak Table and Chairs Painted and Stained

Dining Table Before
(without leaves)
 
Dining Table and Chairs
Painted w/Stained Top
This lovely oak table came with two leaves and six chairs. Our customer had wanted a different, updated look so we suggested painting combined with keeping the table top woodgrain, but staining it little darker. 

They had originally envisioned an antique white, but after reviewing their décor choices, settled on latté, which is exactly as it sounds, a coffee color with a generous amount of cream added for that perfect flavor, or in this case, color combination. 

Prepping furniture for paint, especially chairs, takes patience and time. Mainly because it is all done by hand. You can’t use a power sander for chairs (except minimally) and spend hours scuffing up all the surface area to prepare it for first primer then two coats of paint. You also can’t skimp on the prep work as it directly effects the outcome of the project. 

We stripped and stained the table top, which had minor scratches, a rich, dark walnut to bring out the beautiful wood tones. The table’s pedestal base was painted to match the chairs, all done in latté. While some people simply do not like to paint furniture, there are times when painting is a nice choice. But by no means are you limited to using only paint. The combination of using paint and stain marries two distinct styles into a well-blended upgrade to outdated furniture without sacrificing the original integrity. 

The chairs, having many spindles, take a great deal of time to prep for painting. Chairs, period, are one the most time-consuming of all furniture projects, because there's so much surface area on a chair. Plus, the more detail (hence, spindles), the longer it takes to prep them. It’s also why chairs can be costly to refinish (or paint). All those surfaces need the same amount of attention and prep time. Ultimately, you have many colors in both stain and paint to choose from for your perfect furniture project.


Wednesday, July 7, 2021

Antique Stained Glass Door Revival


Door Interior
Before
This antique door was well over 100 years old and had seen plenty of years of wear and weathering. The cracking was pretty severe and the windows, while amazingly weren’t broken, needed some TLC because the framework was deteriorating and held in by glaze. Unfortunately, upon removing some of the paint we discovered the door was not stainable, so our customer chose a fresh coat of paint.


The stripping process is always the most tedious in any refinishing project, but for doors a lot of the difficulty comes in with the type of paint that was used. The older the door, the harder it is to remove the paint. Milk paint was frequently used back then and with our experience, is quite difficult to remove. We either use a chemical stripper or a heat gun (or both) when we remove the old paint from most projects. 


Sometimes it’s just not possible to remove all the paint so we remove as much as we can then sand it smooth and prep it for paint. A coat of primer is necessary for any paint project whether it has had paint on it previously or not. Especially raw wood projects which always require primer. Once primed, painting flows smoothly. 


Door Interior
After
This door required more work because the customer needed the door knob and hardware moved to the opposite side because of where the door would be located, so it was necessary to remove the old hardware, fill the holes left with wood pieces, dowels and filler, sand it smooth and drill new holes on the other side of the door so that it opens correctly. The new hardware they chose was brass.


This door required refinishing as well as carpentry work. Jim made new moldings for the stained glass panels and replaced the center clear glass. The door was out of square so he made sure all was square and plumb which is necessary for a smooth installation.


As you can see in the photo to the right, once installed, the stained glass looked fabulous, adding charm and character to the kitchen. The color of the glass was not visible from the exterior due to the angle of the photo. Photos below are of the exterior before and after photos.


Door Exterior
Before
Door Exterior
After


Sunday, May 9, 2021

Mid Century Modern Dressers

Tall Dresser After
Tall Dresser Before

Sometimes I have no words for the furniture that comes to us. This is one of those times. This was a Kroehler dresser set, a classic mid-century modern set that at its creation was probably very beautiful. Somewhere along the line the original hardware was lost (who knows) and replaced with completely different (not matching) hardware in a different finish. 

The original drawer pulls were the ones on the bottom two drawers, The center drawers had “scoopy” handles which were not at all correct for this period and the top large drawer had four knobs, also not matching. To say the least, this dresser had a bunch of mismatched pulls that simply didn’t work.

Long Dresser After
Long Dresser Before
Our customer wanted these dressers refinished and stained, however we realized that once we started stripping it wasn’t stained originally, but painted with a glaze treatment. Plus, there were broken veneered corners that wouldn’t have looked good if filled in and stained, so we suggested paint, which turned out to be the best option for these pieces. 

As much as we prefer exposing the beautiful wood hidden beneath layers of paint, sometimes it’s not possible because when we get painted pieces, it’s usually for a reason. But occasionally we get painted pieces that have gorgeous wood beneath and it takes on a completely different look once stripped and stained.

For these dressers, once the holes created by all the handles were filled in, sanded and smoothed out, painting covered them and they once again had a classic, clean line look common to the mid-century modern furniture people gravitate to. It had gotten an upgrade that worked great for these pieces. We also worked on two nightstands (not pictured) that were a part of this set but we didn’t get the “after” pictures of them. Then our customers decided to get a headboard painted to match the rest of the furniture so now they have a complete set that all matches. This one turned out great!

Tuesday, April 27, 2021

Dining Table Upgrade and New Cushions on Chairs

Dining Table Before
Dining Table
and Chairs After
This lovely Queen Anne dining table had a well-worn top, but was overall in great condition. Our customer had wanted to have the top refinished and the legs painted black. I completely stripped the top in an afternoon and Jim took care of the side edges, preparing them for paint. 

Once it was primed, I painted the side of the table edge while he spray painted the legs. You simply can’t beat the look of spray painting furniture when able to do so. It isn’t possible for everything, but when we can, we chose spraying. Brush painting isn’t too bad though and with black, it is an easy color to blend well with any color stain you decide to use with it.

Chair After


Chair Before
She had purchased the table alone and needed chairs, so she found four chairs separately that matched the table perfectly. The chairs were in great shape, but she wanted the seats reupholstered and chose a black vinyl with a diamond shape, a small rectangle of gold accents to finish off the design. The material was very elegant and made a great seat cover to match the black portion of the table. Even though the chairs and table wasn’t a family at first, when all was done, they got along just fine and made a great addition to this lovely kitchen.

Friday, January 15, 2021

Oak Dresser Hidden by Green Paint


Dresser After Stripping

Dresser Before Stripping

This little dresser is similar to a few others we’ve done that had the same overall look and design. However, this one was painted green. In our experience, sometimes when a piece of furniture is painted, there’s a good reason for it. Upon stripping this little dresser, we discovered that one of the drawers had a “patch,” which meant that someone had added a different type of wood that didn’t match the original oak that was used when it was built.

Luckily we were able to apply the stain so that it covered the entire piece in a way that looked as it would have looked originally. Likely, it had never been stained, just painted after it was built. It was old though.

When painting furniture, it usually doesn’t matter if wood styles are mixed because the paint covers it all evenly. But when a person wants something stripped and stained, refinished per se, if the wood is patched with non-original wood, this results in a variance of stain colors since different types of wood accept stain differently. 

A good example would be if you apply a dark stain to a light wood such as pine, it would certainly darken the original raw wood but wouldn’t be as dark as if you used the same stain on walnut, which is a darker wood to begin with. It’s always easier to go darker upon refinishing/restoring but much harder to go lighter. Not to say that it isn’t possible to do this as it all depends on the type of wood that was stained originally. Sometimes you simply don’t know what the raw wood will look like until it is stripped as years and years tend to oxidize the wood, making it darker than the original stain. Most of the time the wood, when stripped and completely sanded, is much lighter than the old finish. This allows for plenty of stain choices as it is fun to experiment with how the various stains draw out the wood’s original beauty. This is one of the most rewarding aspects of refinishing...seeing the final results when applying the stain. Ah, it’s pretty once again!

Tuesday, October 27, 2020

Little Black Chess Piece Table

Chess Piece
Table Before
This little gem is another furniture item to add to our collection of painted black tables. As like the previous posting, our customer had envisioned this table being stripped and stained, but like the last table the wood beneath the gray paint was simply not stainable. It was splotchy and had absorbed the paint into the wood grain. There were two coats of paint on this table, black then gray on top of the black. It was also never primed, which contributed to the discoloration of the
Chess Piece
Table After

wood, making it not stainable. 

So, black was chosen once again as the color choice because it is popular for modern life and matches everything. This little gem was only about 16” in diameter and only about 24” tall, so not very big but big enough to keep a lamp or set down a cup of coffee. 

Needless to say the stripping process was intense and took a couple of days to remove all that paint enough for it to be properly primed and prepared to receive the new paint, which for this table we chose to spray on since it was late summer. We generally can’t paint in the colder months because it’s just too cold and the spray painting doesn’t work very well in cold weather. The finished black table was outstanding and made a huge difference. I told Jim I think the table looked like a large chess piece because of the interesting detail on the underside of the top, lending it a chess piece look. Very cute and very functional, this little chess piece table is once again a nice addition to the customer’s room.