Showing posts with label wood. Show all posts

Friday, January 5, 2024

Button Fluted Chair Makeover


Chair After

Chair Before
This is another classic style chair with fluted channels and buttons to accent the back. It had definitely seen better days since it had a damaged, torn seat from an active dog. The chair itself was very durable and structurally sound, needing no tightening or other repair work. But like many chairs of this style, it had many, many staples to remove which was a very time-consuming process. My customer chose the fabric which was a lovely large floral print on a dark teal background.

And to make matters even more time-consuming, the staples were quite rusty, which made them a bit tougher to remove. This chair may have been in a damp environment, hence the rusty staples, but the fabric had no mold or odors, so despite the dampness, it was dry and odorless.

Removing the fabric is the opposite of putting it on. I removed the welting on the back first before removing the entire back itself. I kept the pieces in tact as I was planning on using them as templates. This is much easier than making the patterns without the original pieces, which I’ve also done. For this particular style of chair having those template pieces was invaluable. I had to carefully transfer the markings for the fluted back and button positions from the old fabric to the new fabric. 

Using a heat removable marker, I transferred the lines to the new fabric. The back consisted of four layers; the outer fabric, the batting, the 1/4” foam and the liner which is the very back fabric (I used muslin), not seen when the chair is put together. The challenging part of this process was stitching all those layers together while keeping them from moving too much. This took the better part of the afternoon to accomplish. The chair also had fabric covered buttons which had to made individually as I don’t own an automatic button maker. (....some day...). 

After I had the seat all done, I began the slow process of attaching the thickly padded back. Starting at the top and temporarily attaching it to the center back, I worked the layers through the bottom wood structure of the chair and attaching it to the lower portion of the wood. All this is not seen once the chair is done. Once I was sure the backing was lined up, I finished attaching it securely. After the front of the back was installed, I attached the very back which covers up the interior of the chair. I covered the back with Dacron batting then used tack strip, which attaches to the wood of the chair all the way down to the arms, then the fabric is tucked between the tacks and folded then hammered with a rubber mallet, attaching it firmly to the back. At the juncture of the arms, I attached the rest of the fabric with staples as that part would be covered with welting.

I then attached the welting below where the tack strip ended, curving around the arms and again on the top curve of the front legs. This is decorative and effective way to finish the chair while covering any raw edges of the fabric. Many chairs have tacks that are used for this purpose, but I prefer welting (also called piping or cording) because once you remove the original tacks, it is hard to apply new ones without defaulting to the old holes, which don’t always line up. Many times the tacks break or bend and can’t be used, especially on very hard wood such as maple or oak. Welting is a great alternative and a cleaner look.

I loved the lines an shape of this chair and boy, was it comfortable to sit on when it was finished!

Sunday, December 26, 2021

Dining Room Set Painted

China Cabinet Before
Wow! This was a big job. Lots of pieces and lots of work,
China Cabinet After

attention to detail and planning. A traditional dining set which was selected to be painted for an updated look to match our customer’s new home. The wood tone no longer suited and after selecting various stains in light shades, we moved into a different direction; paint. With thousands of paint colors available with as many names to match, we ended up with “Dorian Gray,” by Sherwin-Williams. It was a great color; light enough to look fresh but not super bright as white would have been.


Hutch Before

The China cabinet had a lot of curves and detail, so the doors and
Hutch After
drawers were removed and the entire cabinet was sanded, primed and painted, interior and exterior. The hardware was also painted in an accent gunmetal gray metallic, which looked splendid with the new paint in a high gloss finish. The hutch got the same treatment. The color really brought out the carving and details of the pieces.

The other challenge was the six chairs, including two armchairs. These had been re-upholstered many years ago with leather with decorative brass nail heads, but it wasn’t what our customer wanted, I suggested double welting instead of decorative nails. 

The chairs took a long time just to remove the fabric, three hours per chair. There were so many nail heads and beneath them, a million or so staples and smaller nails holding the previous leather in place. It was a very time consuming job leaving Jim and I both with sore hands and shoulders. After that each chair had to be masked off on the seat area, sanded, primed and painted. After they dried, they were ready for fabric, which was custom ordered. While waiting for the fabric, I added decorative detailing paint to the top center of each chair, to  highlight the scallop design. It tied both the light and dark gray colors together and matched the painted hardware. It’s fun adding “bling” to a project.

Armchair After
Armchair Before

The fabric our customer chose was a dark gray plush with a nap and was gorgeous for the freshly painted chairs. Cutting fabric has a sequence. First you need to cut a piece about 4” larger than the area you are covering to allow movement and positioning. 

If the fabric has a pattern, you’ll want to pay attention to the focal point and place the pattern in the center of the seat, working around it to center it prior to attaching it. You tack it in place then stretch it to center it. It’s essential to carefully cut around the arms of the chairs so that you aren’t short. You cut in a “Y” seam perpendicular to the chair’s arm. Precision is key here. Once the fabric is stretched into place, have a pneumatic stapler ready and loaded is essential to get the job done efficiently. It’s my new favorite tool. 

The dining room table had three leaves, which made it a fairly large piece. Painting large surfaces requires patience and a lot of skill. The glossy finish was perfect for this classic design. What a difference!

This was a lengthy job with many challenges, but we love how it turned out and that’s the ultimate reward.

Table Before
Table After


Chair Before
Chair After

Sunday, November 7, 2021

Antique Parlor Chair Gets New Caning


Cane Chair Before

Cane Chair After
When a knee ends up in the seat of a caned chair, well, you have a problem, but not to worry, because it is fixable. It simply needs to be replaced with new caning. This antique parlor chair (it was so cute) had a perfectly round seat with a broken caned center. Like many caned chairs, they are not designed for a sudden, rapid force, such as a knee pushed in the center or a child who jumps from the chair, using it as a launching pad. Cane breaking is not uncommon, especially in old chairs. Unfortunately there’s no quick way to “fix” them. The cane must be replaced.

This little gem had strand caning, which is the weaving that requires a hank of cane in a specified size that is woven directly onto the holes surrounding the perimeter of the seat. I actually prefer this caning to the “press in” spline caning, because the process is quite relaxing. I work on chairs in my lovely sunroom (lots of natural daylight) while trying to keep my cats away from their natural instinct of pulling at what I’m tugging, which is each strand of cane as I weave it through the chair! They indeed love playing. Sadie likes to “sneak” off with a section of cane then run away, feeling like she got away with it. 😂

This chair had spindles on the front legs and overall, the chair was in great shape. You can’t beat hardwood, especially in antiques. They made furniture to last back then. Therefore when people ask the question, “Is it worth restoring?” I always answer with “yes,” because you already have the value in the chair (or other furniture item) so why not get it refinished and keep it another 100 years. It’s something to pass down for future generations. Because once they’re gone, they’re gone. Preserving the past, a bit of history, is a great way to appreciate the artistry created by someone who may not be around anymore. Get it done and you won’t regret it.


Sadie, my “helper"


Friday, January 15, 2021

Oak Dresser Hidden by Green Paint


Dresser After Stripping

Dresser Before Stripping

This little dresser is similar to a few others we’ve done that had the same overall look and design. However, this one was painted green. In our experience, sometimes when a piece of furniture is painted, there’s a good reason for it. Upon stripping this little dresser, we discovered that one of the drawers had a “patch,” which meant that someone had added a different type of wood that didn’t match the original oak that was used when it was built.

Luckily we were able to apply the stain so that it covered the entire piece in a way that looked as it would have looked originally. Likely, it had never been stained, just painted after it was built. It was old though.

When painting furniture, it usually doesn’t matter if wood styles are mixed because the paint covers it all evenly. But when a person wants something stripped and stained, refinished per se, if the wood is patched with non-original wood, this results in a variance of stain colors since different types of wood accept stain differently. 

A good example would be if you apply a dark stain to a light wood such as pine, it would certainly darken the original raw wood but wouldn’t be as dark as if you used the same stain on walnut, which is a darker wood to begin with. It’s always easier to go darker upon refinishing/restoring but much harder to go lighter. Not to say that it isn’t possible to do this as it all depends on the type of wood that was stained originally. Sometimes you simply don’t know what the raw wood will look like until it is stripped as years and years tend to oxidize the wood, making it darker than the original stain. Most of the time the wood, when stripped and completely sanded, is much lighter than the old finish. This allows for plenty of stain choices as it is fun to experiment with how the various stains draw out the wood’s original beauty. This is one of the most rewarding aspects of refinishing...seeing the final results when applying the stain. Ah, it’s pretty once again!

Monday, October 26, 2020

Newly Caned Dining Chair


Cane Chair Before
    My caning abilities are really being tested these days, but the
Cane Chair After
more caning I do, the easier it becomes and the more enjoyable. I’ve rounded another curve in my progress and have become more than just sufficient, in fact, I'm pretty darn good at it. This exquisite dining chair was likely the last survivor of a six to eight set of predecessors, therefore it deserved special treatment and caning done right. 

    This chair had been caned many years prior and had been broken, likely by a knee or a child that used it as a way to sneak cookies out of grandma’s cupboard. Cane gets brittle after so many years, therefore it is vulnerable to breakage as it ages. My choice to keep the cane original (not stain it) is to add years of service to the chair by allowing it to age naturally.

    This chair was “strand caned,” meaning the cane comes in 6’-8’ lengths, then carefully woven, one strand at a time through pre-drilled holes surrounding the chair’s seat. It’s a labor intensive process, both in removing the old cane as well as weaving the new cane. Cane comes in various widths from very fine 2mm to medium 3mm or larger sizes 4mm and up. It’s important to determine the size of the cane in relationship to the holes, or it becomes very difficult the further you get into the process if the cane is too large since you will be pulling many strands through the same holes over and over due to the nature of the weaving. While the caning process is repetitious, each chair is unique in the way it is woven to accommodate the shape of that particular chair. 

    This chair had a curved seat, wider in the front than in the back, therefore it was necessary to double up the strands in some holes and omit others for that direction. The most difficult part of the chair was near the arms, because the cane moves around them beneath the chair so getting the cane to slide through those holes was tricky. Having the right tools is essential as they make the difference between a mediocre job and an excellent one. Strand caning is done is six parts; front to back, left to right, front to back again, diagonal one direction then diagonal in the opposite direction and finally, binding. When you first begin weaving, you use caning pegs (see photo below) to keep the cane in place. Eventually the cane becomes tight so they are no longer needed. 

    The very last step is the tie off the cut cane beneath the chair by tucking it up under the loops created by the weave then tie them tightly prior to snipping off their ends. It was really a nice looking chair one the new cane was in place.

Caning pegs hold cane in place
during weaving process


Monday, August 31, 2020

Large Leather Trunk Coffee Table

Large Leather Trunk Coffee Table

Our customers can get very creative when they transform the use of an item of furniture into something else, i.e.: a large trunk to be used as a coffee table. This is one such example. This trunk was delivered to us from New York, where our customer had purchased it online. The trunk had a leather exterior over wood with leather corners, nails and two wood accent straps on the top. It also weighed about 200 lbs.! Wow!

The caveat was that he had wanted us to install legs to raise it up a bit. Great idea! Unfortunately, this trunk was super heavy and adding legs wouldn’t allow it to be moved without possibly damaging the legs, so I suggested instead of adding stubby legs, we install casters. This was a great alternative, because it made it much more mobile than any legs would have done. This trunk measured around 58” x 42”, a good size for any purpose. The first photo shows the back of the trunk prior to the casters and the second photo shows the front of the trunk with faux buckles and front latch, which was for cosmetic display only as the trunk didn’t open from the top as a traditional trunk would. Instead, it had two side drawers with two leather pulls on each side for handy storage. Ultimately, it was a nice looking trunk which required a set of wheels and a good leather balm to freshen it up.

Wednesday, June 3, 2020

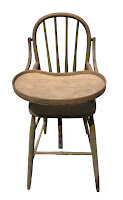
High Chair Before

High Chair After
This is our first high chair restoration. We estimate this height chair was at least 110 years old, based on the owner’s great-grandmother who had used it as a baby. It really look old (and rather creepy) with its dark greenish glaze that sort of, but not completely, covered up the wood. It was indeed a labor of love with all the spindles that neither Jim or I like working on as they are extremely difficult and time-consumimg.

The high chair had a center leather strap that acted as a safety measure to keep the baby from slipping out from under the chair. We were able to keep the original strap and incorporate it into the renovation of this oldie. Not 100% sure of the wood though. It didn’t have a lot of knots or movement so it may have been maple, but it was a hard wood to be sure.

The stripping process took an enormous amount of time to get between all those spindles! Jim took the tray off completely and had to replace a missing rung in the back of the chair. Luckily he could pull the back legs apart far enough to install the new rung into the hole and drill out the broken rung remains on the other side to make the new one fit properly. Once stripped and stained, he chose gunstock stain (our new favorite!) for the entire chair. The edging of the tray needed to be repaired since it had been broken right in the middle with a noticeable split. He added a piece and made it work. Once it was all put together with its new and repaired components, it looked beautiful. Who knew this old creepy chair would turn out so good?? (We did!) Lol.

Check out the oak high chair we also refinished by clicking on this link:

Friday, November 8, 2019

Old Pine Chest Makeover

Pine Chest

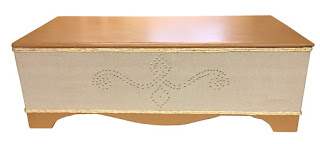
This old pine chest was once covered with a natural fibrous material, then after it was removed, someone had painted it with gloss black paint directly over the residue of glue and fibers left over from the previous surface. (Look below to see how the background looked as well as the fiber that had covered the chest).

The customer thought it was a cedar chest, but it turned out to be made from pine boards, not cedar, which has a distinct look and fragrance.
Top of Chest

Since the side surfaces were so rough, the only
way to make it look good again was to cover it with fabric. We were able to sand the top enough for it to accept paint and look pretty good, so we decided to paint the top and bottom with “gingerbread brick” paint and spray glue tan canvas duck fabric to the sides. It covered the rough exterior very well and gave it a fresh, new look and a chance at a new life.

With polished hardware, it turned out to be a nice piece of furniture. This was a decent sized storage chest, but light enough to be easily relocated if desired. I decided on adding two rows of rope to the top and bottom edges for more texture and to create a “pirate” chest look. For a final embellishment, I created a swash design, then transferred it to the front with a Frixion pen (which is easily removable once the project is complete) and then followed my hand drawn pattern with shiny brass tacks. These tacks not only created a lovely design, they help to keep the fabric in place, which I had adhered with Gorilla spray glue. All in all, a very fun fall project.

Sample of exterior

New Canvas on Background w/new handle

Tuesday, August 7, 2018

Tiny Rocking Chair

Rocking Chair Before

Chairs are the most commonly restored and refinished items that we receive. Chairs come in many styles, sizes, shapes and are made of too many types of wood to list, but they have one thing in common; they are not easy to refinish due to the many surfaces they tend to have. This tiny rocking chair once belonged to a little girl who has since grown up and wanted to preserve the many memories she likely had while enjoying the time she spent in this rocking chair.

Rocking Chair After
She may have sat by a window and enjoyed a Nancy Drew mystery novel as she rocked in time to the suspenseful mystery unfolding before her. Perhaps she stacked her stuffed animals on this chair to "keep it company" while she was at school. No matter how she used this little gem, likely she enjoyed it as a child and now as an adult, would like to see her own children make their own memories. This was a generational rocking chair meant to be passed down. As it where, the rocking chair had a couple of broken spindles in the center of the back. In fact, the entire chair came apart upon closer inspection, so repairing and gluing the broken spindles in place was the first thing that had to be done.

Tuesday, June 19, 2018

Antique Cedar Chest Revival

Cedar Chest After Refinishing

One of my favorite projects to refinish and restore is a beautiful cedar chest such as this lovely antique. The best part of this restoration was that it had retained all the original details such as the four vertical rows of rope braiding that embellished the front as well as the decorative trim surrounding the lid and another row of trim along the bottom. The chest was in pretty good shape overall, with surface scratches marring its top. Otherwise, it was in excellent condition.

Unlike other cedar chests I've done, this one had separate ball type feet which lifted it off the ground, allowing for easy relocating while working on it. Unfortunately, all that detail requires a great deal of time to remove the old finishes which requires a lot of time, patience and the right tools.
Cedar Chest Before Refinishing 

Never underestimate the power of an old toothbrush! Yes indeed a toothbrush is a key element to removing all that yucky, sticky residue that clings to the wood after you brush on the nasty stripper.

A good stripper will burn your skin on contact, so wearing gloves is essential while stripping. (I also keep a clean bucket of water on hand just in case I need to stick my hand into it. Ah, the burn!) A toothbrush, wood carving tools and a good brass brush are a great combination of tools to remove gooey varnish from all those nooks and crannies that would otherwise be impossible to reach. The ultimate goal is to reveal bare wood, that once sanded, is ready for staining. For this lovely cedar chest I used red mahogany stain and semi-gloss polyurethane, which brought out the natural beauty of the wood, showing its grain.
Cedar Chest After

Cedar Chest Before
It never ceases to amaze me just how awesome the wood looks once all the old finishes are removed and the lovely wood beneath is revealed. This was definitely one of my favorite cedar chests to work on because it had all those lovely details, which shows off its unique qualities and of course, the lovely craftsmanship that went into making it.

For other cedar chests I've refinished, you can click on these links:
http://finalefurniture.blogspot.com/2016/08/1948-lane-cedar-chest_22.html
http://finalefurniture.blogspot.com/2017/04/decorative-walnut-antique-cedar-chest.html
http://finalefurniture.blogspot.com/2017/05/solid-cedar-chest-with-copper-accents.html
http://finalefurniture.blogspot.com/2015/04/elegant-cedar-chest-revival.html
http://finalefurniture.blogspot.com/2013/12/1945-lane-waterfall-cedar-chest.html
http://finalefurniture.blogspot.com/2012/06/my-waterfall-cedar-chest.html
http://finalefurniture.blogspot.com/2014/10/solid-cedar-chest.html


Sunday, June 17, 2018

Bench Gets White Chalk Paint

Bench Before Paint
A bench such as this one provides a great place to sit practically anywhere in your  home. But like with many pieces of furniture, after a while you tend to overlook this well-loved item. You may feel a bit guilty because you still love it, but know it needs that special something. In this case, the bench was destined to be a brand new look, which was accomplished by applying Annie Sloan's "Old White" chalk paint and finished with Annie Sloan's clear wax to seal it.

Bench After Paint
By its nature, this bench was a very labor intensive item to work on because of the amount of surface area, and of course, the spindles, which are difficult to paint. Spindles are my least favorite aspect of any furniture painting, restoration or refinishing job because they are, well, spindles. (Don't get me started!)

Chalk paint doesn't require a great deal of sanding or other prep work commonly needed to guarantee a greatly finished painted product, but I chose to lightly sand the entire bench anyway because that's just how I roll. Call it a pet peeve, but I feel that a little bit of sanding is better than no sanding.

I chose to brush the paint instead of spraying because I feel that you still get better coverage and a thicker, richer end product with brushing and for this piece of furniture, it worked quite well. That's another benefit of chalk paint; you don't see the brush strokes as it dries very smooth. The Old White paint was a light and bright color which literally changed the personality of this bench from outdated to outstanding. I added the customized stencil flower for a little something extra and it looked great. This bench received clear wax only so it will be protected from scratches and will be easy to care for.

Wednesday, September 13, 2017

Art Deco Footboard and Headboard

Art Deco Footboard Before
Unfortunately I didn't get the opportunity to take a "before"photo of the headboard and footboard of the art deco bedroom set, so I used the original photo my customer had sent me (left).

The footboard and headboard had extensive veneer damage and required large sections of veneer to be replaced. This was accomplished by using a hot (no steam) iron and removing the old veneer, then sanding the surfaces so they were smooth enough to accept the adhesive prior to dry fitting the veneer in place.

For the headboard and footboard we used two different veneer styles; oak and mahogany, but stained them both with cherry. This gave the piece a beautiful look with contrasting finishes that completed one another, similar to the original style. I love the way the richness of the wood comes through with using these two excellent quality of veneer products!

Once the veneer was cut a bit larger than the surfaces that they would be adhered to, we carefully laid them in place. Then the stripping, sanding and refinishing could be done easily. After final sanding with fine grit sandpaper, we applied cherry stain and two coats of semi-gloss polyurethane. The headboard and footboard turned out great! Luckily I was able to get an "after" photo of the footboard, seen below.
Art Deco Footboard After Refinishing
Check out the other items of this bedroom set by clicking on the links below:
Art Deco Nightstand
Art Deco Vanity
Art Deco Dresser

Tuesday, April 4, 2017

Antique Writing Desk

Writing Desk Before
Writing Desk Before
Long before e-mails, texts, instagram, Facebook and Twitter, people spent a lot of time composing handwritten letters as a way of corresponding with friends and family. There was a sense of satisfaction in holding that special pen and putting it to paper, allowing your thoughts to flow through your hands in a script scral that reflected your unique personality and penmanship. With the electronic, fast paced world we live in, writing letters by hand has all but become a lost art. It's definitely faster to write using a keyboard, but there's something special and magical about writing "old school," using a pen and a piece of lined paper we used in school. While writing that way now gives me writer's cramp (as does long periods of working on my Macintosh), I still enjoy the art of letter writing using fancy stationery and my favorite ink pen. It's a timeless craft that never goes out of style.

Writing Desk After
This antique writing desk was likely used for composing letters by hand and keeping track of bills and correspondence with its five generously sized cubby slots to easily organize one's life. Made of solid walnut, this writing desk had great bones, with surface scratches on the split top and really rusty screws that held the original hinges in place. I knew this would be a very challenging piece to refinish because of the many components and my favorite pet peeve, spindles.

The drawer was removable, which was great because it's much
Writing Desk After
easier to strip and sand a section of an item if it can be removed. Upon further inspection, I discovered that the cubby insert section was also removable, held in place by side boards that slid out, allowing the entire cutty section to be removed. This was a great bonus since it was quite difficult to reach in there to strip the old stain, mostly because I couldn't really see what I was doing. By removing it, I was able to strip it and see all the way to the back so it was done right. Once the removable components were stripped, I began the long, tedious task of stripping the spindles. They are the most difficult and time consuming part of any stripping project because there is simply no fast way to do it.

Sunday, January 22, 2017

Family Heirloom Buffet Restoration

Buffet Before
Buffet After
This lovely old buffet was handed down to a man who wanted to preserve its history and keep its place in the family. It had been crying out to be refinished, as it had seen a lot of use over the years, showing wear. The top was splotchy, scratched and had remnants of water stains. The sides had water stains as well. The entire piece needed some major TLC and detailing, so we got straight to work.

Each restoration project has similarities but differences too. This one needed to be taken apart first; remove the cabinet doors, take off the hinges, remove the handles and sand all the pieces individually then tackle the body. The top back piece was not in place and had to be reconnected to the buffet. The sides were the only part of this piece that had veneer, which had split on the bottom. Once everything had been stripped and sanded, each piece got stained.

Thursday, May 14, 2015

Birch Wine Bar

Bar Before
Bar After
This simple bar was quite the challenge! Made of solid birch, this bar was in my customer's family since the mid-1960s. We received it in the condition it had been for over 50 years, painted white, with more than its share of scratches. Old hardware dated this piece, so we had our work cut out for us. 

You never truly know how much work a piece is going to be until you get into the "bones" of it. Stripping this small bar was deceptively difficult for a few reasons; there was a lot of surface area and the raised panel details as well as the legs and inside was an enormous task. The interior glass holders each took close to two hours to strip. When you strip painted surfaces and plan on staining them, it's necessary to remove every speck of paint. If you don't, the stain will not be able to soak into the wood as those tiny paint specks remain and stick out like the proverbial sore thumb. 

Monday, January 12, 2015

1906 Victrola Makeover

Victrola Cabinet Before
A customer had contacted me about refinishing an old Victrola Gramophone cabinet to be used as a bathroom vanity for her remodeled basement bathroom. The cabinet had the music apparatus removed, but still had the split top and a hole on the side where the crank had once been. The cherry was quite beautiful, but in its condition, it was difficult to envision just how nice it truly was.
Victrola Cabinet After

Stripping the cabinet was first on the list of things to do. After all the previous old stain had been painstakingly removed, it was then sanded and re-stained with cherry stain. In order to prepare the top for the bowl-style vessel sink, it was necessary to fill in the space between the two sides with wood filler then stain over it. Since the top had a left and a right side which the customer had wanted to keep, this was the most feasible solution and it looked pretty good.

My customer had discussed replacing the hardware, but I assured her she'd have plenty of time to choose that once the cabinet had been refinished. I'm sure she'll have fun searching for the perfect hardware because there's so much to choose from. This was definitely a unique refinishing item but as always, very rewarding because this old gem has many years of use left it in as it makes its debut as the most beautiful vanity. What a great way to use an old piece of furniture...
Old Victrola in Customer's Basement Complete

Saturday, December 20, 2014

Charlevoix Cherry Antique Dresser

Dresser Before
Dresser After
While on vacation, we came across this dresser at an estate sale at real date written somewhere on it that we could refer to! As with most antiques, it had great bones but needed some love. We found it at a beautiful house on Lake Michigan in Charlevoix.

There was an inscription written in the upper right corner of the