Showing posts with label chalk paint. Show all posts

Friday, July 19, 2024

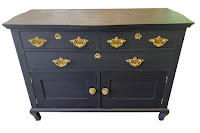
Antique Dresser Freshly Painted "In The Navy" Blue - for Sale!

Dresser After Painting
FOR SALE!
Dresser Before
What you see here is an original antique oak dresser that has been completely modernized with paint, but retaining its original look by reusing the hardware. The frills on the door fronts were removed for a streamlined, clean look. 

First it was stripped, sanded and then painted in a lovely dark shade called "In The Navy." Jim chose to paint this dresser with chalk paint, which requires a finishing treatment of waxing upon completion of painting. The was protects the paint and makes it strong and durable and easy to take care of as it provides a hard finish to the paint, protecting the wood. We've used wax paint on several projects and they always look terrific.

The original hardware was brass, so he cleaned and polished it, making it pop on the newly painted color. The interior drawers were stained and the bottom compartments behind the doors was painted in a light color. Although its primary function was a dresser, this lovely renovated piece of furniture can also be used as a buffet since it has plenty of storage for silverware and plates below and behind the doors. If you wanted a coffee bar, it could be used for that as well. And of course, its original use as a dresser will still suffice. 

This piece is currently for sale. Asking price is $425.00, so please get it touch with us if you are interested!

Sunday, June 17, 2018

Dresser Chalk Paint Makeover

Dresser Before Chalk Paint
Dresser After Chalk Paint

It's hard to believe that this lovely oak dresser was once used to store tools. It had been in a garage for many years being used as a tool bench and work surface so there was a bit of warping, but overall it was still in great shape. Although it had seen better times, the bones and structure were still good and we knew we could make it pretty again. We were both up for the challenge. (This was the last item in the "chalk paint makeover" using Annie Sloan's chalk paint.)

This dresser required some carpentry work before any painting could be done. The top had been split into two pieces, so Jim had to "biscuit" the two sections together and clamp them tight, then fill in the seams so that once painted, you would never know it had been broken. The left front leg had its back part broken off completely, so Jim re-engineered a new leg section, forming it perfect to match the right leg which was still in tact. Some of the drawers didn't open and close very well, so they required a bit of shaving on the table saw.

After he was done with his part of the job, I then sanded the sides and got busy painting. For this dresser, I mixed three parts graphite with one part French Linen which yielded a gorgeous color of a slate-ish gray, perfect for this particular piece of furniture. The thick, rich paint went on smoothly and looked terrific. I knew I would love this piece, since I just knew it would take on the largest transformation of the other pieces I had painted. Using clear wax on the entire dresser with black only on the bottom for accent was just enough to give it a sultry, rich look and a durable surface

The new brass drawer pulls provided the last touch of "bling," which was absolutely the crowning jewel for this amazing old girl. Wow!

Bench Gets White Chalk Paint

Bench Before Paint
A bench such as this one provides a great place to sit practically anywhere in your  home. But like with many pieces of furniture, after a while you tend to overlook this well-loved item. You may feel a bit guilty because you still love it, but know it needs that special something. In this case, the bench was destined to be a brand new look, which was accomplished by applying Annie Sloan's "Old White" chalk paint and finished with Annie Sloan's clear wax to seal it.

Bench After Paint
By its nature, this bench was a very labor intensive item to work on because of the amount of surface area, and of course, the spindles, which are difficult to paint. Spindles are my least favorite aspect of any furniture painting, restoration or refinishing job because they are, well, spindles. (Don't get me started!)

Chalk paint doesn't require a great deal of sanding or other prep work commonly needed to guarantee a greatly finished painted product, but I chose to lightly sand the entire bench anyway because that's just how I roll. Call it a pet peeve, but I feel that a little bit of sanding is better than no sanding.

I chose to brush the paint instead of spraying because I feel that you still get better coverage and a thicker, richer end product with brushing and for this piece of furniture, it worked quite well. That's another benefit of chalk paint; you don't see the brush strokes as it dries very smooth. The Old White paint was a light and bright color which literally changed the personality of this bench from outdated to outstanding. I added the customized stencil flower for a little something extra and it looked great. This bench received clear wax only so it will be protected from scratches and will be easy to care for.

Couch Table Chalk Painted

Couch Table Before Painting

This [behind the] couch table was the second project I painted using "Annie Sloan's" chalk paint and wax system. As in the Queen Anne Table in the blog post below, I used Annie Sloan's French Linen chalk paint.

I gave this table a shabby chic "distressing" by
Couch Table After Painting
scraping away the paint randomly with steel wool and a folded scrap of 100 grit sandpaper. After the paint had dried, I finished the table with generous coat of Annie Sloan's clear wax, then highlighted the border detail with Annie Sloan's black wax which brought out the border detail along the edge of the table top.

Once the wax had dried 24 hours later, I was able to lightly buff the table until it had a smooth finish which will be easy to maintain and provide a lovely, durable piece of furniture for many years.

Queen Anne Table Chalk Painted

Queen Anne Table Before
This was a lovely Queen Anne table in need of a new look and it was decided that paint would achieve this nicely.
Queen Anne Table After

Chalk paint is great to work with. The first coat shows the brush strokes, but this goes away after you paint the second coat giving you great coverage. It also dries very quickly, in 20 minutes so you can easily finish a project from start to finish the same day. Chalk paint has unique qualities and those qualities allow you to experiment with finishes, such as waxing. Prior to this project I had not heard of chalk paint waxing, but I was willing to give it a try.

Thursday, August 18, 2016

1940's Hutch Makeover

Hutch Before
Hutch After
This 1940's hutch caught by eye at a local antique shop here in Marine City. I fell in love with the great lines and gentle curves of this unique piece of furniture. A plain glass door was functional enough, but I could envision something much more suited to this beauty, so I added a leaded glass panel with bevels and glue chip glass to enhance the hutch adding classic, timeless styling.

With relish, I peeled off hideously sticky contact paper circa 1965 from the interior and painted the shelves with serenity blue chalk paint to give it a modern flair and fresh appeal to today's contemporary styles. I replaced the broken back with a section of bead board, which added vertical lines and created additional texture. It looked great! The exterior was in overall terrific shape, but needed refinishing, no easy task. Section by section, I carefully detailed
and stripped, using my special set of tools to remove many years of old finish which hid the beautiful cherry beneath.