Showing posts with label restoration. Show all posts

Sunday, November 6, 2022

A Very Old Rocking Chair Revival

Rocking Chair After
Refinishing w New Leather
Old Broken Chair
Before Refinishing
When we get an item of furniture, it varies in degrees of just
how bad it is and how much work it requires to get it looking good again. Jim and I love a challenge. The uglier it is, the more we love restoring it, because it provides us an opportunity to make it beautiful once again, in most cases, better than new. 

This old rocking chair was exactly the type of piece that gets us both excited in anticipation of what’s inside, what we’ll find and how to best treat the piece with the care it needs. And this one needed a lot of love. The springs were literally popping through the deteriorated fabric (see photo below). The stuffing was long gone and the webbing was hanging from the underside of the seat.

The first step in this type of restoration is removing all the old materials. And this chair had a LOT of decorative (at one time) nail heads that needed to be removed. Nail heads usually get bent when they are installed because the wood is so hard, it bends the nails, so they can seldom be reused. I recommended instead of using nail heads, I’d replace them with new welting, which is also known as cording or piping. This is a cleaner, more updated look and still appropriate for this type of chair.

Wednesday, March 16, 2022

Mid-Century Chair Stripped / New Needlepoint Seat

Mid-Century Chair
w/Needlepoint After
 
Mid-century chair
before refinishing

It’s amazing how styles from the past tend to pop up fifty or sixty years later, as if the idea is brand new. This mid-century modern chair is classical 1960’s style, wide, low back and clean lines which were commonly seen in living rooms across America which mimicked the Scandinavian style. I loved the lines of this chair. 

This chair was extremely well made, quite strong and needed no tightening or repairs. The back had a few missing veneer pieces, which were easily filled in and stained so that it was hardly visible. 

I made the choice to completely strip this chair instead of touch-up because I felt that this is what it needed. In order to be true to the piece, you must determine what’s the best course of action to make it look the best it can. In this case, I stripped off the old finish, luckily wasn’t too difficult to remove as old stain mostly is. It came off easily and once that was done, I thoroughly sanded it, removing the excess stain and stripped. I cleaned it with lacquer thinner and sanded it smooth. 

I was very happy with the way the chair turned out. The light cherry stain was definitely the perfect color to offset the dark color of the needlepoint. A nice foam padding finished off the seat so that the chair is as comfortable as it is pretty.

I chose cherry stain to keep the color light which I felt complimented the lovely needlepoint seat that my customer made just for this seat. This was the third seat such as this that I had made for this same customer. The other two were benches. She is making a needlepoint seat for each of her grandchildren. She makes the needlepoint then finds the chair or bench which is the right size for the needlepoint. So far she’s been pretty lucky! 

To see one the previous needlepoint benches I made for this customer, check out the link below. Unfortunately, I don’t have a photo of the other one, but it had a blue background with a black bench.

https://www.blogger.com/blog/post/edit/5936537173467203420/24816612440806533 


Tuesday, December 14, 2021

Antique Caned Chair Replaced Seat


Caned Chair Before

Caned Chair After
This is an antique parlor chair which had a broken caned seat. It’s not uncommon for this to happen with old caned chairs. They don’t hold up well to a knee or an active child who decides to jump on the chair as if it were upholstered. Caning is pretty durable but does have its limits.

Caning comes in many sizes, so it’s important to measure the holes in the diameter of the chair’s seat and get the caning that fits those holes. This chair had 1/4” holes, so it used 1/8” caning, which is considered medium. Caning also comes in super fine, medium and larger sizes. The procedure is the same, but I prefer working with the medium size cane since it is stronger than the finer sizes and holds up to the pulling and tugging that comes along with installation. 

Chairs get a lot of use, so the upper portion tends to get dirty from the oils from our hands, so they require cleaning and polishing for them to look fresh again. This one needed a good cleaning and a touch up of polyurethane instead of a complete strip. If a full strip isn’t in the budget, a partial strip usually works well. Either way, the chair is always better than it was prior to the restoration. This chair was made of maple, a hardwood, so it will hold up for many more years to come. If you have a caned chair that is a big saggy, simply lay a damp towel on it overnight and it will tighten the caning again to its original tautness. Just a little tip that allows you to get more use out of the chair before investing in a complete cane renovation. 

Wednesday, April 14, 2021

Antique Eastlake Cabinet Upgrade

Cabinet Before

Cabinet After
Once used as a tall dresser, this antique cabinet was in pretty rough condition prior to restoration. Actually, upon receiving it and getting started on the refinishing process, it sort of, well, fell apart. The piece had seen plenty of use over its sixty-plus years and many of the joints had come unglued, so it made sense to simple separate those loose joints and disassemble it to properly strip, sand and stain it the right way. 

The interior of this cabinet had three adjustable shelves, which had a unique adjustability system. The wood in the rear and front of the cabinet had slots which held small sections of wood that each shelf rested on and were easily removed so that they were easily adjustable to whatever height you needed. 

The bottom drawer was an unremarkable feature of the cabinet, the lovely brass drawer pulls blended into the background. It was also in need of a new bottom since the original one had been damaged and was no longer usable. Once the new bottom was built and installed, it was once again strong and usable. 

The hardware was polished, which included the drawer pulls and hinges. The bottom drawer, once almost invisible, was a focal point, the brass pulls looked like new. The keyhole slots were original, but two out the three were broken and had to be replaced with newly constructed, custom made key slots which looked almost identical to the original. When a piece of an old item of furniture is missing, it’s almost impossible to find that exact piece so a bit of ingenuity and design comes in handy to create a replica. 

The right side of the cabinet did not have glass, but plexiglass that was held closed with a piece of cardboard. Of course this wouldn’t do, so we replaced the plexiglass with glass and added a magnet at the top of the right (opening) door so that it would stay closed. A new stain and three coats of polyurethane to protect the surfaces and this old beauty got a major upgrade. Amazing how beautiful wood that hides beneath years of usage becomes when it is revealed with refinishing. This was indeed a lovely piece of furniture that we enjoyed working on.


Thursday, March 11, 2021

Caning an antique rocker video

Caning a chair, final step

Video for caning a chair, final step - click here to view!

This is just a quick video that I wanted to share with my blog followers or anyone who wants an idea on how the process of caning is done without getting into the nitty-gritty. There are plenty of videos on all the steps, but I just wanted to highlight my favorite part of the process and what I’ve learned along the way. I have linked a few other videos on caning on my Youtube channel if you’re interested.

Enjoy!

Rene

😀

To view the entire seven-step process, click on the Peerless Rattan instruction video on the link below: 


Note: The Hammond video shows a pretty straightforward caning method, which uses a rectangular chair. You have to learn the differences in how to cane when you have a rounded back chair or a completely round chair. The part that varies at this step is that you must use the same holes several times to even out the front and rear caning. If you have more holes in the front than you have in the back of a chair, you’ll have to double up the amount of holes in the back to accommodate those extras in the front.

Monday, March 1, 2021

Antique Dresser with Mirror


Dresser Before
Dressers are important pieces of furniture with the important purpose of keeping your sweaters and other items handy and at your fingertips. Nobody said a dresser needs to be boring, so why not take a look at that old dresser in your grandmother’s attic and examined it with a critical eye and imagine it refinished. 
Dresser After

This dresser had been a family heirloom that had seen some wear. The mirror was original and had some marking on the back side, but was still serviceable. A fun aspect of obtaining and refinishing antiques is finding something that dates an item. This dresser had old newspapers on the back that dated back to November of 1913. Made of solid oak, this dresser was a lovely piece of furniture worthy of restoration.

As with most mirrored pieces, they are refinished separately, which requires a great deal of care. Especially with a mirror (because who wants seven years of bad luck?) The lovely curves of the side bars of the mirror really added character to the overall look of the dresser. It was indeed a special element that makes these antiques so special and individually unique. Two top drawers with a single larger drawer and a front curve mimics the curve of the mirror frame as well as the top, which had the most damage. After stripping, sanding and staining, we protected this dresser with two coats of polyurethane. 

Luckily, we are usually able to remove most surface scratches on furniture, so this piece had a great finish. The exception to that rule is when an item has veneer with deep scratches. You can only sand veneer so far before you remove it completely and end up with what appears to be a large patch where the plywood shows through. That’s why we love working with solid wood. It’s much more durable and sturdy and refinishes well, with a better final result. Anything made of particle board isn’t even worth refinishing because it’s not “real” wood. You can’t beat solid wood for furniture, that’s why antiques are always worth refinishing so they can be kept for another few centuries. 

Wednesday, June 3, 2020

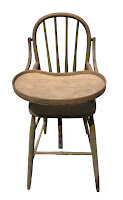
High Chair Before

High Chair After
This is our first high chair restoration. We estimate this height chair was at least 110 years old, based on the owner’s great-grandmother who had used it as a baby. It really look old (and rather creepy) with its dark greenish glaze that sort of, but not completely, covered up the wood. It was indeed a labor of love with all the spindles that neither Jim or I like working on as they are extremely difficult and time-consumimg.

The high chair had a center leather strap that acted as a safety measure to keep the baby from slipping out from under the chair. We were able to keep the original strap and incorporate it into the renovation of this oldie. Not 100% sure of the wood though. It didn’t have a lot of knots or movement so it may have been maple, but it was a hard wood to be sure.

The stripping process took an enormous amount of time to get between all those spindles! Jim took the tray off completely and had to replace a missing rung in the back of the chair. Luckily he could pull the back legs apart far enough to install the new rung into the hole and drill out the broken rung remains on the other side to make the new one fit properly. Once stripped and stained, he chose gunstock stain (our new favorite!) for the entire chair. The edging of the tray needed to be repaired since it had been broken right in the middle with a noticeable split. He added a piece and made it work. Once it was all put together with its new and repaired components, it looked beautiful. Who knew this old creepy chair would turn out so good?? (We did!) Lol.

Check out the oak high chair we also refinished by clicking on this link:

Thursday, September 26, 2019

Maple Rocking Chair Refinished With New Caning

Rocking Chair Before

This antique rocking chair had seen many years of use, unfortunately had gotten a knee through the seat and broke the original caning. The chair is well over 100 years old and likely a host to many relaxing moments, conversations and stories while gently rocking and listening to the many tales told.

Caning Process With Pegs
The chair had aged, the wood darkened, hiding the beautiful wood grain beneath. Since my customer had wanted the chair refinished as well as replace all the caning.

If you are unfamiliar with the chair caning process, there are two types of cane; "strand" cane and "pressed" cane. This chair had “strand” caning, which means you create the weave by measuring the holes and finding center, then string very long strands of cane back and forth through the holes, first vertically, then horizontally and both ways diagonally. While you are weaving, you keep the cane in place by using “caning pegs,” which fit into the holes, keeping the cane tight as you carefully move across and down the chair. If you’ve done all the steps right, you will have the “holes” as a result of the weave.
Rocking Chair After

Because this chair needed refinishing as well as new cane, it was necessary to snip away all the old caning first. This in itself was a time-consuming process because the original cane had been lacquered over so it was stiff and difficult to snip and remove. Once that was complete, the old cane comes easily through the holes, which vary in size. This chair had 1/4” holes and required size 3 medium cane.

After all caning was removed, I began the tedious process of stripping the old finish and revealing the true beauty of the wood, which was maple. Considering the age of this chair, it was in remarkably beautiful condition with no breaks in the structure. Indeed, it was as sturdy as it was the day it was made.

Once I had removed all the old stain using a variety of tools, including a toothbrush, brass brush and lots of in between sanding, I chose chestnut gel stain and finished it with semi-gloss polyurethane. I allowed the chair to dry for two days prior to caning it. It was a fairly large chair and had ultimately required three bundles (called hanks) of caning. I had originally ordered only two hanks, so I had to wait a few days while the third hank was on its way, catching up on other projects in the meantime.

The caning process for this chair took ten days, five days for the bottom and five days for the upper portion of the chair. I spent an average of four hours per day on caning this chair. It can be a strenuous activity, so taking frequent breaks is essential to avoid lower back pain. While caning isn’t super difficult, it does require patience, time and a skill set similar to weaving a basket. It is intensly  gratifying to see the final product after a few hundred feet of caning has been woven through it. Here’s to another one-hundred years and many more stories to share...

Monday, November 19, 2018

Antique Dresser with Mirror

Antique Dresser Before
Antique Dresser After New Stain
Throughout the years we have done a good variety of dressers, each one different, with its own personality. Some of the dressers were tall, others were long and low with plenty of drawers. 

This antique dresser had three spacious drawers and a great looking mirror, with wood that was in excellent condition featuring a unique scroll design. The mirror itself had some age marks, but I always feel that this element adds to the character of the piece. 

The top of the dresser had

Friday, August 10, 2018

Two-Tier Antique Mahogany Table


Table Before Repair
Table After Repair & Refinishing
This table came to me as you see in the photo on the right, with three legs that were broken, the center piece which held them together was missing on two out of the three legs.

These missing sections had to be reconstructed using a template, traced from the legs themselves. This was an lovely antique two-tier table commonly seen during the 1920's and 1930s. Many people remember these tables in their grandparents homes, so they now hold a special place in our hearts along with all those memories. Commonly used for knick-knacks, plants, collectibles and many other

Monday, March 26, 2018

Antique Oak Folding Table

Folding Table Top Before
Table After
Every so often we will get an absolutely divine piece of furniture such as this antique folding table made of solid oak. As a furniture refinisher, I prefer working with solid wood over veneer because you can't beat the outcome of a great piece of wood that most antique furniture is made from. To be a true antique, an item of furniture should be at least 100 years old, otherwise they are considered vintage.

Saturday, March 24, 2018

Hand Carved Glass Top Table

Table Before

Table After
I'm always impressed with hand carved wood such as this gorgeous Bavarian style table, a unique piece with lots of charm.

The table had a removal glass top which was also encased in matching wood with a lovely curved edge. The glass was quite scratched, a clear sign that whoever had owned this table had put it to use, which is wonderful because furniture is meant to be used and shown off.

Wednesday, September 13, 2017

Art Deco Nightstand

Art Deco Nightstand Before

This art deco nightstand matches the dresser and vanity as part of an
Art Deco Nightstand After
art deco bedroom set restoration. This vanity had broken veneer on the top left and bottom left panels as well as noticeable amount of water damage.

To do this right, we removed the handles, drawer and door (as in the dresser) and replaced the broken veneer sections with new matching veneer, then continued the process of stripping, sanding and staining, using cherry stain and three coats of semi-gloss polyurethane to match the other two pieces in the set.

The lower portion of this nightstand opened like a door and had a single shelf on the inside which was just a piece of cardboard laid on top of two flimsy strips of wood that weren't original to the cabinet. We made a new shelf stained it to match and nailed it to the wood strips; much stronger than cardboard and allowing more options for storage on the bottom of this nightstand.

Monday, May 22, 2017

Caned Parlor Chair

Caned Chair Before
Caned Chair After
This little parlor chair had broken cane on the seat, but was otherwise in good condition, albeit a bit scratched up. I had never done caning, but I knew that with a little research, the right tools and a bit of determination I could figure it out, so I began reading about caning and found plenty of videos on YouTube and other "how tos" in various sites on the world wide web.

The concept was simple enough. First step is to remove the spline, then pull out the damaged caning. Once that is removed, you chisel away any remaining glue and debris and clean out the spine groove so that the new spline can be installed. Since the spline comes in various sizes, you need to know what size it is before you purchase new spline, otherwise it may not fit. I didn't realize there were so many sizes!

Monday, April 3, 2017

Antique Piano Bench

Bench Before
Made of gorgeous walnut, this antique piano bench had seen many years of use and had the scratches to show for it. The wood was in pretty good shape, considering how old this bench was. The seat itself had been covered with fabric at least 2 times, each time adding a layer to the old instead of tearing off the fabric beneath.

The top fabric layer had a 1980's look, when mauves and pale
Bench After
blue and peach were frequently used together. The fabric beneath that had been a stained off white with bluish flowers, probably dating back to 1966. Yet beneath that layer of fabric was the "original," yellow, which was so deteriorated it crumbled as it was stuck to the rotted foam cushion it was stuck to.

Once I had removed the fabric, I realized that even though this bench seat cushion had been recovered three times, the very original seat had actually been caning, the splines still in place but the caning completely removed. The tell tale signs of caning were the holes that permanently left shadows on top of the wood. This was exciting because I instantly knew how I wanted this bench to look...back to the original caning, but first I had to tedious task of stripping the old finish from this lovely old piece to bring back the glorious wood hidden beneath a century of old stain, scratches and grime.

Sunday, January 22, 2017

Family Heirloom Buffet Restoration

Buffet Before
Buffet After
This lovely old buffet was handed down to a man who wanted to preserve its history and keep its place in the family. It had been crying out to be refinished, as it had seen a lot of use over the years, showing wear. The top was splotchy, scratched and had remnants of water stains. The sides had water stains as well. The entire piece needed some major TLC and detailing, so we got straight to work.

Each restoration project has similarities but differences too. This one needed to be taken apart first; remove the cabinet doors, take off the hinges, remove the handles and sand all the pieces individually then tackle the body. The top back piece was not in place and had to be reconnected to the buffet. The sides were the only part of this piece that had veneer, which had split on the bottom. Once everything had been stripped and sanded, each piece got stained.

Wednesday, February 24, 2016

Dining Room Table

Duncan Phyfe Dining Table
A large dining room table is one of the most challenging of all furniture restoration jobs, due to the sheer size of the project. Tables are large, heavy and difficult to transport, not to mention all that surface takes a while to strip, sand and refinish. That's why tables are amongst the highest price items when it comes to refinishing cost, but personally, I still prefer a large table to a set of chairs with spindles! Don't get me started on spindles. They're lovely, indeed, but they require a LOT of patience and time.

This lovely mahogany dining room table was quite large to begin with, plus it had two 12" leaves that also needed refinishing. This table had a few surface scratches, luckily they weren't too deep so I was able to sand them away, leaving the table's surface as good as new and ready to accept the stain, for which I chose mahogany, to match the wood. Once restored to its former beauty, this table took its place in the dining room, ready to serve up many family meals for years to come.

Tea Cart Repair

Tea Cart Before
Tea Cart After
This lovely antique tea cart was in need of a broken wheel repair along with refinishing the lower shelf which had seen its share of scratches and wear. Evidently a caretaker who takes care of the owner's ninety-one year old mother had somehow tipped over the cart, breaking the wheel into several pieces.

Made of maple, this tea cart had a gorgeous finish, which I strived hard to maintain while refinishing it. The wheel, however, was a bit of a challenge as it needed to be completely rebuilt.

Using a section of wood that looked close to the original wheel, we were able to make a template of the unbroken wheel, then cut out a brand new one with a scroll saw. The outside of the wheel had to be carved out with a lathe, so that the rubber gasket could be wrapped around it as it had been originally. The finished, repaired tea cart was as good as new and ready to be used for another one hundred plus years.

Monday, September 29, 2014

Charming Antique Desk

Desk Before
Desk After
This antique mahogany desk was an amazing yard sale find. Although the top left edge molding was broken, the bones were good, more importantly, the handles were all intact, a huge plus! I also knew it was a big refinishing job since I wasn't sure how to replace that top rail.

My first goal was to remove all the hardware before stripping the entire desk. I put all the pieces in a closed container so I don't misplace them. (This is the preferred method to which I keep track of small items.) This desk was unique, since all four sides needed stripping, as the backside can face the room if chosen. Normally the back of furniture remains unfinished, since most are placed against a wall. Because the back had been allowed to be seen required additional stripping and sanding.

The edge molding needed a great deal of detail sanding with an orange stick, all done by hand. The lower left edge molding was missing, so that too would need to be addressed. I ended up scrapping the top molding because it would be impossible to replace it and have it look the same, but not all was lost as I was able to salvage it and create the missing molding on the center drawer edge as well as the missing molding on the lower left inside of the desk. That was I was guaranteed to match the red mahogany stain, while maintaining the integrity of the piece.

After I removed all the brass hardware, I started the intense stripping process. It was quite time-consuming, between camping trips and other projects. I would spend evenings sitting on my desk polishing the various components of the hardware. Each drawer had seven (7) individual pieces; the handle, two coin-shaped brass rings, two screws and two nuts, which were round, making them a bit challenging to remove. This is one of the features of a very old piece of furniture; the hardware is usually not exact and quite different from modern hardware, down the the nuts (no pun intended.) I used copper cream, which works beautifully to remove tarnish from brass, then an actual brass polish to really give it a shine.

Taking the extra time to clean the hardware to its original condition makes any furniture piece look 100% better! The clean hardware is the "bling" to the furniture's new finish and well worth it.

Friday, September 5, 2014

Queen Anne Table

Queen Anne Table Before
Queen Anne Table After
I came across this scratched Queen Anne style coffee table and knew it would be a great table once I refinished it. The original finished was a sandy, lighter stain, so I decided to go much darker, giving it a richer appearance. This table was made of pine and wasn't an antique, but it had good bones and needed some TLC and time. After I completed removed the old finish, I gave it a good sanding with a 220 grit before applying red mahogany stain. I was correct in choose the darker stain. The table took on a whole new personality, as the photos speak for themselves.