Showing posts with label walnut stain. Show all posts

Monday, March 22, 2021

Antique Windsor Chair Refinished


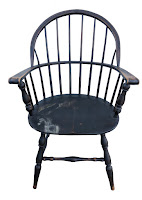
Windsor Chair
Before
This is what is called the “Windsor” Chair. It has the classical round form with spindles on the top and bottom of the chair, with the center split and mounted on a curved flat platform that turns into the top of the armrest. These chairs come in plain or rocking chair styles. 

This chair was over 100 years old and original in its antique styling and manufacturing. It had a center split that had been repaired before we got it, however, the stripping on this type of chair is very intense and takes a long time. (We hate spindles!) Not only did it have spindles, it had two spindle bases, one in the center and one on the bottom seat, therefore making the stripping much more time-consuming. 

Windsor Chair After

One of the most difficult part of refinishing this type of chair is that no power tools can be using when sanding, therefore, everything is hand sanded which adds to the time spent removing the entire old finishing. Some chairs are easier to work on than others. This one was not an easy redo because of the spindles, upper and lower. The chair was made of sturdy walnut, so that’s the end choice color we used to stain it. 

Finished and protected with satin polyurethane, it actually turned out beautiful, despite the splotchy look on the bare wood, which is characteristic of old furniture once stripped. If you ever wondered why chairs cost so much to strip, try your hand at one of these and you’ll understand. It’s a very tedious process and takes many, many hours and lots of patience and of course, the right tools to do the job. The most important tool is patience and tenacity. 

Monday, November 26, 2018

Antique Parlor Chair

Parlor Chair Before
Parlor Chair After
This little antique parlor chair was in excellent condition except for the seat, which was dented inward from being used. The stripping process took a great deal of time because the chairs by their nature have a lot of surface area that requires a lot of hard work to strip. When spindles are involved, it takes even longer.

Spindles are done by using a toothbrush dipped in stripper and then dipped in lacquer thinner and lots of brushing over and over to remove both stripper and lacquer thinner, which melts the stripper. This is quite a messy process that is time consuming as well as tedious.

Once all the goop was removed, I used steel wool dipped

Thursday, September 20, 2018

Spindle Chairs, Oh My!

Spindle Captain Chair
Before Refinishing
Spindle Captain Chair
After Refinishing
I'll be brutally honest. I absolutely do not like to refinish anything with spindles. Simply because spindles require a great deal of time due to their shape and amount of detail. When it comes to chairs, that translates into many, many hours of tediously time-consuming work. There is just no way to do it quickly. Stripping just one chair can take up to a week and that's if if you work on it daily.

For this set of chairs (two captain, two regular), the entire refinishing process took several weeks, because there were so many spindles on the top and bottom of each chair.