 |
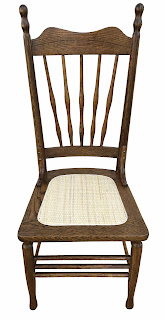
Antique Chair After
|
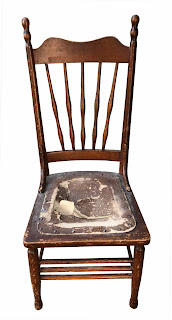 |
| Antique Chair Before |
Here we go with more chairs! This time it was a set of four (4) chairs, all in need of TLC. These chairs dated back to the late 1800’s, so they were 19th century chairs that had seen a lot of use, therefore a lot of wear and tear, literally.
Originally the chairs had caned seats, but over time they likely broke and someone decided to cover the seat with stamped leather, or rather, a leather-look-alike that seemed more like a heavy paper between layers of very thin leather. Broken and no longer able to seat a person, it was high time to remove the leather “fix” and replace it with the original woven caning. But first, the chairs all needed to be stripped, which for this type of chair is very time-consuming because (you guessed it), spindles. Yup, spindles are what takes a long time to strip because there are many of them and they are rounded, making them inaccessible from one angle, therefore it’s necessary to rotate the chair continuously while stripping.
A chemical stripper was the best option for these (compared to a heat gun), because it melts away the old, worn finish and reveals the wood beneath. Once all the old finish is removed, the chairs are then cleaned up by using soft rags (usually old t-shirts, which are excellent for this) and wiping away the residue left by the stripper with lacquer thinner or acetone. This is a necessary step prior to sanding or your sandpaper will clog up with the residue, making it difficult to remove.
Starting with 100 grit sandpaper, the chair is prepared to accept the next grit, 150, until the final sanding, which is done with 220 grit. Once all surfaces are sanded, the chair is wiped with lacquer thinner on a clean cloth, allowed to dry, then it is ready for stain. This entire process (for this type of chair) can take from several hours to a few days. Again, spindles are a lot of work, therefore more tedious and time-consuming than flat surface chairs. Once the stain is applied with either a soft cloth or a brush, or both, you wipe away the excess stain, then enjoy the amazing transformation from raw wood to beautifully restored, refinished wood.
We used "special walnut" on these chairs. The new stain brought out all that gorgeous woodgrain, which had been hidden by years of oxidation that happens over time. Once the chairs had dried from staining (we allow 24-48 hours), the first coat of polyurethane was applied. For these chairs we used a water-based semi-gloss, durable and easy to clean up after. That first coat protects the stain and prepares the wood for the remaining two coats that finish the chair. It is necessary to lightly sand between each coat of poly with a high grit sandpaper to give it “tooth,” which makes just rough enough to accept the next layer of polyurethane. Once the third coat was applied, the chairs were done and ready for the last and final step, install the new caning.
These chairs had “press-in” caning, cane that comes in pre-woven sheets and cut to size, then installed and kept in place with spline. It’s necessary to soak the cane and spline for at least an hour (or longer) so that it is pliable enough to work with, otherwise it cracks and breaks. Caning “wedges" are used to “press” the edge of the cane into the pre-cut 1/4” groove in the chair. The chairs had a closely woven cane originally, so we chose the same style to keep it original.
It’s necessary to choose the right size of spline, which is based on the width of the opening, so that it keeps the cane in place while completely filling the groove. If the cane is too loose, it will not keep the cane taut. It’s a tricky process because once you have pressed all the cane into the groove, you glue it slowly, allowing the glue to run into the groove, starting in the back of the chair. Once it is glued, you push the spline into place, tapping it with a hammer as you go. If the spline has been adequately soaked, it will bend easily around curves. If not, it can break, especially if those curves are tight.
Luckily these chairs’ curves were fairly wide, so it wasn’t too difficult to bend them around the edge. Once you reach the back where you started, make a small pencil mark and cut the spline to match the starting point at an angle and tap it with a hammer in place. After all the spline is installed around the entire seat, hammer the spline so that it is level with the top of the chair. There will be caning strands popping out that were left over from the placement after the spline is installed, so they must be trimmed off. I use a sharp chisel and snap them away by tapping on a hammer close to the spline, which removes the excess. You can also use snippers. This completes the caning process. Allow the cane to dry at least 24-48 hours before you sit on the chair.


