Thursday, August 11, 2022

Antique Buffet Rescued and Refinished


Buffet Before Refinishing

This antique buffet had been stored in someone’s garage for many years before we got it. My customer had gotten it from one of her students (she’s a music teacher) in exchange for music lessons. Who knows how long it had been stored in a garage, but it was evident it had taken on some deterioration as a result  of being stored outdoors. 

Buffet After Refinishing

The top veneer was in bad shape, some of it peeling up. We were unable to remove it, so we stripped and sanded it prior to adding stain and polyurethane (3 layers) to protect it from further deterioration.

Portions of the decorative wood pieces had broken off such as the second drawer front center which is a continuation of the design on the top drawer. The far left spindle was also broken off. Luckily they had the piece and Jim was able to reattach it, but there was still another section of this piece missing completely which he had to create and make it fit in the open space. It’s difficult to create a piece that is missing entirely because you can’t measure it against anything.

The first step in the restoration process requires removing all the hardware, drawers, doors and pieces that are easily taken off the piece, such as the top. By removing these sections, it’s easier to work on them as you can reach more areas to strip, sand and stain before re-assembling it. Jim removed the decorative center on the back top as well as the top which he sanded separately, then reattached when completed. He had to create the missing spindle and glue those pieces back into place. The broken drawer sections were re-glued back on. 

This buffet had a “hidden” secret drawer which was the third and bottom drawer that forms the bottom decorative edge. Jim replaced the bottom portion of that drawer because it had a felt lined bottom that was difficult to open and close so he removed and replace it. It was common to store silverware in these drawers and they were frequently lined with felt which is a deterrent for discoloration of silver. The last step for any project such as this one is cleaning and polishing the hardware. This adds that special final touch that really completes the restoration process.

Monday, August 1, 2022

Woven Chair Replacement

Weave Chair After
Weave Chair Before
Caning and weaving are similar, using the natural fibers of cane or rush, but this application has a different technique, using a herringbone weave instead of spline or woven cane. It’s actually quite fun to do, but takes a lot of time and steps that must be followed, or you end up having to remove a lot of rows. This type of weave can be done in many different styles. 

Herringbone is just one of many. Basketweave is also popular. There is a “radio” weave which looks like the weaves are laid on top of one another. This particular one is my favorite because it is relatively quick and fun to do.

The art and technique of chair caning seems to be a dying, lost art, but with patience and trial and error, you can learn it. I didn’t have this skill until someone had asked me if I knew how to cane a chair. That was about five years ago. I told them that I didn’t know how to cane a chair but would be able to figure it out. The first one I did was frustrating and I swore I would never do it again! Then after the second and third one, I knew the system, became more familiar with the steps involved in doing it right and by the tenth one I was a pro. I’m still learning because each chair has its unique qualities and challenges, but the simplest ones are still my favorite. It’s relaxing and fun to “bond” with an old chair, imagining the stories it could tell me if it could speak. 

Straightback Chair Gets New Cane Seat

Caned Seat After

Caned Seat Broken
This was a relatively simple caning job because it was the seat only, always preferable to the seat and back, which tends to be harder to reach. This is a circa 1930’s chair which had the original caning. One of the disadvantages of caning is that after time, it gets brittle and tends to break or bend. 

This one needed replacement. A trick that you can do if you have a caned chair with a slightly bended seat is to put a damp towel on the seat overnight. The damp towel will soften the caning and once removed, it should tighten up again once dry and the sagging seat problem should be solved. If it’s severely sagging or broken, there’s no fix for it other than a total replacement. 

Caning does come in different thicknesses. You can usually tell what size you require by the size of the holes. The larger the holes, the thicker the caning needed,  however, you can use smaller caning with larger holes but not vice-versa. But either way, a newly caned chair seat is nice and fresh and lends many more years to the life and use of the chair.

Podiatrist Office Chair Seat Fix

Whole Chair Before
New Vinyl

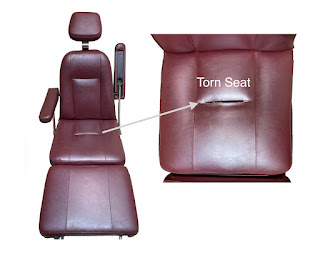
This was a first for me! Last month I received a call from a receptionist at a podiatrist’s office. She inquired if I can reupholster a torn patient chair. Since I had never done this type of upholstery, I told her the truth that “No, I haven’t done this but I’m willing to try.” I asked her a few questions and for her to send me photos. 

Back and Seat After
New Vinyl
Once I saw that it was only the seat that was torn and
the only part of the chair that needed replacing, I realized that it was indeed something I felt that I could tackle and told her so. She asked me to quote two prices; one for just the seat and one for the entire chair. I sent her both quotes and the next day I received a response that the doctor wanted just the seat replaced. I explained to her that although I would likely be unable to match the vinyl exactly, I could come close. Since I had no idea how old the original vinyl was or where it was purchased, I could only go by the photos and order something similar.

Once she brought the torn seat to me, I got to work. The seat, it turned out, was actually connected to the back at the bottom edge with a wide piece of vinyl that was stitched and stapled in place. Replacing the torn vinyl required removing all the attaching pieces of vinyl on the upper and lower portions, as well as peeling up the lower portion of the chair’s back to reveal the sides and access the seat itself. I had to see how it was put together before I could completely take it apart. 

Removing all the components of this chair proved to be quite the challenge, but once I did that, I could clearly see how it was constructed. From experience, I’ve learned to never assume I will remember how something was put together after it’s been taken apart, so I took photos of each removal step which would be repeated in reverse to re-assemble the seat sections. Once I was satisfied with my photos, I carefully marked each piece of vinyl so I would have accurate templates for the new seat. With a lot of notations and marks, the cutting process was a breeze. I kept referring to my original vinyl for accuracy (and those photos which came in handy) until all the sections were cut. I actually re-stitched the old material back together to insure everything would fit with the new vinyl since it was a finite space to attach it to and had to fit precisely. Though an extra step, this made the final new vinyl installation accurate. 

The seat had badly damaged foam, which was breaking up and out of shape, so it needed to be replaced. The foam construction consisted of one larger piece of 2” foam which covered the entire chair, and a 10 x 10 cut-out section of foam that fit into the center and ended at the back, which nestled inside the larger section of foam. The sections of vinyl that were attached to this area of foam had to get an “extension” of durable fabric so they could be stapled down in between the “valley” created by the cut-out area of foam. By doing this, it created the “clinch” center portion which pulled that area down into the valley and flowed with the double-stitched top seams that tied it all together. 

Once all new vinyl was in place, I recreated the tabs that held the two sections together and reattached the seat to the back. It wasn’t one of the easiest jobs I’ver ever done, but it wasn’t the most difficult either. It was nice to have an opportunity to work on a chair such as this because it gives my new industrial sewing machine and myself a good workout and great experience for future jobs like it.