Tuesday, March 23, 2021

Oak Teacher’s Desk Revival


Teacher's Desk Before

Remember elementary school? Do you still remember your teacher’s desk? Well, this was once a teacher’s desk that used way back in the day of notebooks (not laptop computers), pencils, typewriters and maybe even an apple on the teacher’s desk. 

Unlike the desks I remember from my early school years, this one had a unique feature; a slide-out, built-in filing cabinet with many cubby holes and slots for letters and other teacher-ish items. I had never seen a desk like this one. And you can imagine how extremely heavy it was!

Teacher's Desk After

The desk top had been destroyed by fire. Our customer thought the top had water damage, but upon closer inspection, it was fire, not water that had destroyed the top. We also noted that the original desk was likely a roll top, which was no longer part of the desk. Unfortunately the top’s damage was so severe, it was not able to be restored. It had to be replaced. 

We generally prefer to use the original pieces of our furniture restoration process, but when that isn’t an option, we rebuild it to resemble as closely to the original design as possible. The burnt top was comprised of border sections surrounding the center sections instead of larger boards simply glued together to create a uniform, single directional top. This was more involved and complex than a directional top and required much more wood in various lengths, but the new top was outstanding when it was done. Jim did a tremendous job in rebuilding the  top to best represent the original one. If I was the teacher, I’d give him an A+!

Tedious would be an understatement in describing the process of refinishing and restoring this desk. Every drawer had to be removed and labeled. The pull-out filing cabinet was its own entity that required even more disassembly and extra steps. The unique part of this little cabinet was that it rotated so that the teacher could easily access the files in the back. It also had its original snap-in alphabetical folders that the teacher probably used to keep track of her students. The handles did not come off, so the stripping and sanding process involved keeping them in place and working around them. The inside of the desk,  as well as the back, also had to be stripped, sanded and refinished. The stain used was golden oak with satin polyurethane to protect the desk for years to come. 

Burnt Top
Newly Built Top

Monday, March 22, 2021

Antique Windsor Chair Refinished


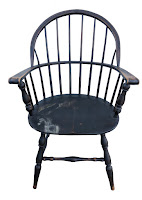
Windsor Chair
Before
This is what is called the “Windsor” Chair. It has the classical round form with spindles on the top and bottom of the chair, with the center split and mounted on a curved flat platform that turns into the top of the armrest. These chairs come in plain or rocking chair styles. 

This chair was over 100 years old and original in its antique styling and manufacturing. It had a center split that had been repaired before we got it, however, the stripping on this type of chair is very intense and takes a long time. (We hate spindles!) Not only did it have spindles, it had two spindle bases, one in the center and one on the bottom seat, therefore making the stripping much more time-consuming. 

Windsor Chair After

One of the most difficult part of refinishing this type of chair is that no power tools can be using when sanding, therefore, everything is hand sanded which adds to the time spent removing the entire old finishing. Some chairs are easier to work on than others. This one was not an easy redo because of the spindles, upper and lower. The chair was made of sturdy walnut, so that’s the end choice color we used to stain it. 

Finished and protected with satin polyurethane, it actually turned out beautiful, despite the splotchy look on the bare wood, which is characteristic of old furniture once stripped. If you ever wondered why chairs cost so much to strip, try your hand at one of these and you’ll understand. It’s a very tedious process and takes many, many hours and lots of patience and of course, the right tools to do the job. The most important tool is patience and tenacity. 

Antique Rocking Chair New Caned Seat


Here's another old beauty of a rocking chair that need the broken caned seat replaced. Like many older chairs with caned seats, they tend to get broken after years of use because the cane gets brittle and if a child happens to put their knee onto it, well, there goes the caning with a hole in the middle. If the caning is slightly bent in the middle, it can be made taut again by placing a damp towel on the seat overnight. This technique softens the cane, thus tightening gradually when it dries and giving it more use, at least for a little while. But when it completely breaks through, the only alternative is removing the old,
Antique Rocking
Chair After

broken cane and replacing it with new cane. This is a “strand” cane chair, which means that it has holes surrounding the chairs seat where the cane strands get woven through. This is a seven-step process that is quite tedious, but if you listen to music or a podcast (like I do), it’s not so bad. It’s actually pretty relaxing once you get into the groove of it and allow your fingers to work their magic. 

For this chair, I used 2.25mm fine caning. This is based on the size caning that was in the chair originally. There are methods to measure the distance between the center to center holes to determine the proper size caning to use, but I prefer just to measure the existing old cane to make sure it will fit since the hole technique isn’t always accurate. The reason is that when many of these very old chair were made, whoever drilled the holes didn’t always measure the exact distance between holes as well as the size of the holes, therefore to use just the holes is not the more accurate way to get the proper new caning installed. 

In my experience, it’s better to use a slightly narrower size than one that is too large as this will be a real problem during the final binding step. If the cane is too big and overfills the holes, it’s nearly impossible to get the final strands through the holes without pushing the cane back out of the holes you’ve worked so hard to get securely in place.

This was to date my very best caning job because everything flowed smoothly and the caning was even and straight. The trickiest part was the the curved arm was attached very closely to the holes on that part of the seat, so the arms had to be lifted up enough so that I could thread the caning through the 6 or 7 holes that were very close to the bottom of the armrest. Some of those holes were drilled at an angle, so that made caning in those areas even more challenging as I tried to find the angle of the hole. However, once that was completed, the rest was easy by comparison. Caning is always done with the first step going front to back, underneath, then pulled through the hole and brought forward again. You repeat this process from the center all the way to the right (or left) side then finish off the other remaining side in the same manner. The next step is horizontal, left to right, starting in the back upper corner of the chair, following the same weaving. 

Third step is going over the first step, keeping the strands to the right of the first vertical strands. This is so that when you weave the fourth step, you go over step 3 and under step 1. This is the actual “weaving” part of caning which will set up the diagonal weaves that go from the upper right to the lower left corners. Finally, you weave from the upper left to the lower right corners, going under vertical and over horizontal one way then the opposite for the other side. 

Binding is what finishes off the top. A slightly wider section of caning is measured around the circumference of the chair. This covers up the holes with sections of caning coming up and going down the same hole, pulling tightly to keep the top edge secure. After this is done, you tap in a 1/2” finishing piece to plug the hole(s) where the caning started. It sounds a lot more complicated then it is, but if you follow the steps, you too can become a caning master. It’s definitely a great skill to have, some call a “dying” art as not many people are doing this anymore. It’s also a unique and creative way to add texture to your home with caned pieces such as speaker covers, cabinets and footstools in addition to chair seats and backs.

Here’s the video of the final step of me caning this rocking chair:

https://draft.blogger.com/blog/post/edit/5936537173467203420/6863734281706129925

Thursday, March 11, 2021

Caning an antique rocker video

Caning a chair, final step

Video for caning a chair, final step - click here to view!

This is just a quick video that I wanted to share with my blog followers or anyone who wants an idea on how the process of caning is done without getting into the nitty-gritty. There are plenty of videos on all the steps, but I just wanted to highlight my favorite part of the process and what I’ve learned along the way. I have linked a few other videos on caning on my Youtube channel if you’re interested.

Enjoy!

Rene

😀

To view the entire seven-step process, click on the Peerless Rattan instruction video on the link below: 


Note: The Hammond video shows a pretty straightforward caning method, which uses a rectangular chair. You have to learn the differences in how to cane when you have a rounded back chair or a completely round chair. The part that varies at this step is that you must use the same holes several times to even out the front and rear caning. If you have more holes in the front than you have in the back of a chair, you’ll have to double up the amount of holes in the back to accommodate those extras in the front.

Monday, March 1, 2021

Maple Table Makeover

Refinished Table

Nothing says family more than a large dining room table. And, because we love our tables, we use them a lot! Therefore, they take a lot of abuse and as a result, get worn, scratched and marred with the passage of time. This is a very large maple dining table with a leaf that showed signs of wear on the surface. 

Luckily there weren’t any super deep gouges, so it was doable to strip, sand and stain the table and bring back its glory. Choosing a newer, darker stain, mocha, brought out the natural woodgrain and tones of the table which seemed hidden by the wear previous to refinishing. Finished off with three protective coats of satin polyurethane, this worn out table was once again a shining star, ready for many family meals.
Table Before Refinishing


Antique Dresser with Mirror


Dresser Before
Dressers are important pieces of furniture with the important purpose of keeping your sweaters and other items handy and at your fingertips. Nobody said a dresser needs to be boring, so why not take a look at that old dresser in your grandmother’s attic and examined it with a critical eye and imagine it refinished. 
Dresser After

This dresser had been a family heirloom that had seen some wear. The mirror was original and had some marking on the back side, but was still serviceable. A fun aspect of obtaining and refinishing antiques is finding something that dates an item. This dresser had old newspapers on the back that dated back to November of 1913. Made of solid oak, this dresser was a lovely piece of furniture worthy of restoration.

As with most mirrored pieces, they are refinished separately, which requires a great deal of care. Especially with a mirror (because who wants seven years of bad luck?) The lovely curves of the side bars of the mirror really added character to the overall look of the dresser. It was indeed a special element that makes these antiques so special and individually unique. Two top drawers with a single larger drawer and a front curve mimics the curve of the mirror frame as well as the top, which had the most damage. After stripping, sanding and staining, we protected this dresser with two coats of polyurethane. 

Luckily, we are usually able to remove most surface scratches on furniture, so this piece had a great finish. The exception to that rule is when an item has veneer with deep scratches. You can only sand veneer so far before you remove it completely and end up with what appears to be a large patch where the plywood shows through. That’s why we love working with solid wood. It’s much more durable and sturdy and refinishes well, with a better final result. Anything made of particle board isn’t even worth refinishing because it’s not “real” wood. You can’t beat solid wood for furniture, that’s why antiques are always worth refinishing so they can be kept for another few centuries.