Showing posts with label chair. Show all posts

Friday, January 5, 2024

Button Fluted Chair Makeover


Chair After

Chair Before
This is another classic style chair with fluted channels and buttons to accent the back. It had definitely seen better days since it had a damaged, torn seat from an active dog. The chair itself was very durable and structurally sound, needing no tightening or other repair work. But like many chairs of this style, it had many, many staples to remove which was a very time-consuming process. My customer chose the fabric which was a lovely large floral print on a dark teal background.

And to make matters even more time-consuming, the staples were quite rusty, which made them a bit tougher to remove. This chair may have been in a damp environment, hence the rusty staples, but the fabric had no mold or odors, so despite the dampness, it was dry and odorless.

Removing the fabric is the opposite of putting it on. I removed the welting on the back first before removing the entire back itself. I kept the pieces in tact as I was planning on using them as templates. This is much easier than making the patterns without the original pieces, which I’ve also done. For this particular style of chair having those template pieces was invaluable. I had to carefully transfer the markings for the fluted back and button positions from the old fabric to the new fabric. 

Using a heat removable marker, I transferred the lines to the new fabric. The back consisted of four layers; the outer fabric, the batting, the 1/4” foam and the liner which is the very back fabric (I used muslin), not seen when the chair is put together. The challenging part of this process was stitching all those layers together while keeping them from moving too much. This took the better part of the afternoon to accomplish. The chair also had fabric covered buttons which had to made individually as I don’t own an automatic button maker. (....some day...). 

After I had the seat all done, I began the slow process of attaching the thickly padded back. Starting at the top and temporarily attaching it to the center back, I worked the layers through the bottom wood structure of the chair and attaching it to the lower portion of the wood. All this is not seen once the chair is done. Once I was sure the backing was lined up, I finished attaching it securely. After the front of the back was installed, I attached the very back which covers up the interior of the chair. I covered the back with Dacron batting then used tack strip, which attaches to the wood of the chair all the way down to the arms, then the fabric is tucked between the tacks and folded then hammered with a rubber mallet, attaching it firmly to the back. At the juncture of the arms, I attached the rest of the fabric with staples as that part would be covered with welting.

I then attached the welting below where the tack strip ended, curving around the arms and again on the top curve of the front legs. This is decorative and effective way to finish the chair while covering any raw edges of the fabric. Many chairs have tacks that are used for this purpose, but I prefer welting (also called piping or cording) because once you remove the original tacks, it is hard to apply new ones without defaulting to the old holes, which don’t always line up. Many times the tacks break or bend and can’t be used, especially on very hard wood such as maple or oak. Welting is a great alternative and a cleaner look.

I loved the lines an shape of this chair and boy, was it comfortable to sit on when it was finished!

Sunday, October 23, 2022

Small Chair Gets Newly Caned Seat

Caned Chair After
 
Caned Chair Before

This was a nicely sized, small antique chair with a broken cane seat. This is a common problem with cane, it breaks easily when someone either puts a knee through it or tries to stand on it (not recommend). 

This chair was a standard strand weave cane, using a medium size cane. To determine what size cane a chair requires, you measure the distance between each hole as well as the size of the holes on the perimeter of the chair’s seat. If you’re unsure what size to get, it’s better to go a size smaller because ultimately it’s easier to work with.

I prefer this type of caning to the spline, or “press in” caning because although it is more time consuming, it is actually easier to do and much more accurate. I also prefer the look of strand caning to spline caning. The process for spline caning is completely different from strand caning, as the caning comes in a sheet anywhere between 16"-24” wide and sold by the foot, so if you are doing a chair that is 13” x 14” you need to get two lengths of caning in the closest size, but allowing an additional two inches on each side to allow enough cane to “press” into the groove on the top edge of the chair.

With the traditional weave as seen in this chair, you start by removing the old cane completely and make sure all the holes are cleaned out. Then you begin the weave by starting from the front center and coming up the back center, passing beneath through each hole, then back up again to the top, repeating this procedure until one side of the chair is completely filled in, then you repeat on the other side. The next step is the horizontal weaving, continuing until the entire chair is covered both vertically and horizontally. The third step is another row of vertical, this one going slightly to the left of the first row. This allows the additional weaving steps to be easier. 

The total process has six steps of weaving then the final step is the final edge which is secured with binding cane which is a bit wider than the cane used on the chair. You come up through each hole then down the same hole, over the binding then securing the it by pulling the working cane through snugly on the underside, then repeating this on each hole until you complete the entire chair.  You secure the corners with a 1” piece of round peg cane that keeps the corners from coming apart. On the underside of the chair will be the loose strands of cane which will be tied beneath the woven strands created through the caning process. This is the last and final step before the chair is complete and ready to use.

My first caning chair was quite the challenge, but after watching many videos and reading material, have since done many caned chairs. Each time it gets a little bit easier, because I understand the weaving process. I’m currently self-learning yet a new type of weave, a rush chair, which is a completely different process from caning, since the entire chair is woven from the corners to the center, ending with a very narrow space to fill in the last strand. Rush is either natural or manufactured, but the process is the same. I’m in the early stages of this, but this evening I finally figured out the direction and how to get it positioned correctly. When I’m done I will hopefully will have four nicely finished rush chairs and a new skill under my belt. I’ll be posing those too, so keep checking back!

Sunday, September 18, 2022

Desk and Chair Gets Fresh Paint

Antique Desk After Painting
 
Antique Desk Before Painting

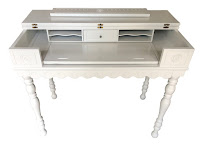
This small lovely antique desk was in great shape, but my customer wanted it, along with a matching chair, painted white to surprise his daughter for her birthday. 

This desk had quite a bit of detail, nice features and scalloped edges on the front and rosettes on each side and the center as well as spindled legs. The wood was mahogany, but had seen some wear, so painting was a nice alternative to refinishing. Many people love the natural look of wood, but there are times when painting is a great option. My customer chose a soft white for the set which looked amazing once it was painted. I prefer white for painting furniture because it’s always a fresh, light look that will match any décor.

Antique Desk Open After
Antique Desk Open Before

The desk had an unusual feature; you could use it as is, or flip the top to
expose a hidden area which has a pull-out area and a slots which could be used for stationary storage and supplies. It’s a really unique and valuable feature of this dainty desk.

The chair was a simple school style with narrow spindles and a form fitted seat bottom. This chair was a perfect complement to the desk as it could be used for many activities. The set was adequate to provide a nice work space but small enough to fit into a tight spot or tucked into a corner of a small room. 

Chair Before
Painting
Chair After
Painting

Monday, August 1, 2022

Woven Chair Replacement

Weave Chair After
Weave Chair Before
Caning and weaving are similar, using the natural fibers of cane or rush, but this application has a different technique, using a herringbone weave instead of spline or woven cane. It’s actually quite fun to do, but takes a lot of time and steps that must be followed, or you end up having to remove a lot of rows. This type of weave can be done in many different styles. 

Herringbone is just one of many. Basketweave is also popular. There is a “radio” weave which looks like the weaves are laid on top of one another. This particular one is my favorite because it is relatively quick and fun to do.

The art and technique of chair caning seems to be a dying, lost art, but with patience and trial and error, you can learn it. I didn’t have this skill until someone had asked me if I knew how to cane a chair. That was about five years ago. I told them that I didn’t know how to cane a chair but would be able to figure it out. The first one I did was frustrating and I swore I would never do it again! Then after the second and third one, I knew the system, became more familiar with the steps involved in doing it right and by the tenth one I was a pro. I’m still learning because each chair has its unique qualities and challenges, but the simplest ones are still my favorite. It’s relaxing and fun to “bond” with an old chair, imagining the stories it could tell me if it could speak. 

Thursday, March 11, 2021

Caning an antique rocker video

Caning a chair, final step

Video for caning a chair, final step - click here to view!

This is just a quick video that I wanted to share with my blog followers or anyone who wants an idea on how the process of caning is done without getting into the nitty-gritty. There are plenty of videos on all the steps, but I just wanted to highlight my favorite part of the process and what I’ve learned along the way. I have linked a few other videos on caning on my Youtube channel if you’re interested.

Enjoy!

Rene

😀

To view the entire seven-step process, click on the Peerless Rattan instruction video on the link below: 


Note: The Hammond video shows a pretty straightforward caning method, which uses a rectangular chair. You have to learn the differences in how to cane when you have a rounded back chair or a completely round chair. The part that varies at this step is that you must use the same holes several times to even out the front and rear caning. If you have more holes in the front than you have in the back of a chair, you’ll have to double up the amount of holes in the back to accommodate those extras in the front.

Friday, February 14, 2020

Chairs Get New Spline Caning

Spline Cane Before
Spline Cane After

If someone were to ask what our most common refinishing job is, I’d have to answer “Chairs.” The reason is simple. We all use them, so we all have them and at some point in time, they will need to be either refinished, reupholstered, restored or in this case, re-caned. This dining chair was in need of a new spline caned back (only) as the seat covers would remain fabric (to be done at a later date).

This is one of a set of four chairs in need of new back cane. It is a “spline” cane style, which means that the back portion is made of a single sheet of caning then kept in place with a spline that keeps the cane sheet in place. This is the first time I have worked with this particular style of caning, which is known as Swedish woven. The difference between this type of cane and the more commonly seen antique cane is that these are double rows of perpendicular lines that criss-cross compared to “hole” style of cane.

When ordering caning supplies, it is very important to measure the width of the channel to get the right size of spline. If you order spline that is too large, it won’t fit into the channel, which can cause damage during the tapping which is an essential part of the installation. If you order spline that is smaller than the channel, it won’t fit tight enough to keep the cane from coming out, so ordering the proper size is key.

Cleaned out channel
The hardest part of this process is removing the old spline. For these chairs, I used a combination of tools; chisel, needle-nose pliers, wood-carving tools, hammer, and then later (after I ordered it) a spline-removal tool, which is exactly the perfect tool to get beneath the old spline and smack it until it lifts up. I then used a small chisel to loosen any remaining spline that stuck to the inside of the channel.

Note: Cane must be soaked prior to installation. I soaked the cane and
Soaking Cane in Tub
spline (in my bathtub) for over an hour. (My little cat, Sadie is supervising!) Soaking spline and cane together is necessary, so that the spline can be manipulated around the tight corners that bend along the edges of the chair. It is okay to leave the everything soaking while you continue to work on each chair. By the time you get to the last chair, your cane and spline will be pliable enough to work easily. The first one is always the hardest one to work on.

I used Frog tape to protect the chair from accidental scratches while removing the old spline. Once the spline was removed and the channel cleaned out, (see photo at left), it is ready to accept the new cane and spline, which gets tapped into place with hammer and caning wedges. This process is tedious and time consuming and you really must focus on the work, which means no distractions!

The basic dynamic of installation is the same as hole cane, but the challenge of this style is to keep the rows straight vertically as well as horizontally, as they tend to shift while you install the spline. Once you have tapped the cane down enough to accept the spline (keep it in place with caning wedges) you can then carefully apply clear drying glue into the channel, then follow it with the new spline, being conscious of carefully bending and fitting it around those tight corners. (If your chairs have larger curves, it is much easier to install spline).

Of the two ways of cane installation, spline or hand weave, this is the “easier” way to do it, but that doesn’t mean it’s simple. It takes precision, patience and the right tools to do it right.

Friday, July 26, 2019

Vintage Wing Chair Gets New Fabric

New Gingham Fabric

This chair had an outdated blue and white plaid fabric which had been popular in the 1970’s. While still in good condition, an updated look was in order, so my customer choose this lovely gingham checkered fabric which suited the style of the chair as well as the era.

This chair was quite challenging because of the many components and sections it had. Because of these many components, I had to carefully remove them all, taking good photos and tagging each one, so I could refer to them later when I put the new fabric on each section. I decided to tackle the hardest piece first and worked on the bottom cushion, then the back cushion. Unfortunately, I have no photos of the chair before I began working on it, but I did take a photo of the cushion so I knew how to put it together.
Old Cushion

Because the bottom cushion had cording on the top and bottom edges, all the way around, and wrapping around the chair’s arms, I knew this was going to be a difficult job because I had done a chair such as this before and knew what was involved. Lining up the cording to match the curves is difficult, to say the least as you have a very narrow and sharply curved area in which to create a tightly fitted, finished corded seat. This was indeed the hardest part of the cushion.

Once that was complete, I “tested” it by slipping it over the cushion and was not pleased that the brand new seat I had just spent four days on no longer fit the original cushion. I opted for not making another cover, but getting a brand new cushion, custom made to fit my cover. The Foam Factory was a life-saver! I took my fabric piece there and left it in their capable hands to make a workable cushion that would look great and be extremely comfortable and fit well. Indeed, the new cushion was perfect and all the work I did was worth it because the seat was super comfortable and fit the chair perfectly.

The wing chair portion had fabric that faced the inside and outside, so each piece had to be marked, “inside facing right, outside of fabric, inside of fabric," etc. This method of marking my photos proved to be invaluable when I put it all together. The padded armrests were yet another story. The original foam was deteriorated and had suffered “dry rot,” which happens when foam cushions basically fall apart, leaving a dusty yellow residue. I replaced them with leftover cushion from another project which worked great. I used my scroll saw to cut and shape the 3” cushion. You can use an electric knife to cut thick cushions, but since I don’t own an electric knife, my scroll saw worked wonderfully, slicing right through the foam like butter. Having the right tools is essential for any project! Finally, the chair was done with new fabric and look pretty good if I do say so myself.

Wednesday, October 10, 2018

Bloodwood Chair

Chair Before Refinishing
Chair After Refinishing

Strong, sturdy and comfortable, this chair was somewhat of a surprise to my customer who thought it was an oak chair. After stripping, I discovered that it was not oak, but actually made from exotic bloodwood, found in Brazil and Australia. This wood is unique in that when the tree that it comes from is cut, you can see red “blood” dripping on the cut piece, hence the name. It is a hardwood with lots of color and movement. In addition to the run that runs through this wood, there are also yellow and gold shades, which complement the luscious red tones. It’s a gorgeous chair to be sure.
The stripping process revealed a lot of red in the wood, which had already been seeping through the old, worn surfaces, especially around the arms.

With the natural red tones of this chair, golden oak stain which was what my customer had originally requested, would not have worked. I opted for red mahogany, which not only brought out the chair's natural color, but worked well with the varied tones which gave the chair the exotic look that it deserved.

After using the red mahogany stain, I finished it with two coats of semi-gloss polyurethane so that this chair will last for many years to come.

Update as of May 12, 2019: I just finished the “sister” chair for this one, except it was a rocking chair. You can read about it here: http://finalefurniture.blogspot.com/2019/05/bloodwood-rocking-chair.html

Tuesday, June 19, 2018

French Dining Chairs Reupholstered

Armchair Before
If you have ever wondered why reupholstering a chair is costly, this is why. It's a LOT of work! Today I finished working on six dining room chairs which included two French armchairs and four regular chairs with caning for the back. The French armchairs had a padded back which was open (so the fabric was actually on front and back) as well as the seat. I was uncertain exactly how the fabric was attached to the chair, as there were no nails or staples visible. The reason for that was that the staples were hidden in a 1/2" deep groove, which was created with a router so the welting could be pushed into it.

Tuesday, November 25, 2014

Danish Chair

Danish Chair Before
Danish Chair After
I love taking on projects that involved such a lovely piece of furniture as this Danish cherry chair. The chair was extremely well made, thus also quite heavy, but after removing the cushion, I realized the weight wasn't in the wood, but in the cushion. Once that was removed, the chair itself was fairly light and easy to handle.

On the back of the chair was a stain, as if someone had spilled a darker stain on top of it and it made its way down the rear left leg. Someone tried to cover up the damage by adding glaze over the legs, which

Monday, August 11, 2014

Edwardian Kidney-Shaped Desk

Edwardian Desk and Chair Before
Edwardian Desk and Chair After
I came across this amazing Edwardian Kidney-shaped desk and matching chair at an estate sale and knew I had to have it. Luckily, all the drawer pulls were in tact, but the top left one was missing a screw. Easy enough to find a screw and put the pull back in. The chair was in great shape, but the fabric was quite worn and dirty. Not a problem, as I could easily replace the fabric.

Drawer Pull Before Polishing
Drawer Pull After Polishing
My first project was the chair. I found a perfect gold fabric that pulls out the painted gold "arrow" design on the chair. I removed the seat and touched up the minor scratches on the chair itself, then replaced the fabric. It turned out to be a great choice as it looked great! Next was the desk itself. I replaced the missing screw and used tung oil to polish the wood until it gleamed. (Unfortunately, I took the photo of the cleaned desk and spent hours removing the background, before I polished the handles, therefore I added the photos [above] of the drawers separately showing the newly polished handles.) 

Once I pushed the newly upholstered chair underneath the desk, I knew I had indeed made the grand finale, hence the name of my business. I loved this beautiful desk and chair and together, they make a great team. The desk and chair are currently available for $675.00. Please contact me at 586.873.1405 if you're interested in purchasing them.
Chair and Desk After
Desk After

Thursday, January 30, 2014

Stripping Tips

Partially stripped spindle
Stripping furniture presents many unique challenges. It can be very simple, or it can be very difficult, but it's always rewarding to see the final product. It doesn't have to be a daunting task since there are techniques you can use to make it easier, so I've written this article to share with you the tricks of the trade that I've found work best for me, with excellent results. I hope this helps you overcome your fear of refinishing because it's worth it!

When stripping, it's important to protect your skin, since a good quality stripper not only removes the paint or stain from furniture, it can irritate your skin and burn when it makes contact. I recommend you use gloves especially crafted for working with chemicals. If you use the thinner, flexible Nitrile gloves commonly used for painting or staining, the stripper will disolve the rubber and expose your hand to the harsh chemical, causing it to burn. (If it doesn't burn your skin, it's not strong enough to remove the old finish!) To avoid this, use good quality gloves, and if you accidentally get stripping solution on your skin, wash and rinse it immediately! 

If you plan on stripping a large, flat surface, have plenty of stripper on hand, because you're going to need it. I prefer to pour the stripper into a smaller container, then apply it with an inexpensive paint brush. Follow the manufacturer's instructions on how long to leave the stripper on. Depending on how many layers you're removing, it could be from 15 to 30 minutes. The more layers you have to remove, the longer it takes and the more times you'll have to apply new stripper. In warm or hot weather, the chemical dries very fast, so don't try to cover an entire table. Choose a 12" x 12" section and finish that before moving on. Use the correct stripper for your project, since they are not created equally. Buy the best one you can afford, as this will save you time and give you better results. There are strippers specifically created for paint or stain, or both. I prefer the one that does it all. 

Once you have applied the stripper, you will see the paint or varnish bubble and crinkle on the surface. Take a putty knife and gently remove the stripper, going in one direction. You can use a plastic putty knife if you use a good quality stripper. A metal putty knife works well too, but be careful not to scratch the surface as you remove the old finishes. The layers of paint or stain will roll back away from the furniture as you swipe the putty knife across the surface, so you'll also have to use something to wipe the excess stripper/paint onto. I prefer a stiff piece of cardboard, or a thin piece of wood. Scrap off the debris, then swipe it into an empty coffee can. (You cannot reuse this, so dispose of it properly when your project is complete).

After you've removed as much paint/varnish as possible with the stripper, you can then use steel wool, #0, on flat surfaces, or a brass wire brush on curved surfaces, (sold at most home centers or hardware stores) to scrape off the residue left behind. Once you're satisfied that the residue is removed, you're ready to sand. The photo (above left) shows the arm of the chair after the old stain and varnish were removed and the spindle with the original finish. The old finish was so dark, you couldn't see any wood grain. Once the old finish was removed, the wood's natural beauty was revealed.

While working on this chair I also used paint thinner to "loosen" up and moisten the wood prior to applying the stripper, thus I discovered a solution to a dilemma that I'd been having since I first began furniture restoration; easily removing old finish from spindles! By applying the thinner shortly after applying the stripper, these two strong chemicals worked as a team to break through years and years of finish. As you can see in the photo below, together, they "melted" the old varnish right off the chair's leg so that it could easily be wiped away with a rag. Once this task was accomplished, I gently used the brass brush and steel wool to remove the old residue.
Then it was ready to sand and stain. I chose a red mahogany stain and semi-gloss polyurethane, and reupholstered the seat cushion with a traditional floral print. The hard work paid off since the chair is great!
Removing old finish

Finished Chair

Thursday, August 23, 2012

Antique Chair Refinished

Kalamazoo House
Chair Before
Jim and I love Kalamazoo! It is rich with history, art and music. Our second trip to Kalamazoo was this February, 2012. Like the first time we were there last February, we stayed at "The Kalamazoo House," a beautiful Bed & Breakfast in the heart of downtown, right next to the Kalamazoo Institute of Arts. The Kalamazoo House is a gorgeous three-story structure, Victorian Era Renovated building that was once a funeral home. The owners, Laurel and Terry Parrot, are extremely friendly and welcoming. You feel as though you're visiting friends while staying at the Kalamazoo House. I highly recommend this place if you love to be pampered. They serve amazing breakfasts, too!

So, while in Kalamazoo in February, Jim and I made the decision that we'd definitely want to come back sometime in the summer months to explore the surroundings. But one thing we did find was an amazing antique furniture salvage store that had a ton of lovely antique furniture and hardware, perfect for those who love restoration as much as we do. I spotted this lovely chair in that store. I felt instantly attracted to it, and simply had to have it.

Well, that weekend Jim and I drove his Grand Prix instead of the mini-van which is the vehicle we
Chair During
usually drive when we're traveling because we never know when we're going to come across something that wants to come home with us (such as this lovely chair!) I realized that I'd have to pass on it unless we could make it fit into the back seat of his car, so the owner was nice enough to let us remove the chair from her store to try it out and make sure it fit, which it did! I was so glad because I simply had to have this chair as I already had plans for it. Other than some minor surface woodworking and a new seat, this chair didn't need much in the way of restoration.

Once I brought the chair home, it sat throughout the summer as other projects seemed to take priority. Finally, I got to the chair last week and finished it yesterday. I had purchased this gorgeous fabric which was left over from my piano bench project and it was exactly enough to use on this chair. I removed the backing first, and to my surprise, there was yet another fabric underneath the floral design! It was labeled, "red mohair," and I suspect it was original to the chair. Knowing that style of fabric was frequently used in the late Victorian period, I now have a point of origin as to the age of this chair. I suspect it dates back to the late 1890's. This was exciting because it's sometimes difficult, if not impossible, to find out the exact age of a piece of furniture unless you have a marking of some kind. It requires a lot of research in styles to determine the age.

Chair Finished
This chair had "good bones" and proved to be an outstanding piece of furniture after the restoration. I removed the backing, but was able to use the original upholstery tacks. And would you believe it? Many of those tacks were so bent I couldn't use them, but found the identical tacks at an estate sale for 50 cents! These extra tacks came in handy since I ended up bending many of them while recovering the chair's back. I then the seat with a new cushion and used new wood because the original wood was completely cracked and not safe to sit on. I custom-sewed the new seat cushion and professionally "tacked" it in place after using my serger on the edges of the fabric so it will never fray. It needed a "touch up" of dark walnut stain and a spray of semi-gloss polyurethane to bring it to life. This sturdy, old chair got a complete makeover.