Tuesday, September 27, 2022

Bedroom Set Gets Updated with Paint

High Boy Dresser
After Paint

High Boy Dresser
Before Paint
This was a well-made high boy dresser which was about fifty years old. It was one of three pieces of furniture in this bedroom set (four if you include the mirror, which is not pictured). This was the high boy, there was also a low dresser and a nightstand. 

My customer had wanted an updated look, so I recommended painting as opposed to refinishing it with stain. After showing her several paint samples, she did her own research and found a lovely neutral creamy beige color, which complemented the design of the furniture, bringing out the details.

Both dressers had plenty of drawers, which each had to be painted individually, thus removed from the dressers so they can be masked off and primed, then ultimately painted. We use a high quality paint that holds up well to daily usage. It’s on the costly side, but is well worth it. Painting requires a lot of prep work, so it’s better to use high quality paint. 

Low Dresser After
Painting
Low Dresser Before
Painting
All in all there were fifteen drawers to mask off. The reason for this masking is so that the non-painted portions of the drawers remain unpainted. 

Our customer had the foresight to label each drawer so that they are easily reinstalled into their proper places in the dressers. You’d think that you could put drawers anywhere within the same dresser, but that’s not always the case. There are times when the drawers only fit in one spot, so marking them ahead of time is a great idea. Just one of those little trick you pick up along the way. A couple of the drawers had lost their bottom tracking, so Jim reinstalled them so they once again worked properly.

Nightstand After
Nightstand Before

Since my customer had opted to use the same hardware, we cleaned them up on the polishing wheel. Since they were made of brass, they polished up nicely and looked great with the newly painted furniture. Brass polishes up great, but if it’s brass plated, using the wheel exposes only the steel, not the brass.

The finished bedroom set looked terrific once it was painted. As refinishers, we love working with “real” wood, because it refinishes much better than some of the newer products which are made nowadays. The wood made a half a century ago was made really well and if preserved properly, will last another half century or more. Antique furniture is by its nature made to last as generations of these special pieces have survived many decades of everyday use with minimum wear. But when they require refinishing or updating, we make it lovely again.

Sunday, September 25, 2022

Eastlake Chair Reupholstered

Eastlake Chair After

Eastlake Chair Before
This was a very old Eastlake chair which had been thrown away. My customer saw the potential of this chair and brought it to me to reupholster. Originally he had just wanted the springs to be restrung, as they had been popping through the fabric on the bottom, but upon closer inspection, I realized the chair’s springs were not the only thing this chair needed. The seat was rock hard, which meant that the foam was completely deteriorated beyond usage, so I told him it needed to be completely restrung, with new webbing. 

After I removed the old fabric, as I had guessed, the foam was so deteriorated it resembled a dried out loaf of bread. Yellow dust had sifted out of the chair’s bottom edges as I pried the old fabric off. It was indeed a mess and was simply not usable in its condition. Once I removed all the fabric, I made yet another discovery. The springs were tied to the chair upside-down, meaning they were strung to the bottom of the chair instead of the top of the chair’s seat, as it should have been done. This involved removing all the “guts” of the seat, which was the old deteriorated webbing as well as the springs and strings. 

Plus instead of using webbing to secure the springs to, they had used burlap only, which was definitely inadequate. Webbing is attached to the bottom of the chair then the springs are attached to the webbing. After this step, the springs are tied in the “eight-way” tying technique so that they are secure and do not move as well as adding the proper support and structure to the seat. Retying strings is a time-consuming job and requires accuracy and a bit of upper body work, or they won’t hold up for the long haul. I tend to over-tie springs, erring on the side of extra instead of under-tying them. Better more than less in this application.

New Webbing
With Springs
Ready for Tying
After the springs were securely tied, I stapled burlap to the top of them, snugging them tightly on all sides. A one inch layer of foam was the next layer, followed by a 1/4” layer of foam for added comfort. For the final padding I used loose cotton which is commonly used for upholstery. This is a very soft, comfortable cotton that comes on a roll. In some applications, many layers of this cotton is applied when a seat (or couch) needs more stuffing. 

Once I had the cotton in place, I stapled a layer of high quality muslin to cover everything else I had applied. The muslin makes a nice final surface on which to attach the fabric. Because my customer was on a tight budget and didn’t want to purchase new fabric, I chose a soft gray plush material, which was left over from a previous job, and was just enough to complete this chair. 


The cushion on the arms needed to be replaced as they too were beyond usage. I used the old cushions as templates and cut new ones using my carving knife. It worked quite well and covered the area nicely. The back of the chair needed new webbing and foam. The fabric was applied to both front and back of the upper part of the chair and the entire chair was finished with piping, which I prefer to using decorative nail heads which are difficult to pound into hardwood, such as this. I polished the metal wheels, which were original to the chair. The chair was once again usable.

Sunday, September 18, 2022

Desk and Chair Gets Fresh Paint

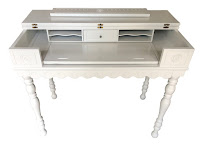
Antique Desk After Painting
 
Antique Desk Before Painting

This small lovely antique desk was in great shape, but my customer wanted it, along with a matching chair, painted white to surprise his daughter for her birthday. 

This desk had quite a bit of detail, nice features and scalloped edges on the front and rosettes on each side and the center as well as spindled legs. The wood was mahogany, but had seen some wear, so painting was a nice alternative to refinishing. Many people love the natural look of wood, but there are times when painting is a great option. My customer chose a soft white for the set which looked amazing once it was painted. I prefer white for painting furniture because it’s always a fresh, light look that will match any décor.

Antique Desk Open After
Antique Desk Open Before

The desk had an unusual feature; you could use it as is, or flip the top to
expose a hidden area which has a pull-out area and a slots which could be used for stationary storage and supplies. It’s a really unique and valuable feature of this dainty desk.

The chair was a simple school style with narrow spindles and a form fitted seat bottom. This chair was a perfect complement to the desk as it could be used for many activities. The set was adequate to provide a nice work space but small enough to fit into a tight spot or tucked into a corner of a small room. 

Chair Before
Painting
Chair After
Painting