Showing posts with label spindles. Show all posts

Sunday, September 18, 2022

Desk and Chair Gets Fresh Paint

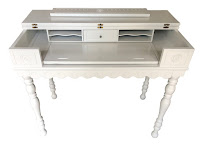
Antique Desk After Painting
 
Antique Desk Before Painting

This small lovely antique desk was in great shape, but my customer wanted it, along with a matching chair, painted white to surprise his daughter for her birthday. 

This desk had quite a bit of detail, nice features and scalloped edges on the front and rosettes on each side and the center as well as spindled legs. The wood was mahogany, but had seen some wear, so painting was a nice alternative to refinishing. Many people love the natural look of wood, but there are times when painting is a great option. My customer chose a soft white for the set which looked amazing once it was painted. I prefer white for painting furniture because it’s always a fresh, light look that will match any décor.

Antique Desk Open After
Antique Desk Open Before

The desk had an unusual feature; you could use it as is, or flip the top to
expose a hidden area which has a pull-out area and a slots which could be used for stationary storage and supplies. It’s a really unique and valuable feature of this dainty desk.

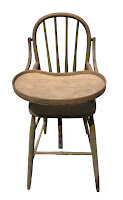
The chair was a simple school style with narrow spindles and a form fitted seat bottom. This chair was a perfect complement to the desk as it could be used for many activities. The set was adequate to provide a nice work space but small enough to fit into a tight spot or tucked into a corner of a small room. 

Chair Before
Painting
Chair After
Painting

Tuesday, March 8, 2022

His and Hers Twin Rocking Chairs


Rockers Before Restoration

Rockers After Restoration
Twin chairs! This was definitely a first for us, having two identical rocking chairs to refinish at the same time. The most surprising feature of these chairs was the size. Each chair weighed in at 60-70 lbs., possibly more. This required both of us to unload them from the customer’s van and bring them into our work space. 

Having chairs such as these as heavy as they were, made working on them quite challenging. They were not only heavy, they were huge! We have a large rocking chair in our living room with a similar style, but ours isn’t nearly as heavy as these were, nor is it as tall as these were.

The keyhole cutout design in the back center of each chair was a unique feature that gave them personality, adding a nice detail. The front of the chairs’ seat had a very rounded and thickness that I could hardly wrap my hand around. Yes, definitely massive. One of the chairs had suffered dog chew damage on the lower right leg spindle. The chairs had been repaired by someone else for the damage prior to us doing the refinishing. 

The chairs were both fairly worn and really cried out to be stripped, sanded and stained. This process was very time-consuming due to the sheer size of these mammoths and the detail, mainly the spindles, which if you’ve read other articles in our blog you know that they require a great deal of time and attention to remove all that old finish. We use work carving tools which allow us to get into the nitty-gritty of the spindles’ curves and tight spot. You’d be surprised at how much stain there is on any item of furniture even though it may look worn. There’s still a lot to remove. And that takes time. There’s simply no getting around that part of this work.

When the chairs were all stripped and sanded, Jim used English Chestnut stain, followed by three coats of polyurethane which will protect them for years to come. Refinishing really shows off the gorgeous woodgrain that was unseen prior to refinishing. That’s the beauty of a full refinish. You can see the woodgrain that is normally not as visible when furniture comes from the factory. Their process is different from hand finishing, therefore has a different look. 

If you've ever wondered if that special piece of furniture you’ve held onto for many years because you don’t know if it’s worth restoring, take a look at the wood. More times than not, once it is stripped, it is better than new because the hand stripping process restores it to its original beauty that was likely not seen when done on the assembly line. The value is already there so refinishing is always worth it. Unless a piece really is made cheaply and has no sentimental value, having it restored/refinished is a great way to preserve a piece of your family’s history or create a new family heirloom for future generations.

Tuesday, November 9, 2021

Amish Oak Table and Chairs Painted and Stained

Dining Table Before
(without leaves)
 
Dining Table and Chairs
Painted w/Stained Top
This lovely oak table came with two leaves and six chairs. Our customer had wanted a different, updated look so we suggested painting combined with keeping the table top woodgrain, but staining it little darker. 

They had originally envisioned an antique white, but after reviewing their décor choices, settled on latté, which is exactly as it sounds, a coffee color with a generous amount of cream added for that perfect flavor, or in this case, color combination. 

Prepping furniture for paint, especially chairs, takes patience and time. Mainly because it is all done by hand. You can’t use a power sander for chairs (except minimally) and spend hours scuffing up all the surface area to prepare it for first primer then two coats of paint. You also can’t skimp on the prep work as it directly effects the outcome of the project. 

We stripped and stained the table top, which had minor scratches, a rich, dark walnut to bring out the beautiful wood tones. The table’s pedestal base was painted to match the chairs, all done in latté. While some people simply do not like to paint furniture, there are times when painting is a nice choice. But by no means are you limited to using only paint. The combination of using paint and stain marries two distinct styles into a well-blended upgrade to outdated furniture without sacrificing the original integrity. 

The chairs, having many spindles, take a great deal of time to prep for painting. Chairs, period, are one the most time-consuming of all furniture projects, because there's so much surface area on a chair. Plus, the more detail (hence, spindles), the longer it takes to prep them. It’s also why chairs can be costly to refinish (or paint). All those surfaces need the same amount of attention and prep time. Ultimately, you have many colors in both stain and paint to choose from for your perfect furniture project.


Sunday, November 7, 2021

Antique Parlor Chair Gets New Caning


Cane Chair Before

Cane Chair After
When a knee ends up in the seat of a caned chair, well, you have a problem, but not to worry, because it is fixable. It simply needs to be replaced with new caning. This antique parlor chair (it was so cute) had a perfectly round seat with a broken caned center. Like many caned chairs, they are not designed for a sudden, rapid force, such as a knee pushed in the center or a child who jumps from the chair, using it as a launching pad. Cane breaking is not uncommon, especially in old chairs. Unfortunately there’s no quick way to “fix” them. The cane must be replaced.

This little gem had strand caning, which is the weaving that requires a hank of cane in a specified size that is woven directly onto the holes surrounding the perimeter of the seat. I actually prefer this caning to the “press in” spline caning, because the process is quite relaxing. I work on chairs in my lovely sunroom (lots of natural daylight) while trying to keep my cats away from their natural instinct of pulling at what I’m tugging, which is each strand of cane as I weave it through the chair! They indeed love playing. Sadie likes to “sneak” off with a section of cane then run away, feeling like she got away with it. 😂

This chair had spindles on the front legs and overall, the chair was in great shape. You can’t beat hardwood, especially in antiques. They made furniture to last back then. Therefore when people ask the question, “Is it worth restoring?” I always answer with “yes,” because you already have the value in the chair (or other furniture item) so why not get it refinished and keep it another 100 years. It’s something to pass down for future generations. Because once they’re gone, they’re gone. Preserving the past, a bit of history, is a great way to appreciate the artistry created by someone who may not be around anymore. Get it done and you won’t regret it.


Sadie, my “helper"


Wednesday, June 3, 2020

High Chair Before

High Chair After
This is our first high chair restoration. We estimate this height chair was at least 110 years old, based on the owner’s great-grandmother who had used it as a baby. It really look old (and rather creepy) with its dark greenish glaze that sort of, but not completely, covered up the wood. It was indeed a labor of love with all the spindles that neither Jim or I like working on as they are extremely difficult and time-consumimg.

The high chair had a center leather strap that acted as a safety measure to keep the baby from slipping out from under the chair. We were able to keep the original strap and incorporate it into the renovation of this oldie. Not 100% sure of the wood though. It didn’t have a lot of knots or movement so it may have been maple, but it was a hard wood to be sure.

The stripping process took an enormous amount of time to get between all those spindles! Jim took the tray off completely and had to replace a missing rung in the back of the chair. Luckily he could pull the back legs apart far enough to install the new rung into the hole and drill out the broken rung remains on the other side to make the new one fit properly. Once stripped and stained, he chose gunstock stain (our new favorite!) for the entire chair. The edging of the tray needed to be repaired since it had been broken right in the middle with a noticeable split. He added a piece and made it work. Once it was all put together with its new and repaired components, it looked beautiful. Who knew this old creepy chair would turn out so good?? (We did!) Lol.

Check out the oak high chair we also refinished by clicking on this link:

Monday, September 2, 2019

Drop Leaf Table Painted

Drop Leaf Table Before
Drop Leaf Table After

Every so often we get a unique job such as this drop leaf table. It was small, pretty and in need of a new look. The request was to paint the legs a soft white and paint the top black. This was a dramatic change for the white, yet worn table.

The unique feature of this table was that the center spindles opened up to support the leaves when the table was opened. This made the table easy to store as it was only ten inches wide when the leaves were down. Then when needed, easily opened to accommodate a few chairs and have tea time in ten minutes. I realized after I had begun working on this little gem that one of the bottom sections of a spindle was broken, held together with tape and painted over.

In order to repair the break and do it right, I removed the top from the legs along with all the hinges. This way I was able to reach the hard to get to places to properly prep the table for painting. It required a bit of stripping, a lot of sanding and three coats of spray paint on the legs and three coats of brush on paint for the top. I also cleaned the hinges and screws on my polishing wheel. I believe if you are going to take a piece of furniture apart, cleaning the hardware is part of the restoration process. It looks so much better than using the rusty hinges (or other hardware) and makes it easier to install.

TIP: A trick I’ve learned is after removing the rust from the screws, I scrape each screw along the edge of a bar of soap. This little extra step makes the screws easier to re-install as the soap acts as a lubricant without damaging the wood or the metal. To do a restoration right, it’s well worth the many steps involved since the results will be obvious and appreciated.

Drop Leaf Table Finished and Open

Tuesday, August 7, 2018

Tiny Rocking Chair

Rocking Chair Before

Chairs are the most commonly restored and refinished items that we receive. Chairs come in many styles, sizes, shapes and are made of too many types of wood to list, but they have one thing in common; they are not easy to refinish due to the many surfaces they tend to have. This tiny rocking chair once belonged to a little girl who has since grown up and wanted to preserve the many memories she likely had while enjoying the time she spent in this rocking chair.

Rocking Chair After
She may have sat by a window and enjoyed a Nancy Drew mystery novel as she rocked in time to the suspenseful mystery unfolding before her. Perhaps she stacked her stuffed animals on this chair to "keep it company" while she was at school. No matter how she used this little gem, likely she enjoyed it as a child and now as an adult, would like to see her own children make their own memories. This was a generational rocking chair meant to be passed down. As it where, the rocking chair had a couple of broken spindles in the center of the back. In fact, the entire chair came apart upon closer inspection, so repairing and gluing the broken spindles in place was the first thing that had to be done.

Sunday, June 17, 2018

Bench Gets White Chalk Paint

Bench Before Paint
A bench such as this one provides a great place to sit practically anywhere in your  home. But like with many pieces of furniture, after a while you tend to overlook this well-loved item. You may feel a bit guilty because you still love it, but know it needs that special something. In this case, the bench was destined to be a brand new look, which was accomplished by applying Annie Sloan's "Old White" chalk paint and finished with Annie Sloan's clear wax to seal it.

Bench After Paint
By its nature, this bench was a very labor intensive item to work on because of the amount of surface area, and of course, the spindles, which are difficult to paint. Spindles are my least favorite aspect of any furniture painting, restoration or refinishing job because they are, well, spindles. (Don't get me started!)

Chalk paint doesn't require a great deal of sanding or other prep work commonly needed to guarantee a greatly finished painted product, but I chose to lightly sand the entire bench anyway because that's just how I roll. Call it a pet peeve, but I feel that a little bit of sanding is better than no sanding.

I chose to brush the paint instead of spraying because I feel that you still get better coverage and a thicker, richer end product with brushing and for this piece of furniture, it worked quite well. That's another benefit of chalk paint; you don't see the brush strokes as it dries very smooth. The Old White paint was a light and bright color which literally changed the personality of this bench from outdated to outstanding. I added the customized stencil flower for a little something extra and it looked great. This bench received clear wax only so it will be protected from scratches and will be easy to care for.

Monday, April 3, 2017

Antique Piano Bench

Bench Before
Made of gorgeous walnut, this antique piano bench had seen many years of use and had the scratches to show for it. The wood was in pretty good shape, considering how old this bench was. The seat itself had been covered with fabric at least 2 times, each time adding a layer to the old instead of tearing off the fabric beneath.

The top fabric layer had a 1980's look, when mauves and pale
Bench After
blue and peach were frequently used together. The fabric beneath that had been a stained off white with bluish flowers, probably dating back to 1966. Yet beneath that layer of fabric was the "original," yellow, which was so deteriorated it crumbled as it was stuck to the rotted foam cushion it was stuck to.

Once I had removed the fabric, I realized that even though this bench seat cushion had been recovered three times, the very original seat had actually been caning, the splines still in place but the caning completely removed. The tell tale signs of caning were the holes that permanently left shadows on top of the wood. This was exciting because I instantly knew how I wanted this bench to look...back to the original caning, but first I had to tedious task of stripping the old finish from this lovely old piece to bring back the glorious wood hidden beneath a century of old stain, scratches and grime.

Thursday, October 30, 2014

Side Table


Side Table Before
Side Table After
I saw this little table at a resale shop for $6.86. I had been looking for a table such as this to keep my quilting supplies organized because it has a bottom shelf, so when I stumbled upon it, I bought it. The table was originally used with a built-in lamp, which I removed as I hadn't planned on using it that way. The lamp was ugly and in the way.

Never underestimate a smaller project! Just because this table was small, didn't mean it wasn't difficult to refinish. The spindles, I knew, would make it difficult because the area between them was hard to get to, so I ended up removing them and sanding that entire strip, much easier. The spindles were also spinning around, since they had not been secured to the table. That was my first priority, to make sure they stayed put, so after I had spent many days and hours stripping, sanding and refinishing the table, I used my pin nailer to secure the spindles so they no longer rotated. The hole left from where the lamp base once was secured had to be filled in, so I ended up cutting a small piece of wood to best match the opening, then glued it in place.

Ugh, this was a tedious, frustrating job, as most of them for myself turn out to be, but nevertheless, I'm happily using the table to keep my quilting supplies neatly tucked away underneath, on the shelf instead of dangling all over my floor!

Thursday, November 14, 2013

Nightstand Gets Painted Eggshell

Nightstand After
Nightstand Before

This little nightstand was a job for a customer who wanted it to match her dressers, however, the end result didn't match so I suggested painting it. As a traditionalist, I normally lean toward refinishing wood, as opposed to painting it, but sometimes painting is a great solution. This was a great example of paint vs. stain, as the wood didn't accept the stain very well, thus making the wood a great deal darker and no longer matching the dressers. This is caused by absorption, which determines the wood's ability to take on the proper color. When I suggested painting the piece, my customer agreed and purchased an eggshell white that matched her bed. The bottom line was a great little table that received a coat of paint and a brand new look! Be open to your finishes, because you never know how great something will look until you try it!

Here's another nightstand we've painted: http://finalefurniture.blogspot.com/2013/11/nightstand-gets-facelift.html