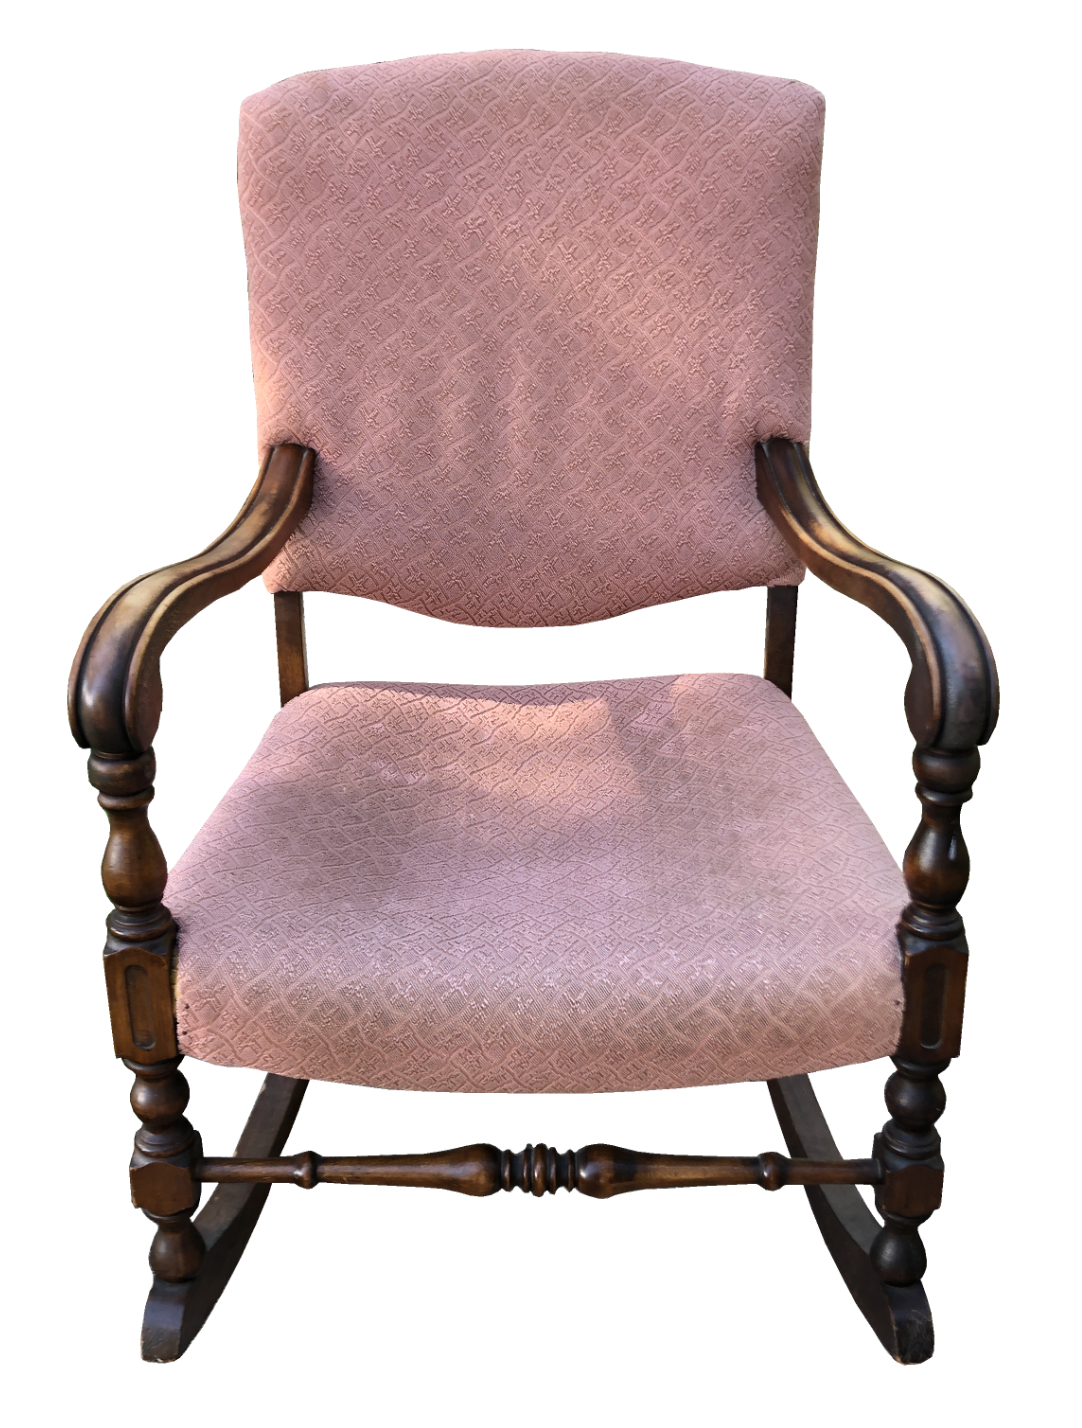
Showing posts with label padding. Show all posts

Friday, January 5, 2024

Button Fluted Chair Makeover


Chair After

Chair Before
This is another classic style chair with fluted channels and buttons to accent the back. It had definitely seen better days since it had a damaged, torn seat from an active dog. The chair itself was very durable and structurally sound, needing no tightening or other repair work. But like many chairs of this style, it had many, many staples to remove which was a very time-consuming process. My customer chose the fabric which was a lovely large floral print on a dark teal background.

And to make matters even more time-consuming, the staples were quite rusty, which made them a bit tougher to remove. This chair may have been in a damp environment, hence the rusty staples, but the fabric had no mold or odors, so despite the dampness, it was dry and odorless.

Removing the fabric is the opposite of putting it on. I removed the welting on the back first before removing the entire back itself. I kept the pieces in tact as I was planning on using them as templates. This is much easier than making the patterns without the original pieces, which I’ve also done. For this particular style of chair having those template pieces was invaluable. I had to carefully transfer the markings for the fluted back and button positions from the old fabric to the new fabric. 

Using a heat removable marker, I transferred the lines to the new fabric. The back consisted of four layers; the outer fabric, the batting, the 1/4” foam and the liner which is the very back fabric (I used muslin), not seen when the chair is put together. The challenging part of this process was stitching all those layers together while keeping them from moving too much. This took the better part of the afternoon to accomplish. The chair also had fabric covered buttons which had to made individually as I don’t own an automatic button maker. (....some day...). 

After I had the seat all done, I began the slow process of attaching the thickly padded back. Starting at the top and temporarily attaching it to the center back, I worked the layers through the bottom wood structure of the chair and attaching it to the lower portion of the wood. All this is not seen once the chair is done. Once I was sure the backing was lined up, I finished attaching it securely. After the front of the back was installed, I attached the very back which covers up the interior of the chair. I covered the back with Dacron batting then used tack strip, which attaches to the wood of the chair all the way down to the arms, then the fabric is tucked between the tacks and folded then hammered with a rubber mallet, attaching it firmly to the back. At the juncture of the arms, I attached the rest of the fabric with staples as that part would be covered with welting.

I then attached the welting below where the tack strip ended, curving around the arms and again on the top curve of the front legs. This is decorative and effective way to finish the chair while covering any raw edges of the fabric. Many chairs have tacks that are used for this purpose, but I prefer welting (also called piping or cording) because once you remove the original tacks, it is hard to apply new ones without defaulting to the old holes, which don’t always line up. Many times the tacks break or bend and can’t be used, especially on very hard wood such as maple or oak. Welting is a great alternative and a cleaner look.

I loved the lines an shape of this chair and boy, was it comfortable to sit on when it was finished!

Sunday, May 29, 2022

Grandmother’s Antique Chair Gets New Upholstery


Antique Chair Before

Antique Chair After
This was an antique chair had a lovely harp design on the back also had a heart-warming history. This chair was my customer’s husband’s grandmother’s chair and was given to the couple as a wedding present. Although grandma passed away twenty-seven years ago, the chair had been kept by family members and had been well cared for. The chair had come to us refinished, but needed new fabric, as well as spring tightening. 

The previous upholsterer used inadequate material on the springs as you could see them right through the seat fabric. When I sat on the the chair, I felt as though I would fall right through, that’s how bad it was. Everything was so thin, the springs popped right through, so I got to work and stripped it all off. Once I removed the old fabric, was what revealed was; the springs had been covered with a thin layer of shabby white fabric a rusty ring outlining each spring beneath. Next was a thin layer of raw cotton and a super thin layer of foam. That was it! The common denominator was “thin.” 

After I removed all the fabric, thin foam and the rest, I removed the springs. There were only four strips of webbing beneath the springs, which was inadequate. I replaced them with six strips of webbing, which I criss-crossed, making the webbing tight which lends proper support for the springs and a much better feel for the chair’s seat. 

The springs were pretty rusty and greasy, so I used my grinder’s brass wheel and cleaned and polished each spring, removing the grime and rust, revealing the nice metal beneath. It made them easier to work with and of course, much nicer looking. Evening though nobody will see these newly cleaned springs, I knew they were clean and that made me happy. Having the right tools for this type of work is essential! This spring cleaning step was not necessary, but a good idea to clean the interior parts of the chair. Plus, it gives me a feeling of doing it right.

Once the springs were cleaned, I hand sewed each one into place with strong waxed upholstery thread. Each spring was marked with a black sharpie, 2 inches away from the chair’s inner frame. This is a very important step, keeping the springs in line with each other for equal support. Once this is complete, the springs receive an eight-way tie. You start with the horizontal rows and tie each spring together, secured to the chair’s frame with staples (or nails) depending on the condition of the wood. If the wood is damaged from too many nails from previous reupholstering, staples are preferable. They are my personal favorite as I feel they are much faster and easier to use. Repeat the process with vertical ties, again securing each row, looping the string around each spring to keep them tight and the same height. Once the horizontal and verticals are secured, you repeat the process, now from corner to corner, in the shape of an “X” until you have eight strings overlapping one another. I added a couple more rows on the edges of the outer springs for extra strength. 

The next step is securing all the freshly tied springs with a layer of burlap, secured with staples to the edge of the chair’s frame. After the burlap, I added a 1” layer of high density foam, a thick layer of raw cotton batting, a thick layer of dacron and a layer of batting. I finished this with a layer of muslin to keep it all in place before I finished it with the fabric. After sitting on the newly finished seat, I no longer felt the springs, a good indication of a properly layered seat.

This chair was finished with decorative trim, or gimp, which was used to cover the staples that secured the fabric to the top of the chair. The back of the chair also needed to be reupholstered. The previous upholsterer used no webbing for the back, so I added a couple of strips for extra support and strength. Then I added a thin layer of closed cell foam and batting, which was appropriate for the back of the chair (unlike the seat, the needs a lot more layers of multiple materials so you don’t feel the springs.) Again, I used gimp trim to cover the staples which finished it off nicely. The gimp complemented the fabric, adding a decorative, finished look to the chair.

Check out the photos below to see the before and after springs and you can see the way an 8-way tie is properly done with chairs that have springs.

Chair Before Proper
Spring Tying and Less Webbing
Chair After Proper Spring
Tying and Six Strips of Webbing

Wednesday, April 20, 2022

1940’s Chair New Upholstery


1940s Chair Before

1940s Chair After
This was a super challenging reupholstery project. This chair was purchased by my customer’s grandmother in the 1940s. The story was that her grandmother had saved her money so she could purchase this heart-shaped back chair. I’m sure at the time she bought it, it was in much better condition than when I received it. Made of green satin, the chair was made with tufting, buttons and formed to accentuate the heart shape, which is part of the chair’s wood structure. 

Because the original fabric was much thinner than the upgraded fabric, it had a skirting along the bottom edge which surrounded the chair. Popular for the time, this skirting was a definitive feminine design for a small chair such as this which was commonly found in a woman’s dressing room. The chair’s petite size is an attractive feature because it was small enough to put into a corner of a bedroom or dressing room. The heart-shaped top was surrounded by shirred fabric to match the arms. Piping in an off-white was the accent color for the green. However, the chair had seen better days and had spent many years neglected,  suffering the elements and its share of rodent damage as well as other crawly things that made the interior their home. To say the least, it needed a major overhaul.

Back of chair after
Back of chair before

My customer had her heart set on a nautical theme and chose a lovely fabric with light blue, gray, white and navy with various nautical elements including sea shells, lighthouse, seagulls and a compass. The colors were muted but worked well with the overall design and theme of the fabric. 

I spent four evenings removing the old fabric, including the old thread and taking the sections apart, measuring and marking them, so that I could replicate them in the new design. However ambitious this was, it didn’t turn out that way. As I reconstructed the new underlayment of the chair, i.e. webbing, burlap, foam, rolled raw cotton batting, etc. the dictation that I take it into a different direction. I had always planned on adding the skirting, but the more I worked on the fabric, the less I wanted the skirting. It just didn’t look right with the new design of the chair.

Because the chair had zig-zag springs, it required a strong foundation so that you wouldn't feel the springs when you sat on the chair. And because the upholstery fabric was considerably thicker than the original satin, creating the “loose cushion” style was not possible. I was able to maintain integrity of the chair’s original “heart” design in the back by following the form of of the wood and being conscientious about keeping that shape while adding the various layers of cotton batting and foam. 

The most difficult part of the top heart shaped area was adding the fabric covered buttons. Because I made the back as a single, attached unit, the buttons has to be pulled through all those layers and stitched individually into place before the back fabric could be applied. This proved to be quite a task which involved using various tools of the trade. (I have learned to keep bandaids on hand while doing this type of work!)

Because of the shaping of the new fabric, I could only add piping to the very back of the chair, but I used two rows for character and keeping the back area straight, so I could easily apply the back fabric by using tack strip. Tack strip (or curve ease) attaches the back fabric in a way that you can’t see any fasteners. It’s got sharp “teeth” that grab the fabric’s edge, then gets hammered down to close the fabric on itself. 

Because the chair’s arms were built with fairly thin wood strips, it was a bit tricky attaching the batting layers and eventually the fabric because it was difficult to find where the wood was. This was quite time-consuming, but turned out great. Plus with all the padding, the chair is much more comfortable than it was before since the seating is much thicker than it was originally made. I finished the chair by making arm covers (to protect from your skin’s natural oil) and made a matching pillow with ruffled edges. I refinished the chair’s legs, because I opted to omit the original skirting, which simply didn’t look good with the updated fabric and style of the chair. The legs weren’t in bad shape, but they needed a touch-up so this completed the chair. Now it’s ready to face another 70 years as a cute little chair that graces a woman’s dressing room.

Friday, November 19, 2021

Very Old Rocking Chair Gets a “Boost"

Rocking Chair Before
Saggy seat!

This rocking chair was estimated to be about 150 years old. My customer’s grandmother had installed the pink fabric (seen on the photo on the left) in the 1930’s, so it definitely had seen a lot of wear since then, which was over 80 years ago. Unbelievably, the fabric had maintained its overall condition, with no rips or other damage, but the seating itself had sunken in the center. Sagging happens over time, no matter how the chair had been originally constructed. And this one was reupholstered over 80 years ago, so sagging was not unusual. The upholstery work was done very well with unseen nails and tiny stitches. Quality lasts.

Rocking Chair after
Higher padding in the seat
Since my customer had wanted the chair refinished in addition to replacing the worn, outdated fabric, the first step was to remove the old fabric and all the padding, webbing and dust cover that’s beneath the seat. Once the fabric and padding, etc. was removed, the tedious task of stripping was the next step.

Chairs have a lot of surface area, therefore they take a long time to strip and refinish, because you must remove all the original stain prior to sanding and re-staining it. (See video at bottom). The detail in this chair with its dowels on the front arms and across the front crosspiece took the most amount of time, but the rockers themselves were also a challenge because they were harder to reach because of their location beneath the chair. I spent five long afternoons to remove all the finish, sand and re-stain the chair. Two coats of polyurethane applied over 24 hours was the final step prior to moving ahead with installing the new fabric. 

Unfinished 
Rocker

Prepping the chair for fabric is essential and involves replacing the original webbing with new webbing, making sure it’s nice and taut so the seat is built with a strong foundation. This chair had seat and back webbing, as well as front and back fabric on the backing. The seat area of the chair had some damage. It was broken on one side and the webbing had come apart, causing the sagging seat. I repaired the damage before installing the new webbing.

New Webbing
After Refinishing
After the webbing has been secured with staples on the folded edges, the next step is covering it with burlap. This strengthens the seat even further. (See photo on right). I then put a fitted piece of high density foam on the burlap, covered it with nice, thick cotton batting and finished it with Dacron, stapling everything in place. Last is the fabric. In this case, I was installing directional fabric. This means the fabric is installed in the “up” direction. Most fabric manufacturers have a line on the border side, with an arrow that points to the top of the fabric. This is vital, because the last thing you want is to get the fabric fitted perfectly only to find out it is upside-down!! Ugh!

The most difficult part of putting fabric on any chair with arms, is making sure you cut the fabric towards the arms with a “Y” cut. This gives you enough fabric to wrap it around each arm before folding and tucking the fabric securely next to either side of the arms prior to securing it with staples. It’s a long, labor-intensive process and should not be rushed. Installing the fabric properly requires concentration with no distractions so that you can focus on what you’re doing. If not, you may make costly mistakes. 

I got lucky with this chair, because the back of the arms had a screw and were removable, so that I could slide the fabric beneath it, which made the installation nice and clean with no cut lines required. Not all chairs have that option, in which case you have to make those tricky cuts, but sometimes you get lucky. After I finished the front, making sure the fabric was tightly wrapped and secured to the back, I adding the final piece of fabric, folding the edges and finished it with piping.