Friday, April 10, 2020

China Cabinet Transforms to Coffee Station

China Cabinet Before 

New Self-Serve Coffee Bar
This is another example of how to redefine what an item of furniture can become by employing a few creative elements, a dash of imagination and a coat of paint. This was a 1980’s era China cabinet which held a collection of, well, China. It likely housed glasses, knick-knacks and crystal. But my daughter had wanted this cabinet to be used at “Roasted” in downtown Marine City’s Water Street as a self-serve coffee station to replace the old coffee bar during the store’s recent design upgrades and painting.

Her vision was to remove the top doors and paint the entire cabinet, then add wood to the interior to match the paneled wood in the restaurant’s bottom portion of the wall that complements the new paint color. She got the idea on Pinterest, but Jim was able to modify the original design to fit the needs of the coffee shop and size of this general cabinet.

He removed the top glass doors (as they were no longer being used) and lined the interior with the same wood panels to match the theme of the newly decorated coffee shop. Jim removed the original front bottom door panels and replaced them with the same panels as the interior. He built a raised platform so the coffee station would be ergonomically sufficient. This also created storage directly beneath for napkins, sugar, stir sticks, etc. The bottom portion would hold coffee cups and other supplies easily reachable but hidden behind the newly fashioned doors. The final updated cabinet was stunning. A ship’s wheel clock was the perfect design element that perfectly tied in with the coffee shop’s new theme and matched the new coffee station perfectly. You can see the cabinet at “Roasted,” which is located at 218 S. Water Street, Marine City, Michigan.


Old Hutch, New Paint and Repairs Needed, Badly!

Hutch Before
Cabinet After
An old hutch is not an uncommon item of furniture in many
households. These classic, traditional and much-used cabinets have been around for many years, serving as many uses through generations of families.

This old hutch was originally painted white, but as you can see in the “before” photo to the left, that fresh white paint had long since dulled to a dirty gray with various smudges and markings of orange, green and purple paint, likely left by little fingers. Needless to say, it needed a lot of love, starting with being completely taken apart, section by section since it was literally falling apart.

The doors didn’t have glass, but plexiglass that was barely held in place by the broken door pieces that were coming apart at the top. This alone made the cabinet difficult to transport from the customer’s home to ours. And as you can imagine it wasn’t light, so it had to be handled with care and carried carefully down the steps while watching those flimsy doors.

Once we got it into the workspace, Jim began the tedious process of removing the hardware, cabinets, plexiglass and doors. The sides were also falling off, so he took those off in addition to the doors and carefully marked each section for proper re-assembly. Each piece was then stripped, repaired, shored up and sanded prior to painting. The customer had wanted it to match her recently painted kitchen. Luckily, she still had some paint left over from the kitchen project and gave us the 1/3 gallon of pale gray paint which we used on the interior as well as the exterior of the hutch. The plexiglass was removed and replaced with actual glass. The drawer tracks were all but broken and needed to be rebuilt. The back of the hutch was mostly intact, but needed the horizontal wood slats replaced.

Our customer had asked for the shelves to moved up so she could store her coffee pots and other kitchen appliances, so Jim made each shelf adjustable, which required drilling holes on each side and adding metal pegs on which the shelves would rest. He also added to each shelf a 1-1/4” edge, which added strength as well as aesthetics. The glass door latching device was non-existent, so Jim added durable magnets at the top to keep the glass doors closed. New hinges and new knobs were added and the old hutch looked fantastic. It was not only much prettier, it was stronger and more functional than it had been in a long time.


Friday, February 14, 2020

Chairs Get New Spline Caning

Spline Cane Before
Spline Cane After

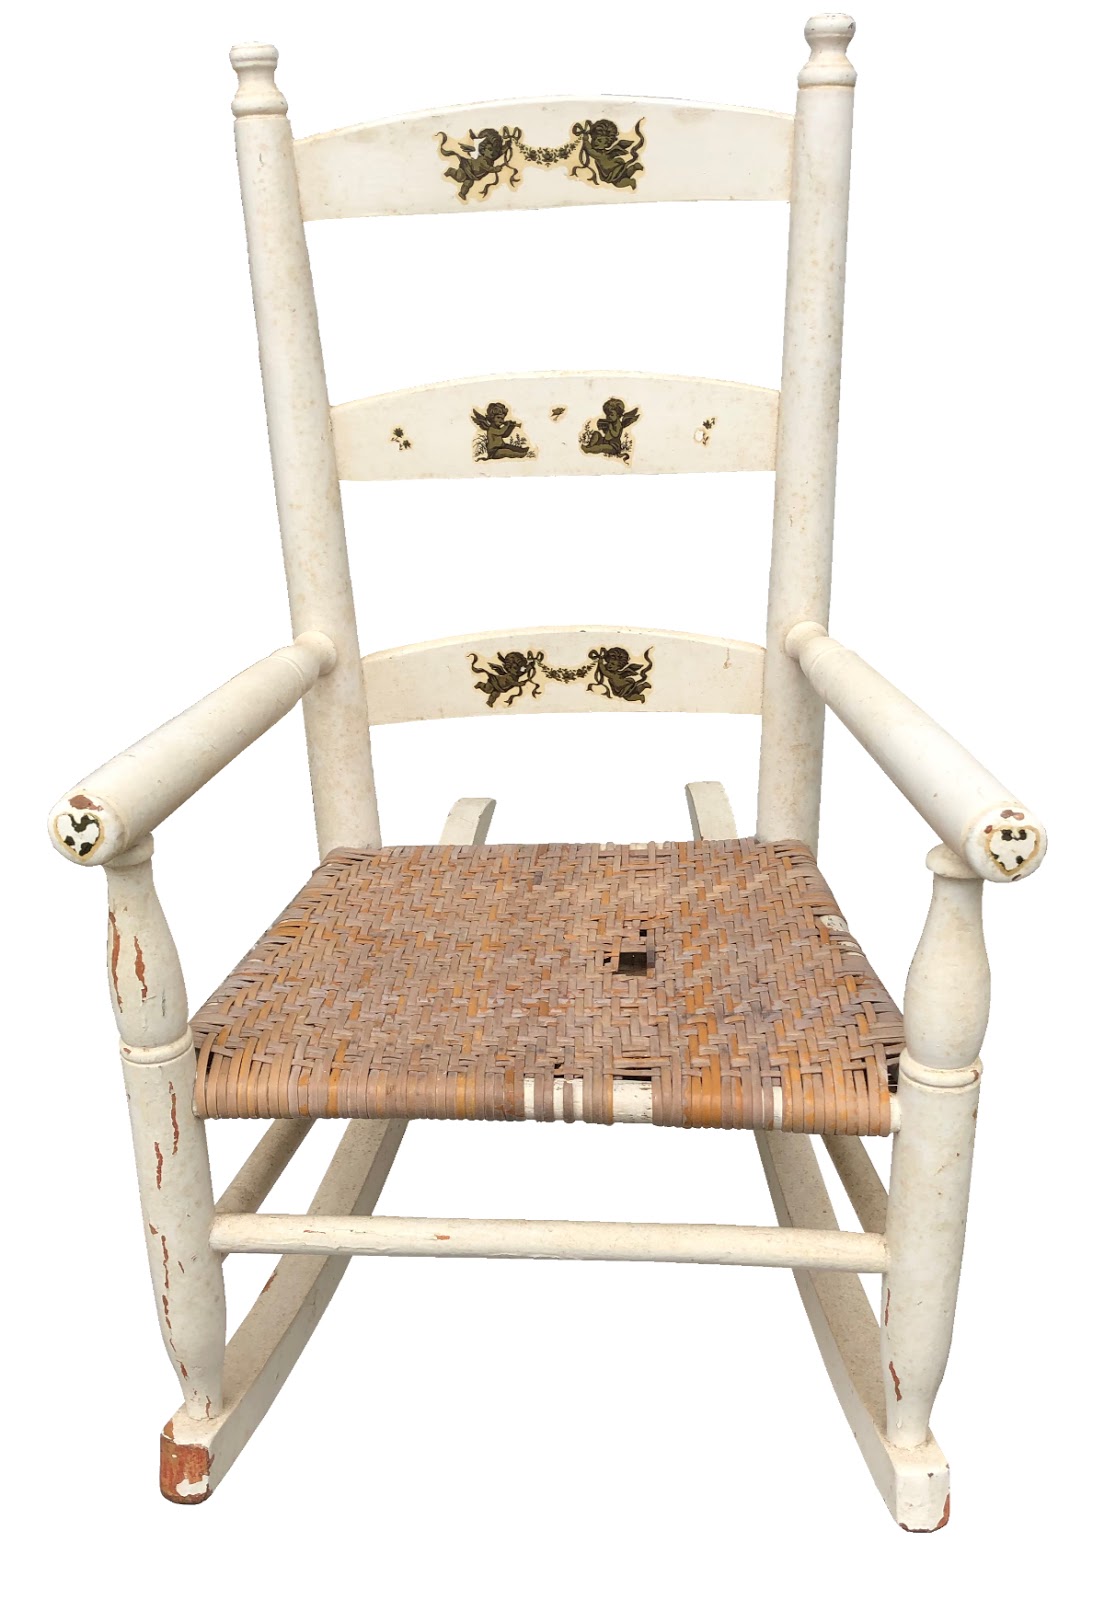
If someone were to ask what our most common refinishing job is, I’d have to answer “Chairs.” The reason is simple. We all use them, so we all have them and at some point in time, they will need to be either refinished, reupholstered, restored or in this case, re-caned. This dining chair was in need of a new spline caned back (only) as the seat covers would remain fabric (to be done at a later date).

This is one of a set of four chairs in need of new back cane. It is a “spline” cane style, which means that the back portion is made of a single sheet of caning then kept in place with a spline that keeps the cane sheet in place. This is the first time I have worked with this particular style of caning, which is known as Swedish woven. The difference between this type of cane and the more commonly seen antique cane is that these are double rows of perpendicular lines that criss-cross compared to “hole” style of cane.

When ordering caning supplies, it is very important to measure the width of the channel to get the right size of spline. If you order spline that is too large, it won’t fit into the channel, which can cause damage during the tapping which is an essential part of the installation. If you order spline that is smaller than the channel, it won’t fit tight enough to keep the cane from coming out, so ordering the proper size is key.

Cleaned out channel
The hardest part of this process is removing the old spline. For these chairs, I used a combination of tools; chisel, needle-nose pliers, wood-carving tools, hammer, and then later (after I ordered it) a spline-removal tool, which is exactly the perfect tool to get beneath the old spline and smack it until it lifts up. I then used a small chisel to loosen any remaining spline that stuck to the inside of the channel.

Note: Cane must be soaked prior to installation. I soaked the cane and
Soaking Cane in Tub
spline (in my bathtub) for over an hour. (My little cat, Sadie is supervising!) Soaking spline and cane together is necessary, so that the spline can be manipulated around the tight corners that bend along the edges of the chair. It is okay to leave the everything soaking while you continue to work on each chair. By the time you get to the last chair, your cane and spline will be pliable enough to work easily. The first one is always the hardest one to work on.

I used Frog tape to protect the chair from accidental scratches while removing the old spline. Once the spline was removed and the channel cleaned out, (see photo at left), it is ready to accept the new cane and spline, which gets tapped into place with hammer and caning wedges. This process is tedious and time consuming and you really must focus on the work, which means no distractions!

The basic dynamic of installation is the same as hole cane, but the challenge of this style is to keep the rows straight vertically as well as horizontally, as they tend to shift while you install the spline. Once you have tapped the cane down enough to accept the spline (keep it in place with caning wedges) you can then carefully apply clear drying glue into the channel, then follow it with the new spline, being conscious of carefully bending and fitting it around those tight corners. (If your chairs have larger curves, it is much easier to install spline).

Of the two ways of cane installation, spline or hand weave, this is the “easier” way to do it, but that doesn’t mean it’s simple. It takes precision, patience and the right tools to do it right.

Monday, January 6, 2020

Painted Cedar Chest Revival

Cedar Chest Before
Cedar Chest After
This is one of many cedar chests we have done, but it is the first one we have refinished that was painted. Personally, I can’t imagine why someone would paint a cedar chest, as the wood itself is too beautiful to cover up. My customer had purchased this painted cedar chest at an estate sale and wanted to see what was hidden beneath ugly green paint. I innerly groaned envisioning someone slapping paint on such a lovely piece of furniture. We had our work cut out for us!

The refinishing process is tedious, but when we get a painted item of furniture that the customer wants stained, it is necessary that every spec of paint is removed, because once it is stained, if not removed, that paint will be visible. Therefore, the stripping and sanding process must be done with intense precision and close attention to detail. It is easy to overlook the small crevices, but they too must be stripped of any and all remnants of paint or any other old finish. That’s where the wood carving tools come in quite handy as they allow us to get into the tiny spots that paint can get trapped.

You never really know what the wood will reveal once the paint has been removed, but as with most cedar chests, this one was was quite beautiful. It had accent strips on the front with wood “buttons” for a bit if decorative flair. It has great lines and a lift-up shelf not the inside. It was also a Lane, so a commonly known brand name that many people have experience with. Upon research, I discovered that Lane cedar chests have the date they were made stamped on the underside of the chest in reverse.  (Therefore if your cedar chest’s serial number is 649010, it was built on January 9, 1946). 

Cedar Chest Before
Cedar Chest After
The inside bottom of the Lane brand cedar chest has a large inset dowel, with a screw that you can turn to release the cedar fragrance. Cedar chests are natural moth repellants, so they are much sought after for precious linens or vintage and antique quilts, to keep them free of these destructive pests and hole-free.

Not all cedar chests have a serial or date stamp on the bottom as there were many manufacturers of cedar chests across the country. Lane is a popular brand that offers a variety of styles and sizes.

Upon completion, this lovely Lane was once again in its original condition, showing off its many tones of wood with that easily recognizable cedar fragrance that we love and moths hate!

Finished Cedar Chest

Check out other cedar chests we have refinished by clicking on these links:
https://finalefurniture.blogspot.com/2019/11/solid-cedar-chest.html
https://finalefurniture.blogspot.com/2016/08/1948-lane-cedar-chest_22.html
https://finalefurniture.blogspot.com/2015/04/elegant-cedar-chest-revival.html
https://finalefurniture.blogspot.com/2013/12/1945-lane-waterfall-cedar-chest.html
https://finalefurniture.blogspot.com/2012/06/my-waterfall-cedar-chest.html

Saturday, January 4, 2020

Antique Parlor Cane Chair Refinished

Cane Chair Before

Cane Chair After
This was a lovely antique parlor chair with a broken seat that needed new caning. A few areas also needed to be regaled and tightened, otherwise the chair was in great shape. I had done a similar chair in size a couple of years ago and knew this one was of the same era, approximately 1870’s,  making it a true antique. It had nice lines and was a great accent chair. Its soft curves made it perfect for a ladies boudoir.

The first step was to remove the old, broken cane then open up and glue the loose joints, leaving them in clamps overnight. Although the customer didn’t require this chair to be refinished, once it had been glued I removed the cane and determined there was so much grime on the chair from handling over the years that I would go ahead and surprise her with a full strip and refinish. There wasn’t much to it so it didn’t take that long and turned out to be all worth it, a perfect canvas for new caning.

I chose early American stain with a semi-gloss polyurethane (two coats). I always allow the poly to dry completely before beginning the long, tedious process of caning. This I do indoors in winter but love to do it outdoors on my deck in the warmer months. Luckily I have a lovely sunroom with three window walls and have plenty of natural light which is necessary to work on any caning job.

The most difficult part of this is keeping my two cats, Chelsea and Sadie from biting into the cane while I pull it through the slots. Cats think that anything longer than 3” is something worth playing with, i.e. batting at it with their paws or grabbing it between their teeth and tugging in the opposite direction that I need it to go. They absolutely love the scrap cut pieces I toss at them while they jump a foot off the ground to paw at it. But no worries. I don’t allow them to actually bite the cane I’m working on as I don’t want it to break halfway through a pull-through. Caning requires to be soaked, so the kitties also enjoy watching that process. I call them my two “Snoopervisors,” an adequate description for their careful observation with large, green eyes not missing a thing.

All in all, it’s a good system and the end result is as great as it is time-consuming. The customer was very happy with the chair and was surprised at the “bonus” refinishing job. This chair was completed on Christmas Day, after gift opening. Why not work on Christmas? It’s not like I had to cook since my daughter did that. It was indeed a relaxing yet productive Christmas!

To see a couple other small caning chairs, click on these links:
https://finalefurniture.blogspot.com/2017/05/caned-parlor-chair.html
https://finalefurniture.blogspot.com/2018/11/antique-parlor-chair.html

Century Old Maple Courtroom Chairs Makeover

Maple Chair Before
Maple Chair After

This is one of two courtroom style chairs that were once owned by a
friend’s grandfather and used in his print shop. We estimate the chairs to be approximately one-hundred years old (possibly older).

He had been wanting to get these chairs refinished for years, but finally got around to it approaching last Christmas as a gift for his wife (it belonged to her grandfather) to surprise her. Evidently he had them hung in his garage for over fifteen years after they had relocated to their current farm house on nine acres of land.

These chairs were very sturdy, made of solid maple which was hard to see beneath so many years of oxidation and grime. It never ceases to amaze me how gorgeous wood is hidden under all that worn finish and dirt. I was pleasantly surprised that once the chairs had been completely stripped and sanded to discover the wood was actually light and could be stained a lighter stain per his request. I have been using “gunstock” stain on a few projects lately and found it is one of my new favorite stain color choices. It is a mid-tone color with warm, rich tones, much like cinnamon and brown sugar (makes me think of cookies). It works well with any type of wood, depending on how light you prefer it to be. I used it on a very long handrail in my own home and it matches the existing railing and woodwork perfectly. If I ever get around to refinishing the stairs and railing, that will be my color choice for stain.

While the chairs were is great shape with a very solid structure, the only thing I had to repair was one of the chairs’ back section (behind the slats) had been popping out of their spots which required the wood to be removed, reshaped and glued before pushing back into place. Once the glue was dry, I gently sanded the area and filled in the small spaces with matching filler. After it was stained and polyurethane was applied, you couldn’t even see where the damage had been. I did it and it took close inspection to see where those spots were broken through. The end result was two lovely refinished chairs in a lighter tone that displayed the beautiful wood grain.

Friday, November 8, 2019

Old Pine Chest Makeover

Pine Chest

This old pine chest was once covered with a natural fibrous material, then after it was removed, someone had painted it with gloss black paint directly over the residue of glue and fibers left over from the previous surface. (Look below to see how the background looked as well as the fiber that had covered the chest).

The customer thought it was a cedar chest, but it turned out to be made from pine boards, not cedar, which has a distinct look and fragrance.
Top of Chest

Since the side surfaces were so rough, the only
way to make it look good again was to cover it with fabric. We were able to sand the top enough for it to accept paint and look pretty good, so we decided to paint the top and bottom with “gingerbread brick” paint and spray glue tan canvas duck fabric to the sides. It covered the rough exterior very well and gave it a fresh, new look and a chance at a new life.

With polished hardware, it turned out to be a nice piece of furniture. This was a decent sized storage chest, but light enough to be easily relocated if desired. I decided on adding two rows of rope to the top and bottom edges for more texture and to create a “pirate” chest look. For a final embellishment, I created a swash design, then transferred it to the front with a Frixion pen (which is easily removable once the project is complete) and then followed my hand drawn pattern with shiny brass tacks. These tacks not only created a lovely design, they help to keep the fabric in place, which I had adhered with Gorilla spray glue. All in all, a very fun fall project.

Sample of exterior

New Canvas on Background w/new handle

Solid Cedar Chest

Cedar Chest Before
Over the many years I have been restoring cedar chests, this is only the second one that was made of solid cedar. Many cedar chests have a decorative outer layer, which is created by carefully piecing many veneer sections together to create a vast style of designs and patterns.
Cedar Chest After

This cedar chest had no veneer, therefore the natural beauty of the cedar could be seen. As you can see, the cedar itself is such a lovely wood that it needs no embellishments. The hardware was made of copper, dulled by age, hiding the color beneath years of oxidation. Our customer had not wanted this cedar chest stained, just left natural and then protected with polyurethane only.

This chest had been painted at one time and the paint had been mostly removed, except for the left front foot. Why anyone would paint a cedar chest is beyond me, but it happens. Cedar is a natural moth repellant, so it makes for an excellent place for storing linens, quilts and seasonal items.

For this cedar chest, we removed the hardware prior to sanding the exterior to remove any remaining old finish, then filled the holes with a medium-tone wood filler. There had been a few gouges, other than that the exterior was in pretty good condition. All hardware was removed and polished. The oversized tacks were treated with black patina so that they would contrast well with the brass. Since it was being use as a coffee table as well as a storage chest, we replaced the worn interior hinge with a friction lid hinge, which is adjustable, so that it doesn’t fall on tiny fingers when it is being opened and closed. Once it was sanded and gouges filled, it received two coats of satin polyurethane and looked better than new.

Check out other cedar chests we have refinished by clicking on these links:

https://finalefurniture.blogspot.com/2016/08/1948-lane-cedar-chest_22.html
https://finalefurniture.blogspot.com/2015/04/elegant-cedar-chest-revival.html
https://finalefurniture.blogspot.com/2013/12/1945-lane-waterfall-cedar-chest.html
https://finalefurniture.blogspot.com/2012/06/my-waterfall-cedar-chest.html
https://finalefurniture.blogspot.com/2020/01/painted-cedar-chest-revival.html

Cedar Chest Before Open
Cedar Chest After Open


Monday, October 21, 2019

Antique Child’s Rocking Chair

Rocking Chair Before
Rocking Chair After
This antique child’s rocking chair had been painted white many, many years ago. With painted furniture, you never know what is hidden beneath the paint, so removing the paint from this special little chair would prove to be quite time-consuming, involving a lot of work and much, much detailing.

This type of restoration job generally uses my personal arsenal of tools including many types of sanders, wood carving tools (which I used to scrape away hard-to-reach painted places), a small dremel tool with an assortment of miniature sanding discs and diamond drill bit heads that work extremely well for tiny projects such as this. Of course, my most useful tool, my hands.

Any type of stripping/sanding work requires a lot of hands-on use, but the smaller the project, the harder the hands work. This causes super dry fingertips, sore finger joints, along with cuts, scrapes and bruises; all par for the course. Thus are the “hazards” of furniture restoration. I use a product called “Ghost Glove,” which is a lotion you apply prior to doing any type of hands-on work. This “invisible” lotion protects your skin from drying out and makes it easier to wash off in the event you are a mechanic working on a greasy engine. It’s one of many little things that makes the job just a bit easier.

Anyway, back to the chair. You’d think a small project is a quick one, well think again. This little gem took an entire week to strip clean of the old paint. Every tiny crevice, dowel end, edge and other hard to reach places had to be completely free of paint residue, or it would be visible when applying the stain. After a week of stripping, I spent an afternoon sanding the chair thoroughly, using folded sandpaper to get into the edges and grooves. Finally it was ready to be stained! I used “gunstock” stain, as I had for a few other jobs. This is a lovely golden tan color that really brings out the highlights of the wood.

This chair was actually my third “bloodwood” chair. I had done two other ones, so I recognized the signature “bleeding” red at the chair’s joints. You can see my other bloodwood chairs by clicking on these links: https://finalefurniture.blogspot.com/2019/05/bloodwood-rocking-chair.html
https://finalefurniture.blogspot.com/2018/10/sturdy-cherry-chair.html

Since it had only one coat of white paint on it, I knew this red I saw was the wood itself. It actually took the stain very well and I was happy with the results. I used two coats of satin polyurethane to protect it, let it dry for two days then began the tedious process of weaving new cane into the seat. The previous seat had a herringbone style weave. I chose a “New England Style Porch” chair design, which was perfect for this size rocking chair. Once the caning was complete, this little rocking chair was complete, with a major transformation.

Antique Oak Cabinet

Cabinet Before Refinishing

Cabinet After Refinishing
Oak is one of my favorite woods to work with. This antique
cabinet was made from solid oak, which had been previously stained in a medium golden color. While it wasn’t in terrible condition, it needed to be fleshed up, thus refinished. The first step as in most restoration jobs is to strip off the old finishes, including old stain and any lacquer or varnish.

The top of this piece had a bit of water damage as some one had left a planter on top and didn’t place anything beneath it. This is a commonly seen problem with wooden furniture if it is used to keep plants. If you don’t have something to protect the top from water, eventually even the most protected furniture will begin show signs of water damage, including a milky looking top coat to a deeper, darkening of the wood beneath the top layer which is harder to mask as it affects the fibers of the wood and is usually deeper than the surface. Either way, it’s always best to keep your plants on a porous barrier such as a plastic or aluminum pie pan or plate to properly protect your furniture from water damage.

Old Drawer Lining
New Drawer Lining
Once this cabinet was stripped, I chose “gunstock” stain, followed up with two coats of satin polyurethane.

The inside of the cabinet drawers and door area had been lined with outdated 1960’s era contact paper (it had to go!) I opted for wallpaper that had been used for a great replacement of headboard when we added a half bath to our upstairs. It worked well for drawer liner and mimicked the headboard front of the cabinet door. I used this for the three drawers and the shelf inside the cabinet. The final step is polishing the hardware and viola! We have a newly restored, lovely piece of oak furniture which will look great for many years.

Friday, September 27, 2019

Old Mahogany Desk

Old Mahogany Desk Before
Old Mahogany Desk After
Antiques are simply the best furniture to refinish and restore
because they are well made, have plenty of character and solid wood. This old mahogany desk is a great example of those characteristics as it was in supreme condition with everything still intact, no broken pieces. This is uncommon for such an old piece of furniture, estimated to be built around the early 1900’s based on the design and materials used. As with many antiques, this one had also seen some wear and a refreshing would bring back its original beauty.

The amount of detail on this desk was incredible. It had a wooden beaded border which surrounded the bottom edge, and again on the top portion of the legs. The drawer, which had no handles, did not stand out. In fact, unless you realized it was a drawer, it was easy to overlook. The fluted legs, carved rosettes and rippled crosspieces show elements of the time and craftsmanship that went into the process of building this old desk. Made of mahogany, it was also a sturdy and somewhat heavy piece of furniture.

The same elements that make an item of furniture beautiful such as all those details, also make it quite challenging to refinish and restore. We utilize many hand tools to remove the old finishes that accumulate between the details of each finely carved piece of wood that creates the unique design of an item of furniture, differentiating it from mass-produced pieces. This desk took several days to strip, sand and remove the residue of old finishes.

Staining was also a tedious process because there were many nooks and crannies that needed careful application of stain, as not to be missed. I chose chestnut gel stain which worked well on the vertical surfaces. Gel stain is great because it doesn’t drip onto everything beneath it and you have more control to where the stain ends up. I chose to spray two coats of semi-gloss polyurethane instead of brushing because of the many vertical surfaces. Spraying mush be carefully applied to avoid runs and drips, but is ultimately much faster than using a brush. The end result was a beautifully refinished antique, which once again glowed with its inherent character.

Thursday, September 26, 2019

Maple Rocking Chair Refinished With New Caning

Rocking Chair Before

This antique rocking chair had seen many years of use, unfortunately had gotten a knee through the seat and broke the original caning. The chair is well over 100 years old and likely a host to many relaxing moments, conversations and stories while gently rocking and listening to the many tales told.

Caning Process With Pegs
The chair had aged, the wood darkened, hiding the beautiful wood grain beneath. Since my customer had wanted the chair refinished as well as replace all the caning.

If you are unfamiliar with the chair caning process, there are two types of cane; "strand" cane and "pressed" cane. This chair had “strand” caning, which means you create the weave by measuring the holes and finding center, then string very long strands of cane back and forth through the holes, first vertically, then horizontally and both ways diagonally. While you are weaving, you keep the cane in place by using “caning pegs,” which fit into the holes, keeping the cane tight as you carefully move across and down the chair. If you’ve done all the steps right, you will have the “holes” as a result of the weave.
Rocking Chair After

Because this chair needed refinishing as well as new cane, it was necessary to snip away all the old caning first. This in itself was a time-consuming process because the original cane had been lacquered over so it was stiff and difficult to snip and remove. Once that was complete, the old cane comes easily through the holes, which vary in size. This chair had 1/4” holes and required size 3 medium cane.

After all caning was removed, I began the tedious process of stripping the old finish and revealing the true beauty of the wood, which was maple. Considering the age of this chair, it was in remarkably beautiful condition with no breaks in the structure. Indeed, it was as sturdy as it was the day it was made.

Once I had removed all the old stain using a variety of tools, including a toothbrush, brass brush and lots of in between sanding, I chose chestnut gel stain and finished it with semi-gloss polyurethane. I allowed the chair to dry for two days prior to caning it. It was a fairly large chair and had ultimately required three bundles (called hanks) of caning. I had originally ordered only two hanks, so I had to wait a few days while the third hank was on its way, catching up on other projects in the meantime.

The caning process for this chair took ten days, five days for the bottom and five days for the upper portion of the chair. I spent an average of four hours per day on caning this chair. It can be a strenuous activity, so taking frequent breaks is essential to avoid lower back pain. While caning isn’t super difficult, it does require patience, time and a skill set similar to weaving a basket. It is intensly  gratifying to see the final product after a few hundred feet of caning has been woven through it. Here’s to another one-hundred years and many more stories to share...