Showing posts with label cedar chest. Show all posts

Monday, January 6, 2020

Painted Cedar Chest Revival

Cedar Chest Before
Cedar Chest After
This is one of many cedar chests we have done, but it is the first one we have refinished that was painted. Personally, I can’t imagine why someone would paint a cedar chest, as the wood itself is too beautiful to cover up. My customer had purchased this painted cedar chest at an estate sale and wanted to see what was hidden beneath ugly green paint. I innerly groaned envisioning someone slapping paint on such a lovely piece of furniture. We had our work cut out for us!

The refinishing process is tedious, but when we get a painted item of furniture that the customer wants stained, it is necessary that every spec of paint is removed, because once it is stained, if not removed, that paint will be visible. Therefore, the stripping and sanding process must be done with intense precision and close attention to detail. It is easy to overlook the small crevices, but they too must be stripped of any and all remnants of paint or any other old finish. That’s where the wood carving tools come in quite handy as they allow us to get into the tiny spots that paint can get trapped.

You never really know what the wood will reveal once the paint has been removed, but as with most cedar chests, this one was was quite beautiful. It had accent strips on the front with wood “buttons” for a bit if decorative flair. It has great lines and a lift-up shelf not the inside. It was also a Lane, so a commonly known brand name that many people have experience with. Upon research, I discovered that Lane cedar chests have the date they were made stamped on the underside of the chest in reverse.  (Therefore if your cedar chest’s serial number is 649010, it was built on January 9, 1946). 

Cedar Chest Before
Cedar Chest After
The inside bottom of the Lane brand cedar chest has a large inset dowel, with a screw that you can turn to release the cedar fragrance. Cedar chests are natural moth repellants, so they are much sought after for precious linens or vintage and antique quilts, to keep them free of these destructive pests and hole-free.

Not all cedar chests have a serial or date stamp on the bottom as there were many manufacturers of cedar chests across the country. Lane is a popular brand that offers a variety of styles and sizes.

Upon completion, this lovely Lane was once again in its original condition, showing off its many tones of wood with that easily recognizable cedar fragrance that we love and moths hate!

Finished Cedar Chest

Check out other cedar chests we have refinished by clicking on these links:
https://finalefurniture.blogspot.com/2019/11/solid-cedar-chest.html
https://finalefurniture.blogspot.com/2016/08/1948-lane-cedar-chest_22.html
https://finalefurniture.blogspot.com/2015/04/elegant-cedar-chest-revival.html
https://finalefurniture.blogspot.com/2013/12/1945-lane-waterfall-cedar-chest.html
https://finalefurniture.blogspot.com/2012/06/my-waterfall-cedar-chest.html

Tuesday, June 19, 2018

Antique Cedar Chest Revival

Cedar Chest After Refinishing

One of my favorite projects to refinish and restore is a beautiful cedar chest such as this lovely antique. The best part of this restoration was that it had retained all the original details such as the four vertical rows of rope braiding that embellished the front as well as the decorative trim surrounding the lid and another row of trim along the bottom. The chest was in pretty good shape overall, with surface scratches marring its top. Otherwise, it was in excellent condition.

Unlike other cedar chests I've done, this one had separate ball type feet which lifted it off the ground, allowing for easy relocating while working on it. Unfortunately, all that detail requires a great deal of time to remove the old finishes which requires a lot of time, patience and the right tools.
Cedar Chest Before Refinishing 

Never underestimate the power of an old toothbrush! Yes indeed a toothbrush is a key element to removing all that yucky, sticky residue that clings to the wood after you brush on the nasty stripper.

A good stripper will burn your skin on contact, so wearing gloves is essential while stripping. (I also keep a clean bucket of water on hand just in case I need to stick my hand into it. Ah, the burn!) A toothbrush, wood carving tools and a good brass brush are a great combination of tools to remove gooey varnish from all those nooks and crannies that would otherwise be impossible to reach. The ultimate goal is to reveal bare wood, that once sanded, is ready for staining. For this lovely cedar chest I used red mahogany stain and semi-gloss polyurethane, which brought out the natural beauty of the wood, showing its grain.
Cedar Chest After

Cedar Chest Before
It never ceases to amaze me just how awesome the wood looks once all the old finishes are removed and the lovely wood beneath is revealed. This was definitely one of my favorite cedar chests to work on because it had all those lovely details, which shows off its unique qualities and of course, the lovely craftsmanship that went into making it.

For other cedar chests I've refinished, you can click on these links:
http://finalefurniture.blogspot.com/2016/08/1948-lane-cedar-chest_22.html
http://finalefurniture.blogspot.com/2017/04/decorative-walnut-antique-cedar-chest.html
http://finalefurniture.blogspot.com/2017/05/solid-cedar-chest-with-copper-accents.html
http://finalefurniture.blogspot.com/2015/04/elegant-cedar-chest-revival.html
http://finalefurniture.blogspot.com/2013/12/1945-lane-waterfall-cedar-chest.html
http://finalefurniture.blogspot.com/2012/06/my-waterfall-cedar-chest.html
http://finalefurniture.blogspot.com/2014/10/solid-cedar-chest.html


Thursday, May 4, 2017

Solid Cedar Chest with Copper Accents

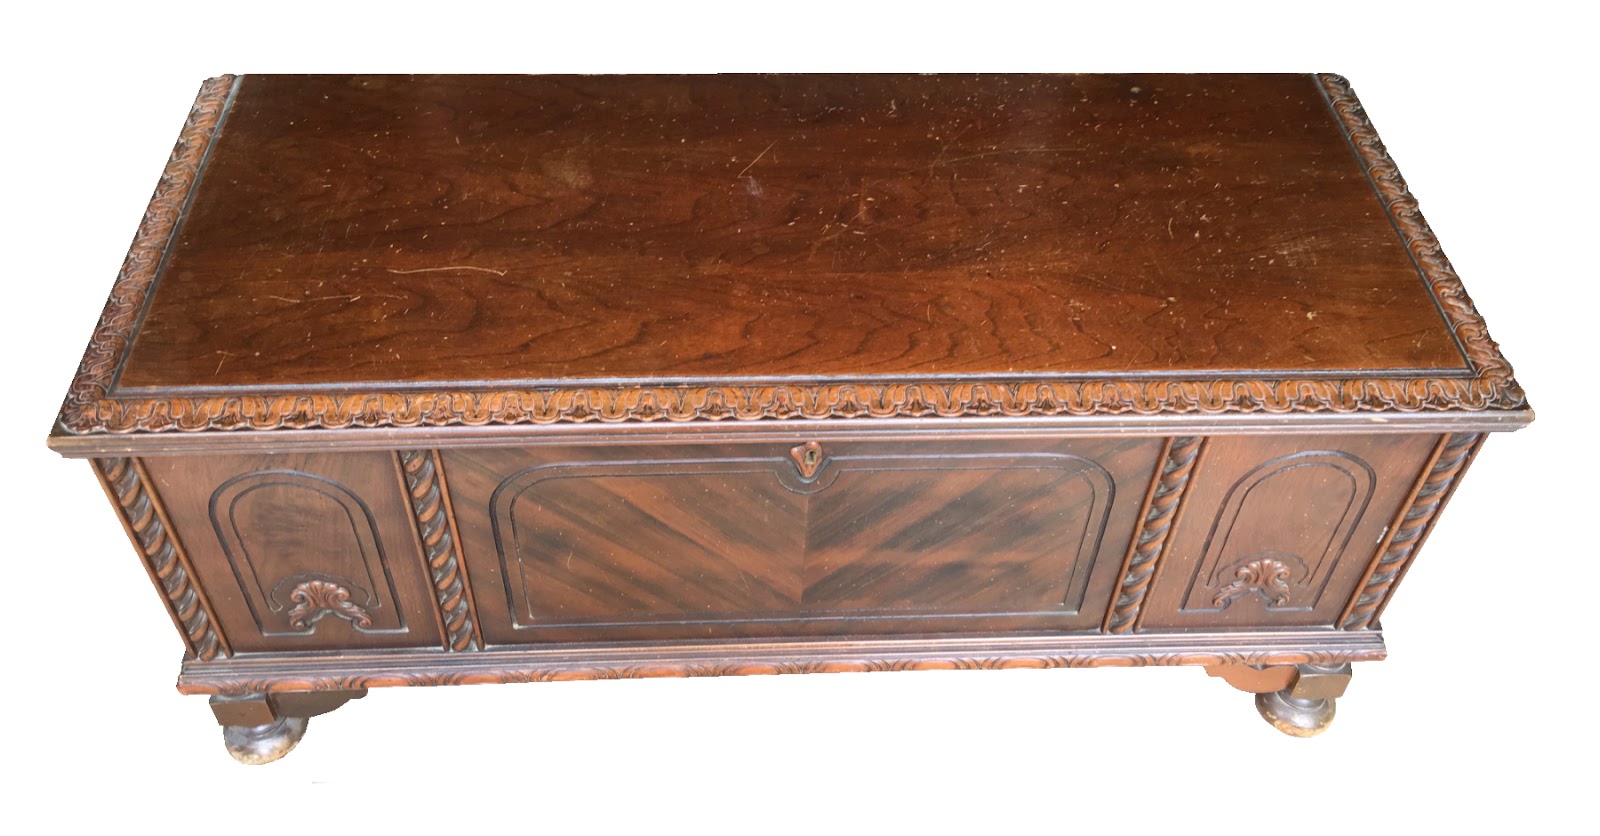
Cedar Chest Finished
I've refinished many cedar chests since I began working on furniture, but I don't often get cedar chests that are solid cedar. This is actually my second cedar chest. Take a look at my first one by clicking on the link below: (http://finalefurniture.blogspot.com/2014/10/solid-cedar-chest.html).

Like the first cedar chest, this one had no veneer and was made of solid cedar, although it was a bit larger than the first one. It also had a unique feature, two copper straps on each side, attached with furniture tacks. The copper had been quite tarnished, a natural process which happens over aging, therefore it needed its own restoration.


Cedar Chest Before
To clean the copper straps the proper way, I carefully removed them by using my vice grips and pulling off the tacks that held the straps in place. (Unfortunately eight of the original tacks snapped when I removed them and couldn't be salvaged). There were two long straps on the top and two shorter straps that continued down the front. I cleaned them individually, using copper cleaner, a toothbrush, a wire brush and a lot of elbow grease.

Left Strap Before
Eventually I removed the tarnish to reveal the beautiful original copper hidden beneath it. For the tacks, I used my handy dandy wire brush which is attached to my bench grinder and cleaned them up enough to paint them black, (making a mental note to look for new ones to replace the ones that had broken).

Like all my other stripping projects, I used a strong chemical stripper to remove the old finish on the chest, liberally applying it and using a metal putty knife to scrape away the messy brown goo and swiping it into an empty plastic container. I find this to be the most effective way to get rid of the first layer of
Left Strap After
old finish, then follow up with as many applications as needed to remove as much residue as possible.

Right Strap Before
Working with solid wood is so much easier than veneer, because one, it is easier to strip and two, it looks amazing when you get to the bare wood hidden beneath all that dull old grime. After the surface is no longer sticky with residue, I used steel wool dipped in acetone to remove any remaining chemicals before sanding. I always start out with a 100-150 grit sandpaper, eventually working up to a 220 grit, which gives the wood a smooth surface which will better accept the stain. After the sanding was complete, I wiped it down with a rag dipped in acetone or laquer thinner and it was ready for stain, my favorite part! This cedar chest didn't need stain, so I left it natural, but applied three coats of semi-gloss polyurethane to protect the surface.

Quick Tip: don't skimp on brushes when applying polyurethane! A cheap brush will not give you the quality and look your furniture deserves. Use a good brush with thick bristles and keep it clean between uses by soaking it in acetone and wrapping it in a paper towel. This will prolong your brush for many applications.

One of the rear legs was split in two, so I removed all the legs and refinished them each separately. The wheels had to come off, so Jim cut them with a bandsaw because they were impossible to pull out. The split wheel was attached with a "molly bolt," which expanded into the pre-drilled hole, making it impossible to remove without further
Right Strap After
damaging the leg. They too were made of cedar. I glued the broken leg back together, clamped it with my bench vice and screwed it securely back into the cedar chest after it was refinished.

Reassembling the individually restored components of any furniture project is always my favorite part, this one being no exception. The shiny, clean copper straps added a special feature to this old trunk and the painted black tacks gave it character. Luckily I was able to locate the exact same tacks at my local hardware store! They were called "furniture tacks," which are different from household tacks because they have a longer tack point and a rounded head.

Working on this cedar chest was quite satisfying, because hidden under years of old finish and scratches, was a gorgeous piece of aromatic furniture. The most confusing part of the restoration process though, was I didn't know if I should be hanging in a closet or running on a hamster wheel...😉

Monday, April 24, 2017

Decorative Walnut Antique Cedar Chest

Walnut Cedar Chest Before
Having refinished several cedar chests, this was definitely the most decorative and detailed ones I'd ever seen. I had no clue as to its age, as it had no markings on it, but judging by the way it was made and the materials used, I estimated it to be well over one hundred years old. It had no shelf on the inside, as many cedar chests do, but it was roomy enough to store many blankets, quilts and sets of sheets.

In order to properly restore this cedar chest in the best way possible, I removed the back decorative scroll, which had veneer damage, as well as the side scroll features, which were solid walnut, no veneer. The bottom of the chest was missing a back leg post and the veneer was damaged or missing. I knew this would be a major
Walnut Cedar Chest After
project, but to do it justice, it needed to be done right.

After removing the scrollwork, I began the tedious task of stripping the old finish with my choice gel stripper. Stripping is extremely messy work and requires several applications of stripper and many passes with a putty knife. The method I use is slow and steady, but gives excellent results. After liberally applying the stripper, I leave it on a bit, then slowly pull the putty knife toward myself (as to avoid gouging the wood) bringing a thick, gooey layer of the old finish and the now brown stripping compound with it, then swipe the entire mess into a plastic margarine container. (Never underestimate the use of these handy containers!) 

For the hard to reach areas of the cedar chest I used a wide selection of wood carving tools which are quite handy to get into the nooks and crannies, such as the front panel and beaded detail. I scraped as much old finish off as I could with the tool of choice, then used a small brass brush to remove residue I was unable to scrape off. I then used a steel wool pad to remove the rest of the residue prior to sanding. For this cedar chest I chose not to use my orbital sander, instead opting for hand sanding because of the beading and panel detail on the front.

Monday, August 22, 2016

1948 Lane Cedar Chest

Cedar Chest Before
Cedar Chest After
I found this lovely Lane cedar chest at an estate sale on my way to the grocery store. It was the last day of the sale and everything was half off! I was thrilled that this cedar chest was still there after a few people had expressed interest in it, but never came back to buy it. It was as though it was saved just for me. It was exactly what I had been searching for since spring. I was determined to find one that I could afford since I still had to put work into it to make it pretty again. My patience had paid off!

Monday, April 13, 2015

Elegant Cedar Chest Revival

Cedar Chest Before
This was a classic antique cedar chest, similar to the others we've done, but the first one with a combination lock on the front. It was in the family of my customer for many years, so she wanted it refinished to maintain of her family's treasures. It had seen better days, for sure, but that didn't deter us from making it better than new.

First, like most project we do, total stripping and sanding was in order. This revealed the beautiful linear design of this remarkable cedar chest. It was in great shape already, so a little refinishing made a huge difference. We were so glad the veneer was in tact, as many older chests lose their original veneer over the years, because they get used and see a lot of wear.

Cedar Chest After
After stripping and sanding, we applied a light stain which brought out the true beauty of the cedar. We added the proper hardware to the interior, which had an incorrect hinge set on the back and nothing holding it up safely. The front combination lock needed to be polished. It looked fabulous!

Once everything else was accomplished, a good interior cleaning and the chest was complete. My customer was speechless over the results. This chest was truly a unique piece of furniture which deserved all the TLC we could give it. Check out the other cedar chests we've worked on at these links: http://finalefurniture.blogspot.com/2012/06/my-waterfall-cedar-chest.html
http://finalefurniture.blogspot.com/2014/10/solid-cedar-chest.html
http://finalefurniture.blogspot.com/2013/12/1945-lane-waterfall-cedar-chest.html

Wednesday, October 29, 2014

Solid Cedar Chest

Cedar Chest Before
Cedar Chest After
A good friend had contacted me about refinishing an antique cedar chest that had belonged to his wife's grandmother. Up for the challenge, I took on the job with anxious enthusiasm. When he'd brought it over, it had one broken leg, the lower left front had been knocked off. Luckily, someone had kept that original leg, therefore it was easily fixable. I talked him into keeping the wheels, which added character and made the petite chest easy to relocate once it was refinished. After the repairs were made, it was ready to refinish.

Sunday, December 22, 2013

1944 and 1945 Lane Waterfall Cedar Chests

1945 Cedar Chest Before

1945 Cedar Chest After
I got an unexpected customer, a woman who lives in Kalamazoo (one of my favorite places!) who was in town visiting her parents who lived in St. Clair Shores. She had a cedar chest she wanted stripped, so her daughter could use it for a coffee table. She brought the chest over that same evening. It was a 1945 Lane Cedar chest. She had asked for a darker stain, so after I stripped and sanded it down, I applied walnut, which brought out the dark wood. I then added two coats of semi-gloss polyurethane and made some minor repairs.

Friday, June 22, 2012

My Waterfall Cedar Chest

Cedar Chest Before Restoration
Cedar Chest After Restoration
A few summers ago I went to an estate sale right around the block from my house. I wasn't looking for anything in particular, so you can imagine my surprise when I found this gem in the basement, covered with Christmas items! I quicklyran upstairs and asked the woman how much she wanted for the cedar chest. My heart was racing as numbers ran through my head. Surely, she'd ask at least $75.00 for it as it was well worth it. Other than surface scratches, it was in mint condition. The shelf on the interior was broken and its bottom was missing, but I examined it closely and found no broken veneer or other broken wood on the exterior. The interior looked as new as the day it was made and smelled strongly of cedar. I was so engulfed in my thoughts, I thought I misinterpreted what the woman had said about where it came from. I was already envisioning this beautiful 1940's chest restored to mint condition.

I asked her again how much she wanted for it and she tilted her head and said, "I don't know, how about $5.00?" I said, "Sold!" So I paid her for the chest and told her I'd be back in an hour with my husband and son to pick it up. Then I headed home in anticipation after I had message my two guys to make sure they don't stop anywhere on their way home from work because I needed them to pick up an item I'd purchased. Andy came over around 5:00, shortly after Jim got home from work and we all headed over to the estate sale on "Love" street, appropriately named for my lovely cedar chest. They loaded it up in the van and poor Andy had to squeeze between the chest and the seats since we had to put my "stow and go" seats down, but for the short trip home, it wasn't a biggie.

The cedar chest went right into the spare bedroom, but I got to work on the broken shelf right away. I repaired the broken side and replaced the bottom, then put it aside until I could get to the chest. With all the other project I was working on, I didn't get to the chest last year. I did some research on Lane cedar chests and discovered that each one has a serial number on the bottom. If you reverse that serial number, you have the date the chest was made. Mine was made on September 6, 1944.

Finally, this May, I stripped it down and refinished it completely. I lined the shelf with green felt and put it back inside and loaded it up with linens. I am now proudly displaying my $5.00 cedar chest in my spare bedroom. It was a once in a lifetime find and I'll treasure it for a long time!
Interior prior to fixing shelf
Interior with shelf installed