Showing posts with label detailed. Show all posts

Sunday, June 9, 2024

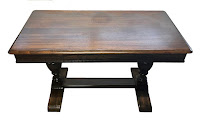
Antique Desk Refinish

Desk After
Desk Before
A beautiful antique walnut desk used by our customer's grandfather for his practice as a physician. It had been kept near a window and had a little sun damage, but other than that it was in great shape. 

The top was a bit worn as it had been used for many years. But overall, this desk/table served a great purpose for the owner's business use. In front is a drawer which is difficult to see in the photographs, but it was a nice feature of this lovely piece of furniture. 

Jim stripped it down to bare wood and sanded it carefully, maintaining the original details at the bottom edge. It had a sturdy base with two sidebar supports which made this desk a very stable piece of furniture. He chose dark walnut stain and satin polyurethane for protection. This makes a great family heirloom and can be used for many more years to come, serving the future generations well.


Thursday, October 14, 2021

Antique Mahogany Secretary


Secretary Before
The art of letter writing is almost a lost art. With the influx of everything
Secretary After

instantaneous with text messaging, e-mail and FaceTime, who wants to take the time to hand write anything? Yet, there’s something appealing to putting pen to paper and feel the words as they appear on your page. This antique mahogany secretary had been in the family for many years and had likely been witness to many such letters. It was probably used for bill paying, keeping track of household expenses and storing those stationary items to keep them accessible when you needed them. Because it was used quite a bit over the years, it was quite worn and needed refinishing. It’s hard to see in the picture, but the “after” photo shows new knobs, which were glass. (Unfortunately they don’t photograph very well.)


Secretary Inside After
Secretary Inside Before

Mahogany is one of my favorite woods to restore. It has such lovely patterns and tones that are rich with color and movement. This is a dream to strip and stain as it takes the new stain quite well. The interior also needed to be stripped, which is quite tedious because it had to come apart, otherwise you can’t reach those little cubby holes where envelopes are kept. It’s time-consuming work, no doubt about it. These things simply take a lot of time. 

There are no shortcuts to quality work. This piece, like many of that period, was a perfect size for a small office and a tidy way to keep track of those pesky papers you don’t want cluttering up your table. After it was stripped, sanded and re-stained then protected with two coats of polyurethane, it was once again a lovely piece of furniture that will be useful for many generations to come.

Thursday, September 16, 2021

Antique Chair Updated to 21st Century


Antique Chair Before

Antique Chair After
Every household has chairs, usually lots of them. There are as many styles chairs as there are other types of furniture, but not many other furniture items are used as much as chairs, therefore they tend to get more wear than other furniture. 

Antique chairs are unique because the materials used in the 1920’s or 1930’s were limited and not as “user friendly” as they are today. This antique cherry chair was in relatively good condition, meaning it had good bones, but was in dire need of refinishing and new fabric. The fabric on this chair was not only very worn and threadbare, but no longer usable and likely had a zillion or more dust mites. 

For this type of project, Jim takes care of the refinishing and restoration process while I handle the new fabric. Jim used a custom mixed stain consisting of 25% mahogany and 75% chestnut, which looked fabulous. When the chair was finished and protected with two coats of polyurethane, I took over and tackled the fabric. I don’t claim to be an expert upholsterer (I’ll leave that to my local expert) but I can handle certain projects. Seat covers is much easier than working with an attached seat because you must allow for the fabric to go around the arms and back of the chair, which is a nail-biting experience. 

This chair originally had horse hair stuffing for the back and worn out springs for the seat. My experience with chair springs isn’t terrific, so I prefer to replace them with a sturdy new wood bottom and 2” of high density foam. The foam is covered with thick batting for extra cush for the tush, and finished with the customer’s fabric of choice. My customer chose a lovely paisley pattern,  definitely a 21st century fabric. With the freshly refinished wood and the new fabric, this chair will last another 125 years.


Friday, February 14, 2020

Chairs Get New Spline Caning

Spline Cane Before
Spline Cane After

If someone were to ask what our most common refinishing job is, I’d have to answer “Chairs.” The reason is simple. We all use them, so we all have them and at some point in time, they will need to be either refinished, reupholstered, restored or in this case, re-caned. This dining chair was in need of a new spline caned back (only) as the seat covers would remain fabric (to be done at a later date).

This is one of a set of four chairs in need of new back cane. It is a “spline” cane style, which means that the back portion is made of a single sheet of caning then kept in place with a spline that keeps the cane sheet in place. This is the first time I have worked with this particular style of caning, which is known as Swedish woven. The difference between this type of cane and the more commonly seen antique cane is that these are double rows of perpendicular lines that criss-cross compared to “hole” style of cane.

When ordering caning supplies, it is very important to measure the width of the channel to get the right size of spline. If you order spline that is too large, it won’t fit into the channel, which can cause damage during the tapping which is an essential part of the installation. If you order spline that is smaller than the channel, it won’t fit tight enough to keep the cane from coming out, so ordering the proper size is key.

Cleaned out channel
The hardest part of this process is removing the old spline. For these chairs, I used a combination of tools; chisel, needle-nose pliers, wood-carving tools, hammer, and then later (after I ordered it) a spline-removal tool, which is exactly the perfect tool to get beneath the old spline and smack it until it lifts up. I then used a small chisel to loosen any remaining spline that stuck to the inside of the channel.

Note: Cane must be soaked prior to installation. I soaked the cane and
Soaking Cane in Tub
spline (in my bathtub) for over an hour. (My little cat, Sadie is supervising!) Soaking spline and cane together is necessary, so that the spline can be manipulated around the tight corners that bend along the edges of the chair. It is okay to leave the everything soaking while you continue to work on each chair. By the time you get to the last chair, your cane and spline will be pliable enough to work easily. The first one is always the hardest one to work on.

I used Frog tape to protect the chair from accidental scratches while removing the old spline. Once the spline was removed and the channel cleaned out, (see photo at left), it is ready to accept the new cane and spline, which gets tapped into place with hammer and caning wedges. This process is tedious and time consuming and you really must focus on the work, which means no distractions!

The basic dynamic of installation is the same as hole cane, but the challenge of this style is to keep the rows straight vertically as well as horizontally, as they tend to shift while you install the spline. Once you have tapped the cane down enough to accept the spline (keep it in place with caning wedges) you can then carefully apply clear drying glue into the channel, then follow it with the new spline, being conscious of carefully bending and fitting it around those tight corners. (If your chairs have larger curves, it is much easier to install spline).

Of the two ways of cane installation, spline or hand weave, this is the “easier” way to do it, but that doesn’t mean it’s simple. It takes precision, patience and the right tools to do it right.

Wednesday, September 4, 2019

Tiger Oak Chair Refinished


Tiger Oak Chair Refinished
Tiger Oak Chair Before
This very old chair was one of the most unusual chairs I had ever refinished. I nicknamed it “The Bulky Chair,” because it has very manly characteristics, with wide armrests and a sturdy frame. The original caning was still intact, so I left it alone. Hidden under man-years of oxidation which causes the finish to darken, was a beautiful tiger oak finish, waiting to be visible.

I began by painstakingly removing the old stain and varnish (always a messy job) which took almost a week with a few hours per day dedicated strictly to this chair among other ongoing projects. The right armrest had a large ring stain on it which took a lot of patient sanding to remove as the stain had penetrated into the fibers of the wood.

It looked like a black paint can had been left there and had soaked into the armrest, thus leaving a dark ring which would not come off after stripping alone. After tedious sanding, starting with 80 grit and working up to 220 grit, I was able to remove the unsightly ring. I simply couldn’t leave it there, as it would have been visible even after the new stain was applied. It’s always best to remove marks that have been left whenever possible because it makes for a much cleaner finish. The hard work paid off!

The nature of chairs, with various sizes and surfaces, generally require a lot of hand sanding, especially when there are spindles. Because of the spiral legs on this chair, I used sandpaper exclusively, since curves such as these could not be sanded with a power sander. As you could imagine, this took a great deal of time.

I chose chestnut gel stain, which proved to be a great choice as it brought out the gorgeous tones of the wood. I let it dry for a day, then finished it off with two coats of satin polyurethane, waiting a day between each coat. So after about ten days, the chair was completely refinished.

Made of a unique style of tiger oak, this chair was a great candidate for refinishing. The seat was easily removable and made of black leather, adding to the “manly” style and size of the chair’s design. I believe this is a one-of-a-kind chair, much like the German Rocking Chair I had refinished many years ago. You can read about that chair by clicking on this link: https://finalefurniture.blogspot.com/2012/06/antique-secretary-desk-german-rocking.html

Tuesday, June 18, 2019

Very Old Pie Safe

Pie Safe Before
Pie Safe After

This pie safe was very, very old. My customer had told me it belonged to her great-great grandmother and had originally come from West Virginia. She believes it dates back to the mid-1800’s. It is one of the oldest pieces of furniture we have restored and refinished so far. (Another one is a steamer trunk, also from the mid-1800’s which will hopefully be done this month, so stay tuned!)

This pie safe had been through many, many years and oh, the stories it could tell if it could speak! It had been around during the civil war, the great depression and had paralleled the election and death of many presidents as well as welcoming many children, grandchildren and great-grandchildren to this world.

While it had “good bones,” it needed a great deal of work and of course, time. The top was bent and warped, the metal and body had been painted numerous times and was literally “caked” on, so it made sense to take this oldie apart and restore each piece separately as this allowed better access to the metal work and gave Jim a chance to straighten out and repair a few things, such as the broken bottom drawer and bent, warped top.

After removing a few layers of paint from the body, Jim painstakingly began a 7-week process of removing all the paint from the tin, which had a lovely pattern which was all but hidden beneath that paint. He chose to use a drill bit that matched the size of the holes to remove the paint which had seeped into each hole, then used a wood carving tool to remove the rest. This was a very long, tedious process, but it was the only way to do it right. Once done, he had to prime then paint the metal and let it dry completely before I could paint the body.

The customer had originally wanted the pie safe stripped and stained, but once the old paint was removed, the wood used to create this pie safe wasn’t stain-worthy, so we opted for painting it white with copper spray paint for the metal inserts which had a beautiful circular design, practically invisible under all that paint. The copper was an excellent choice, as it highlighted the beautiful paint color, Sherwin-Williams "Cotton White.” For a finishing “fun” touch, I selected polka dot knobs to replace the old wooden ones to add a touch of whimsy.

After this old beauty was done, the results were absolutely stunning, one which will go into our “Finale Hall of Fame,” for sure. Definitely a great and beautiful item of furniture which will be lovingly used for many years to come.


Monday, June 17, 2019

Ship’s Wheel Stripped

Ship's Wheel Before
Ship's Wheel After Stripping

Every once in a while we get an unusual job, not your everyday furniture. This teak ship’s wheel was such a job. He had also brought two other small things, a cup holder and a t.v. remote (or cell phone) holder. The customer had wanted this ship’s wheel to match his boat, so he wanted it stripped only. He would take care of the staining.

I started with the wheel lying flat on the table, then decided it would be easier to work on in an upright position, so I had Jim cut a small hole in my work table and I used this to position the ship’s wheel in it and spun it as needed to get into all the small areas on the spindles. It turned out to be a great idea as it helped me access areas that would otherwise have been very difficult to reach otherwise. This ship’s wheel took a full three days of detailed, time-consuming hand-stripping and sanding to remove the worn, peeling polyurethane.

The wheel had no stain on it, just polyurethane, but had begun to wear off and in some areas had suffered water damage. While sanding, I focused on those areas, but after it was to be stained, it would cover those areas completely. When I had completed the sanding, I took an old toothbrush and used brass cleaner to remove the oxidation from the center, which was made of solid brass. It look great when all that oxidation was removed and with a bit of elbow grease and brass polish, it shined up and looked brand new. This final touch made the ship’s wheel look great.

Ship's Wheel hole in Table


Sunday, June 17, 2018

Dresser Chalk Paint Makeover

Dresser Before Chalk Paint
Dresser After Chalk Paint

It's hard to believe that this lovely oak dresser was once used to store tools. It had been in a garage for many years being used as a tool bench and work surface so there was a bit of warping, but overall it was still in great shape. Although it had seen better times, the bones and structure were still good and we knew we could make it pretty again. We were both up for the challenge. (This was the last item in the "chalk paint makeover" using Annie Sloan's chalk paint.)

This dresser required some carpentry work before any painting could be done. The top had been split into two pieces, so Jim had to "biscuit" the two sections together and clamp them tight, then fill in the seams so that once painted, you would never know it had been broken. The left front leg had its back part broken off completely, so Jim re-engineered a new leg section, forming it perfect to match the right leg which was still in tact. Some of the drawers didn't open and close very well, so they required a bit of shaving on the table saw.

After he was done with his part of the job, I then sanded the sides and got busy painting. For this dresser, I mixed three parts graphite with one part French Linen which yielded a gorgeous color of a slate-ish gray, perfect for this particular piece of furniture. The thick, rich paint went on smoothly and looked terrific. I knew I would love this piece, since I just knew it would take on the largest transformation of the other pieces I had painted. Using clear wax on the entire dresser with black only on the bottom for accent was just enough to give it a sultry, rich look and a durable surface

The new brass drawer pulls provided the last touch of "bling," which was absolutely the crowning jewel for this amazing old girl. Wow!

Thursday, May 14, 2015

Birch Wine Bar

Bar Before
Bar After
This simple bar was quite the challenge! Made of solid birch, this bar was in my customer's family since the mid-1960s. We received it in the condition it had been for over 50 years, painted white, with more than its share of scratches. Old hardware dated this piece, so we had our work cut out for us. 

You never truly know how much work a piece is going to be until you get into the "bones" of it. Stripping this small bar was deceptively difficult for a few reasons; there was a lot of surface area and the raised panel details as well as the legs and inside was an enormous task. The interior glass holders each took close to two hours to strip. When you strip painted surfaces and plan on staining them, it's necessary to remove every speck of paint. If you don't, the stain will not be able to soak into the wood as those tiny paint specks remain and stick out like the proverbial sore thumb. 

Tuesday, July 23, 2013

Antique Round Table

Antique Table Before
This was an adorable little antique table I found up at an estate sale last year, around September, 2012. I had begun working on it late summer and didn't finish it until spring, 2013. It far exceeded my expectations as far as the amount of work I had to put into it. It required a great deal of sanding as it is made of cherry (typically very hard to work on) and the details, such as the "button style" feet made it indeed a difficult piece to sand. The "fluted" top edge makes this a special little table as it shows the craftsmanship that went into it so many years ago.
Antique Table After