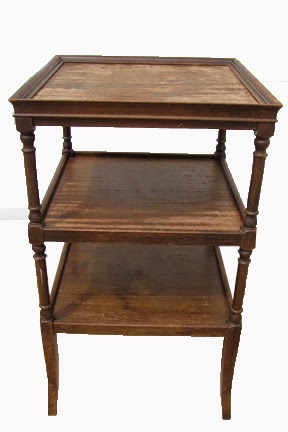
Showing posts with label refinish. Show all posts

Monday, March 26, 2018

Antique Oak Folding Table

Folding Table Top Before
Table After
Every so often we will get an absolutely divine piece of furniture such as this antique folding table made of solid oak. As a furniture refinisher, I prefer working with solid wood over veneer because you can't beat the outcome of a great piece of wood that most antique furniture is made from. To be a true antique, an item of furniture should be at least 100 years old, otherwise they are considered vintage.

Tuesday, September 5, 2017

Dining Table Top Refinished

Table Top Before
Table Top After
We all know how much we use our tables, therefore the top of them tends to get plenty of use, which is okay, because that's what they're for. This solid oak table was purchased twenty-five years ago and got plenty of use, so the top had some wear on it. Nothing too bad, but enough to justify a refinish, top only. It also had two leaves, so the owner wanted those refinished as well.

This great table was made by the Amish and the quality of the workmanship showed. Amish are known for their precision and attention to details as well as simplicity in structure so their furniture is easy to use and guaranteed to last a long time. The woodgrain of this table was beautiful, which became apparent after I totally stripped the top.

I kept the leaves on the table and stripped them in place (much easier) and made sure the sides of the

Tuesday, April 4, 2017

Artistic End Table

End Table Before
Leather on an end table such as this was commonly used for furniture as a decorative effect for the top. It worked nicely when new, but over the years these tables' leather got pretty beat up. Scratches, gouges, tears and discoloration became more common than shiny new leather and it no longer looked pretty, just old and worn out.
End Table After

While I wasn't quite sure what I would do to replace the leather which was peeling up on one side, it needed to be completely removed, which had proven to be quite a task, as the non-lifted portion adhered quite well. I had to use a small heat gun to soften the adhesive enough to carefully slip my putty knife under the leather and slowly peel it off the wood. It took about 30 minutes, but I was successfully able to lift the last corner of the leather and tear it off. Goodbye old leather, hello new design.

I used a chisel to scrape remaining paper left by the leather section, then sanded the surface smooth. While I was unsure exactly what I would do to replace the leather, I knew that when the time came, I'd have exactly the right treatment, so I got to work on the rest of it. I stripped, sanded and stained the end table using cherry stain, which brought out the gorgeous tones in the cherry wood the table was made from. Making a decision on stain can be tricky, since you don't really know how it will look until you apply it. A darker stain would have hidden much of the wood grain, so cherry was the perfect choice for this end table.


Once stained, I put this table aside while working on other furniture items for this project, (while my I left my subconscious work on the creative side of how to make the top stand out). Eventually I had formulated an idea which involved my trusty carpenter, my husband Jim. I had asked him to make custom veneer sections out of oak and mahogany, so he sliced up sixteen 1-1/2" sections of veneer, more than enough to experiment with a workable design for the tabletop.
End Table After

Using the freshly cut veneer sections, I laid out the pieces and worked up a design, much like one would put together a puzzle, only you create the design as you go. It took a while as I played around with the length of each piece, layout and design, but eventually I had created a random pattern I was satisfied with, then applied adhesive to the table and each veneer section, then let everything dry for fifteen minutes before I carefully positioned each section into place. There's no forgiveness when you work with adhesive cement on both sides of the wood. Once they're down, they're down, so it's a good idea to "dry fit" them before you apply the adhesive.

After sanding the tabletop to get all the veneer sections level, I applied golden pecan stain. Because of the two distinct woods, each wood had taken on a different tone, which created an interesting, artistic and contemporary tabletop. Once the stain was dry, I applied two coats of polyurethane to the lower areas and legs of the table and three coats to the top for added protection. It looked fabulous! This was definitely one of my favorite projects as I was able to blend the craft of refinishing, with the art of creating a custom made veneer design that gave this old beauty a modern, updated look.

This table was one of four pieces of furniture we did at the same time. Click on the links below to see the others:

http://finalefurniture.blogspot.com/2017/04/antique-secretary.html
http://finalefurniture.blogspot.com/2017/04/antique-writing-desk.html
http://finalefurniture.blogspot.com/2017/04/antique-piano-bench.html

Sunday, January 22, 2017

Family Heirloom Buffet Restoration

Buffet Before
Buffet After
This lovely old buffet was handed down to a man who wanted to preserve its history and keep its place in the family. It had been crying out to be refinished, as it had seen a lot of use over the years, showing wear. The top was splotchy, scratched and had remnants of water stains. The sides had water stains as well. The entire piece needed some major TLC and detailing, so we got straight to work.

Each restoration project has similarities but differences too. This one needed to be taken apart first; remove the cabinet doors, take off the hinges, remove the handles and sand all the pieces individually then tackle the body. The top back piece was not in place and had to be reconnected to the buffet. The sides were the only part of this piece that had veneer, which had split on the bottom. Once everything had been stripped and sanded, each piece got stained.

Saturday, January 21, 2017

Antique Wash Stand Refinish

Wash Stand Before
Long before indoor plumbing was introduced into society, people used a large basin and a wash stand such as this early American style to clean up after a busy day of working in the fields or at a factory.
Wash Stand After

With the ultra-modern technology available to us in this twenty-first century, it's hard to imagine life without a steam shower or a soaker tub, but people made use of what they had. This wash stand restoration was a pleasure because it was made of solid oak and pretty much exactly the same as it was well over a hundred years ago. It had seen some wear, to be sure.

If this wash stand could speak, it would have plenty of stories to share. I wonder how many people used this old beauty to clean up over the years? Did it belong to a man who had seen his

Wednesday, November 2, 2016

Edwardian Console

Console Before Refinishing
Console After
This console was an extraordinarily large piece of furniture. It's hard to judge the scale of this piece standing alone, but it comes up to the center of my five foot frame and is approximately six feet wide and twenty-one inches deep in the middle.

It had many surface scratches and had seen some wear, mostly on the top where the veneer had worn off and on the sides where the veneer had peeled off on one side and was half gone on the other. Before anything else could be done, I needed to repair that veneer on the one side and add a section to the missing left side. Luckily I was able to match the existing veneer pretty close. With veneer it's a gamble, because most of these pieces were done many years ago and the veneer they used was quite different from today's selection, but I was satisfied the veneer was appropriate for this piece and blended quite nicely.

Thursday, October 27, 2016

Table Top Makeover

Table Before Refinishing
Table After Refinishing
This tabletop had seen many years of use and was crying out to be refinished. It was also extremely heavy, therefore needed a firm grip just to get it onto our work surface. Made of solid birch and about 1-1/2" thick, the table seated at least 8 people. The legs required nothing because they were made out of metal, which was a perfect foundation to turn this 1980's table into an "industrial urban" table. Giving new life to an outdated piece of furniture is the greatest reward of the inevitably tedious amount of work that these projects require.

Saturday, August 20, 2016

Cheap TV Stand Makeover

TV Stand Before
TV Stand After Paint
This corner tv stand was a very lucky find for me! I had been looking for something to replace the "too tall" temporary tv stand with something lower, since the antique cherry cabinet I had used was too high and blocked a significant amount of light from the window, making it hard to open and close the curtains.

We simply don't have the time to build an adequate tv stand right now with everything else we're trying to accomplish outside before the weather turns cold, so finding this little gem was an unexpected surprise, especially since it cost me only $5.00!

Thursday, August 18, 2016

Beautiful Oak Table Refinish

Oak Table Before
This great oak table had strong "bones," but the surface had minor surface scratches and required gentle sanding and a new finish of golden oak stain to create a better than new look. Oak is one of my favorite woods to work with because it handles sanding well, allowing the grain, commonly hidden by layers of grime and
Oak Table After
wear, to come to light. 


Decent sized, this table was the couples' primary dining table, so I made sure I put a "rush" on it and got it done quickly. Lots and lots of sanding and three coats of polyurethane, this little gem was once again a great piece of furniture that can be used for years to come.

Wednesday, February 24, 2016

Tea Cart Repair

Tea Cart Before
Tea Cart After
This lovely antique tea cart was in need of a broken wheel repair along with refinishing the lower shelf which had seen its share of scratches and wear. Evidently a caretaker who takes care of the owner's ninety-one year old mother had somehow tipped over the cart, breaking the wheel into several pieces.

Made of maple, this tea cart had a gorgeous finish, which I strived hard to maintain while refinishing it. The wheel, however, was a bit of a challenge as it needed to be completely rebuilt.

Using a section of wood that looked close to the original wheel, we were able to make a template of the unbroken wheel, then cut out a brand new one with a scroll saw. The outside of the wheel had to be carved out with a lathe, so that the rubber gasket could be wrapped around it as it had been originally. The finished, repaired tea cart was as good as new and ready to be used for another one hundred plus years.

Tuesday, October 27, 2015

Antique Desk Cabinet

Cabinet Before
This lovely old cabinet came to us in less than perfect condition. It had seen a lot of use over the years, judging by the scratches and wear, however, we were able to detect the high quality of the wood (tiger oak) and the overall structure of the piece and knew we would be able to breathe new life
into it making it shine again. 
Cabinet After

We determined that this cabinet once had a large door, likely glass, which had opened on left side where the shelves were located, but the owner no longer had the door and didn't mind not having one. The cabinet had only three of the four original wheels. Luckily we had the same style of wheels leftover from a previous job, so we were able to add the fourth wheel, making this piece much easier to move around. (It's a good idea to save hardware!)

Monday, September 29, 2014

Charming Antique Desk

Desk Before
Desk After
This antique mahogany desk was an amazing yard sale find. Although the top left edge molding was broken, the bones were good, more importantly, the handles were all intact, a huge plus! I also knew it was a big refinishing job since I wasn't sure how to replace that top rail.

My first goal was to remove all the hardware before stripping the entire desk. I put all the pieces in a closed container so I don't misplace them. (This is the preferred method to which I keep track of small items.) This desk was unique, since all four sides needed stripping, as the backside can face the room if chosen. Normally the back of furniture remains unfinished, since most are placed against a wall. Because the back had been allowed to be seen required additional stripping and sanding.

The edge molding needed a great deal of detail sanding with an orange stick, all done by hand. The lower left edge molding was missing, so that too would need to be addressed. I ended up scrapping the top molding because it would be impossible to replace it and have it look the same, but not all was lost as I was able to salvage it and create the missing molding on the center drawer edge as well as the missing molding on the lower left inside of the desk. That was I was guaranteed to match the red mahogany stain, while maintaining the integrity of the piece.

After I removed all the brass hardware, I started the intense stripping process. It was quite time-consuming, between camping trips and other projects. I would spend evenings sitting on my desk polishing the various components of the hardware. Each drawer had seven (7) individual pieces; the handle, two coin-shaped brass rings, two screws and two nuts, which were round, making them a bit challenging to remove. This is one of the features of a very old piece of furniture; the hardware is usually not exact and quite different from modern hardware, down the the nuts (no pun intended.) I used copper cream, which works beautifully to remove tarnish from brass, then an actual brass polish to really give it a shine.

Taking the extra time to clean the hardware to its original condition makes any furniture piece look 100% better! The clean hardware is the "bling" to the furniture's new finish and well worth it.

Thursday, June 19, 2014

Dressers Painted Black

Dresser Before
Dresser After
I found this little treasure at an estate sale along with another dresser (at bottom, which also had a special design detail at the lower edge). I especially loved the top drawer, which was slightly longer than the other three and had a great curvy top, reminding me of an Art Deco style. The dresser was pine, and while the wood was in great shape and would have look good stained, I chose black paint instead.

I knew the two dressers would look great painted black, as long as I could find matching knobs. As always, a full stripping was necessary before priming and painting. I was fortunate to find online sixteen knobs that were light gray porcelain with a "crackled" look. This was the detail needed to link the two different style dressers together so that they made a matched set. It never ceases to amaze me how much paint changes the look and feel of a piece of furniture. In this case, choosing the right paint linked two totally separate pieces together as a matched set.
Dresser Before
Dresser After

Oak Mantel Stained Darker

Mantel Before
This beautiful oak mantel was quite challenging because of the intricate design with fluted sides and so much detail in the top. There was also a hearth, which I took no photos. (Unfortunately, I didn't get a vertical photo of the mantel before I began stripping it.) My customer wanted a darker finish, so the first step was to completely strip the wood surface of its coating, which proved to be time-consuming and labor intensive work.
Mantel After
The process was to first completely remove the old polyurethane with a strong gel stripper, first using a large brass brush, then going into the grooves with a smaller brass brush, then finally gently scrubbing the surface with a #0 steel wool before the final coat of sanding with a 200 grit piece of sandpaper.

It was a couple of days before I was ready to apply the stain, which was "General Stain Java Gel," the customer's choice. I had not worked with a gel stain before and found that not only was the stain spectacular to use, it had a "cherry" fragrance,  not the typical "chemical" odor you expect from a chemical stain. It was thick and easy to work with and left a deep, rich finish after two applications. The end result was an elegant, rich darker mantel which the customer loved!

Friday, August 9, 2013

Antique Dresser Painted Black

Dresser Before Paint
I picked up this sad-looking dresser at a garage sale on the street I used to live on twenty years ago, right here in St. Clair Shores. It was smothered with kid's toys and dishes in the corner of their garage. I knew it was a buried treasure, so I asked the owners if they could pull it out for me. It was a little scary looking but I'm not that easily intimidated by old furniture. The scarier it looks, the better it turns out!) Bring it on! I had a vision and it was to be another black dresser with white knobs. So I bought it and had two young men load it into the back of the mini-van.

First thing was to take photos. The next step was to replace the sides as they had water damage and were deteriorating, but otherwise, this old piece was in amazingly good condition. After the repairs, Jim sanded the entire thing down to bare wood and primed, then painted it. Black was a great choice! Isn't it amazing what a little elbow grease and paint can do?

Here's another terrific dresser that needed paint and love: http://finalefurniture.blogspot.com/2013/08/petite-old-dresser-goes-modern.html
Dresser After Paint

Buffet Painted Black

Buffet Before Painting
A customer on Craig's List contacted me about painting a
buffet. She was undecided on the color, so I suggested she go mat black. It turned out to be a great choice. You simply can't go wrong with black paint. It's a versatile classic that matches any decor. What a great piece of furniture!

This piece was solid mahogany and needed lots of TLC, sanding and patience, but the results speak for themselves. The customer decided to keep the original handles which take on an entirely different personality with the elegant black paint. After a lot of sanding and clean-up, this buffet is better than new!

Buffet After Painting


Friday, August 31, 2012

Telephone Table With Cherry Stain

Telephone Table Before
Telephone Table After
Looks can be deceiving and this one looked like it would be "a piece
of cake" to remove the old stain and simply re-stain. Yeah, right. It proved to be quite the challenge as that old stain simply REFUSED to come off. I have three power sanders and lots of sandpaper and I used all of them to remove the extremely stubborn old finish on this old cherry telephone table. This was a client of mine who also had me refinish her red magazine rack. I had no idea this piece would be as difficult as it was! I spent the better part of 1-1/2 days just removing the old finish, but I was determined to make