Showing posts with label stained. Show all posts

Tuesday, March 23, 2021

Oak Teacher’s Desk Revival


Teacher's Desk Before

Remember elementary school? Do you still remember your teacher’s desk? Well, this was once a teacher’s desk that used way back in the day of notebooks (not laptop computers), pencils, typewriters and maybe even an apple on the teacher’s desk. 

Unlike the desks I remember from my early school years, this one had a unique feature; a slide-out, built-in filing cabinet with many cubby holes and slots for letters and other teacher-ish items. I had never seen a desk like this one. And you can imagine how extremely heavy it was!

Teacher's Desk After

The desk top had been destroyed by fire. Our customer thought the top had water damage, but upon closer inspection, it was fire, not water that had destroyed the top. We also noted that the original desk was likely a roll top, which was no longer part of the desk. Unfortunately the top’s damage was so severe, it was not able to be restored. It had to be replaced. 

We generally prefer to use the original pieces of our furniture restoration process, but when that isn’t an option, we rebuild it to resemble as closely to the original design as possible. The burnt top was comprised of border sections surrounding the center sections instead of larger boards simply glued together to create a uniform, single directional top. This was more involved and complex than a directional top and required much more wood in various lengths, but the new top was outstanding when it was done. Jim did a tremendous job in rebuilding the  top to best represent the original one. If I was the teacher, I’d give him an A+!

Tedious would be an understatement in describing the process of refinishing and restoring this desk. Every drawer had to be removed and labeled. The pull-out filing cabinet was its own entity that required even more disassembly and extra steps. The unique part of this little cabinet was that it rotated so that the teacher could easily access the files in the back. It also had its original snap-in alphabetical folders that the teacher probably used to keep track of her students. The handles did not come off, so the stripping and sanding process involved keeping them in place and working around them. The inside of the desk,  as well as the back, also had to be stripped, sanded and refinished. The stain used was golden oak with satin polyurethane to protect the desk for years to come. 

Burnt Top
Newly Built Top

Monday, March 22, 2021

Antique Windsor Chair Refinished


Windsor Chair
Before
This is what is called the “Windsor” Chair. It has the classical round form with spindles on the top and bottom of the chair, with the center split and mounted on a curved flat platform that turns into the top of the armrest. These chairs come in plain or rocking chair styles. 

This chair was over 100 years old and original in its antique styling and manufacturing. It had a center split that had been repaired before we got it, however, the stripping on this type of chair is very intense and takes a long time. (We hate spindles!) Not only did it have spindles, it had two spindle bases, one in the center and one on the bottom seat, therefore making the stripping much more time-consuming. 

Windsor Chair After

One of the most difficult part of refinishing this type of chair is that no power tools can be using when sanding, therefore, everything is hand sanded which adds to the time spent removing the entire old finishing. Some chairs are easier to work on than others. This one was not an easy redo because of the spindles, upper and lower. The chair was made of sturdy walnut, so that’s the end choice color we used to stain it. 

Finished and protected with satin polyurethane, it actually turned out beautiful, despite the splotchy look on the bare wood, which is characteristic of old furniture once stripped. If you ever wondered why chairs cost so much to strip, try your hand at one of these and you’ll understand. It’s a very tedious process and takes many, many hours and lots of patience and of course, the right tools to do the job. The most important tool is patience and tenacity. 

Monday, March 1, 2021

Maple Table Makeover

Refinished Table

Nothing says family more than a large dining room table. And, because we love our tables, we use them a lot! Therefore, they take a lot of abuse and as a result, get worn, scratched and marred with the passage of time. This is a very large maple dining table with a leaf that showed signs of wear on the surface. 

Luckily there weren’t any super deep gouges, so it was doable to strip, sand and stain the table and bring back its glory. Choosing a newer, darker stain, mocha, brought out the natural woodgrain and tones of the table which seemed hidden by the wear previous to refinishing. Finished off with three protective coats of satin polyurethane, this worn out table was once again a shining star, ready for many family meals.
Table Before Refinishing


Friday, January 15, 2021

Checkerboard Antique Card Table


Card Table Before

Card Table After

Every once in a while we get a totally unique piece of furniture that is one in a million. One of the many aspects of furniture restoration is the wide variety of items that come our way. It’s always a surprise! At times the surprise comes when we see it. Other times the surprise comes after we remove the years and years of grime to reveal the beauty beneath it. This antique card table with a checkerboard center was such a piece.

It’s hard to know origins of furniture, such as how old an item is, where it was made, what kind of wood is was made from. We have seen mostly oak, walnut, cherry and even some more exotic woods such as bloodwood and olive wood. At times we’ve seen wood we can’t easily identify. With this unique table we quickly realized it was made of many types of wood combined to create a work of art which ended with a center design in a checkerboard or chess table.

However, it was completely covered with years of grime, dirt and who knows what else. Hidden away in a garage for over thirty years, this table was likely overlooked and became part of the back storage of the space it occupied until my customer yanked it out with the intention of getting it refinished. It looked like a major undertaking since there were many pieces of wood missing that would have to be replaced as well as all that grim removed with stripper and carefully sanded so that none of the wood would be destroyed in the process. And yes, each piece of wood you see has been individually placed into the table! This alone makes it a highly unique work of art. 

Once stripped, the gorgeous wood beneath was exposed. It was comprised of maple, bird’s eye maple, walnut and mahogany. Since many of the original tiny pieces were missing, it was necessary to cut and carefully place each missing piece in its place so that it blended in with the table and look as if they were always there. As you can imagine, this was a very time-consuming process. After all those missing pieces were installed and glued, it was then stained and protected with four coats of strong polyurethane so it will hold up for another one hundred years at least. A timeless beauty can say, “Checkmate.”

Card Table Before
Card Table After

Oak Dresser Hidden by Green Paint


Dresser After Stripping

Dresser Before Stripping

This little dresser is similar to a few others we’ve done that had the same overall look and design. However, this one was painted green. In our experience, sometimes when a piece of furniture is painted, there’s a good reason for it. Upon stripping this little dresser, we discovered that one of the drawers had a “patch,” which meant that someone had added a different type of wood that didn’t match the original oak that was used when it was built.

Luckily we were able to apply the stain so that it covered the entire piece in a way that looked as it would have looked originally. Likely, it had never been stained, just painted after it was built. It was old though.

When painting furniture, it usually doesn’t matter if wood styles are mixed because the paint covers it all evenly. But when a person wants something stripped and stained, refinished per se, if the wood is patched with non-original wood, this results in a variance of stain colors since different types of wood accept stain differently. 

A good example would be if you apply a dark stain to a light wood such as pine, it would certainly darken the original raw wood but wouldn’t be as dark as if you used the same stain on walnut, which is a darker wood to begin with. It’s always easier to go darker upon refinishing/restoring but much harder to go lighter. Not to say that it isn’t possible to do this as it all depends on the type of wood that was stained originally. Sometimes you simply don’t know what the raw wood will look like until it is stripped as years and years tend to oxidize the wood, making it darker than the original stain. Most of the time the wood, when stripped and completely sanded, is much lighter than the old finish. This allows for plenty of stain choices as it is fun to experiment with how the various stains draw out the wood’s original beauty. This is one of the most rewarding aspects of refinishing...seeing the final results when applying the stain. Ah, it’s pretty once again!

Wednesday, November 18, 2020

Antique Mahogany Swivel Table


Swivel Table Before

Another beautiful swivel table! This antique was made of mahogany with brass accents. The lower portion of this table had a unique “harp” design with three brass prongs, that cleaned up real nice. The top was in rough shape and had seen years of use, including water damage likely from placing a planter directly not the wood. It’s always a good idea to have a planter with a tray or aluminum pie tin to eliminate water damage. 

Swivel Table After
This table was in need of stripping, sanding and new stain. We chose special walnut stain and three coats of semi-gloss polyurethane to ensure protection from everyday use. All the brass accents, feet, harp metal and two small knobs (not seen in photo) were cleaned and polished. Polishing the brass, truly accentuates the refinishing process. It also adds a special “bling” to any piece of furniture, much like the right jewelry does for an outfit.

This style of table is used for playing board games or cards, as it has a “secret” swivel compartment beneath the top that is accessible by rotating the table 90 degrees, then opening one side to reveal the compact area beneath, just large enough to hold note pads, decks of cards and paper goods. When not being used as a game table, it folds in half and can be pushed right up against a wall and used for decorative accents such as plants, lamps or collectibles. Now that it has been refinished, this table will likely be used for many card games and other fun activities.

Friday, November 6, 2020

Antique 19th Century Caned Chairs

Antique Chair After
 
Antique Chair Before

Here we go with more chairs! This time it was a set of four (4) chairs, all in need of TLC. These chairs dated back to the late 1800’s, so they were 19th century chairs that had seen a lot of use, therefore a lot of wear and tear, literally. 

Originally the chairs had caned seats, but over time they likely broke and someone decided to cover the seat with stamped leather, or rather, a leather-look-alike that seemed more like a heavy paper between layers of very thin leather. Broken and no longer able to seat a person, it was high time to remove the leather “fix” and replace it with the original woven caning. But first, the chairs all needed to be stripped, which for this type of chair is very time-consuming because (you guessed it), spindles. Yup, spindles are what takes a long time to strip because there are many of them and they are rounded, making them inaccessible from one angle, therefore it’s necessary to rotate the chair continuously while stripping. 

A chemical stripper was the best option for these (compared to a heat gun), because it melts away the old, worn finish and reveals the wood beneath. Once all the old finish is removed, the chairs are then cleaned up by using soft rags (usually old t-shirts, which are excellent for this) and wiping away the residue left by the stripper with lacquer thinner or acetone. This is a necessary step prior to sanding or your sandpaper will clog up with the residue, making it difficult to remove. 

Starting with 100 grit sandpaper, the chair is prepared to accept the next grit, 150, until the final sanding, which is done with 220 grit. Once all surfaces are sanded, the chair is wiped with lacquer thinner on a clean cloth, allowed to dry, then it is ready for stain. This entire process (for this type of chair) can take from several hours to a few days. Again, spindles are a lot of work, therefore more tedious and time-consuming than flat surface chairs. Once the stain is applied with either a soft cloth or a brush, or both, you wipe away the excess stain, then enjoy the amazing transformation from raw wood to beautifully restored, refinished wood. 

We used "special walnut" on these chairs. The new stain brought out all that gorgeous woodgrain, which had been hidden by years of oxidation that happens over time. Once the chairs had dried from staining (we allow 24-48 hours), the first coat of polyurethane was applied. For these chairs we used a water-based semi-gloss, durable and easy to clean up after. That first coat protects the stain and prepares the wood for the remaining two coats that finish the chair. It is necessary to lightly sand between each coat of poly with a high grit sandpaper to give it “tooth,” which makes just rough enough to accept the next layer of polyurethane. Once the third coat was applied, the chairs were done and ready for the last and final step, install the new caning. 

These chairs had “press-in” caning, cane that comes in pre-woven sheets and cut to size, then installed and kept in place with spline. It’s necessary to soak the cane and spline for at least an hour (or longer) so that it is pliable enough to work with, otherwise it cracks and breaks. Caning “wedges" are used to “press” the edge of the cane into the pre-cut 1/4” groove in the chair. The chairs had a closely woven cane originally, so we chose the same style to keep it original.

It’s necessary to choose the right size of spline, which is based on the width of the opening, so that it keeps the cane in place while completely filling the groove. If the cane is too loose, it will not keep the cane taut. It’s a tricky process because once you have pressed all the cane into the groove, you glue it slowly, allowing the glue to run into the groove, starting in the back of the chair. Once it is glued, you push the spline into place, tapping it with a hammer as you go. If the spline has been adequately soaked, it will bend easily around curves. If not, it can break, especially if those curves are tight. 

Luckily these chairs’ curves were fairly wide, so it wasn’t too difficult to bend them around the edge. Once you reach the back where you started, make a small pencil mark and cut the spline to match the starting point at an angle and tap it with a hammer in place. After all the spline is installed around the entire seat, hammer the spline so that it is level with the top of the chair. There will be caning strands popping out that were left over from the placement after the spline is installed, so they must be trimmed off. I use a sharp chisel and snap them away by tapping on a hammer close to the spline, which removes the excess. You can also use snippers. This completes the caning process. Allow the cane to dry at least 24-48 hours before you sit on the chair.

Tuesday, October 6, 2020

Antique Oak High Chair


High Chair Before
    The very nature of a chair’s construction makes it quite time consuming
High Chair After

to work on. When a chair has spindles with curves and detail, the time spent stripping is even more time consuming than a relatively simple style. But the very best part of restoring any chair is the finished product, which always amazes me because of the drastic difference between how it comes to us and how it looks when it is restored. Yup, chairs are a lot of work, but the outcome is always worthwhile and successful.     

    A high chair such as this one was once used for a great-grandfather whom would have been seated in while his mother fed him mashed carrots. Needless to say if this chair could speak, oh what stories it would tell! Unfortunately, the most obvious story was that it was in need of restoration and repair. The seat was held together by panty hose (which works well in a pinch!)

    The center portion of the seat had split directly in the center as well as a minor split closer to the side. Therefore in addition to refinishing, it needed to be repaired first. The best way to achieve this and do it properly, was to take it apart, partially. Once it was separated all the way, it was cleaned and re-glued, then clamped overnight so that the glue would do its job and mend the splits. If this is done properly, the glue will hold for many years to come (providing a high school student that had long since outgrown the chair didn’t intend to sit on it!)

    After the chair was strong and secure again, the slow and tedious process of stripping and sanding was next. There are no shortcuts when it comes to stripping a chair, any chair. It simply takes a long time because chairs have a LOT of surface area. This chair had such pretty grain that had been hiding under many years of use. When this is stripped and sanded away, that original grain shines through, giving the chair a new life by revealing its original beauty. We selected “gunstock” stain and a satin finish for this high chair. I absolutely love the way the chair turned out! Once again structurally sound and the gorgeous wood revealed, this chair is ready for another century of being a family heirloom.

Check out the other high chair we’ve done by clicking on this link: https://finalefurniture.blogspot.com/2020/06/height-chair-before-height-chair-after.html


Monday, August 31, 2020

Oak Table for Church Services

Oak Table Before

This was a beautiful oak table hiding beneath years of usage. Used in a local church, this table’s place was at the front of the church used in their Sunday services as a communion table. It had been covered with a white tablecloth that hid the lovely carving (which you cannot see in the “before” photo. The top of the table had lots of wear and some water damage, but luckily it was superficial and mostly on the surface, not beneath the wood’s fibers. Therefore a good stripping and sanding process removed the unsightly stains and damage to reveal the original gorgeous oak hidden by years of normal wear. 
Table After


The table’s bottom cross piece, which was connected only with dowels, had come apart and was spinning wildly during transport. This was the first order of business, to repair that loose cross piece to stabilize the table and keep it from shifting again. To achieve this, we drilled two holes on each end of the underside of the board with a pocket screw assembly, then screwed it tightly after applying a generous amount of wood glue to the end cap. 

After clamping the sides together, the center board was again secure and super strong and won’t come apart anytime soon. (We always make any repairs prior to the refinishing process). Once the center board was dried and secured, we stripped and sanded the entire table, revealing the lovely carving which read, “This do in remembrance of me.” 

We chose “gunstock” as a stain color, which is a gorgeous golden rust with red tones. It’s my new favorite stain color as of this year and we’ve used it many times as it works for any type of wood. Followed up with four coats of satin polyurethane on the top and three coats on the rest of the table, this lovely oak piece will glorify the church and its services for many years to come.

Sunday, June 28, 2020

New Front Door

Door Before
Door After
A front door is most important feature of your home. It keeps out weather, makes a home secure, invites people inside and is a representation of the people living in the home. Therefore, a front door should be well maintained, weatherproof and attractive as well as functional. This front door had been exposed to the elements and over time it became weathered and worn. (We took the photo on our work table so we don’t have a “before” of the door in the home, but our customer sent us the “after picture.

The interior was in great shape, but the exterior needed the most attention. However, upon closer inspection, the interior had been affected by the exterior’s wear because the door had warped, therefore the trim surrounding each panel was lifting enough so that one could get a decent scratch at the least and broken or missing pieces which would be not easy to replace. Before we could start on the exterior, we needed to address the interior’s warping issue by carefully removing the “lifted” trim and sanding each piece down just enough so they could “curve" with the warped panel and would lie flat again. Then we could refinish the weathered front. This door was solid oak and weighed a ton. The door knocker was brass along, with the handle/lock, which carried a hefty price tag (quality costs money!) This door was begging to be made handsome once again. 

Because of the amount of trim and the narrow passages between the trim. stripping was intensely tedious and took a lot longer than expected (it always does!) Stripping took several days and sanding a few more. Since this was our customer’s front door (he literally didn’t have a front door for a week, other than the storm door), we needed to move as quickly as time would allow. We used a variety of hand tools in addition to the much-used orbital sander. Our favorite hand tools are a set of wood carving tools that allow us to get into the nooks and crannies and corners, so we can remove the residue that is left by stripping the old stain and varnish. Once that’s done, lots and lots of sanding prior to the fun part, staining. For this door we used golden oak stain which matched the existing interior color perfectly. To protect the exterior, we applied three coats of satin polyurethane. Once the finely crafted brass hardware was reinstalled, the door was complete, looking brand new again.

Saturday, June 13, 2020

Bedroom Set Stripped and Whitewashed

Vanity Before
Vanity After

This is one of three bedroom pieces that came to us with an old yellowish paint that was at one time supposed to be much lighter. It had oxidized over the years and obtained some wear, so a refresh was in order.

My customer had wanted a whitewashed finish, so a full strip, sanding and application of white stain, which creates a whitewashed finish that she had wanted. The hardest part is always removing the old finish before anything else and with the amount of detail in this set including ball and claw feet, the stripping and sanding process took a great deal of time. This had to be done to all three pieces, removing the original hardware which luckily, was all in tact and accessible.

Dresser Before
Sometimes hardware pieces get missing so must be replaced. But
Dresser After
mostly, people prefer to use the original hardware in their restoration process.

When changing the entire appearance of an item such as going from stain stripping to painting for a more modern appearance, they will sometimes elect to replace the old hardware with newer, more modern hardware. It’s all personal preference, but it always looks great when it’s done.


Night Stand Before
Night Stand After


Wednesday, June 3, 2020

High Chair Before

High Chair After
This is our first high chair restoration. We estimate this height chair was at least 110 years old, based on the owner’s great-grandmother who had used it as a baby. It really look old (and rather creepy) with its dark greenish glaze that sort of, but not completely, covered up the wood. It was indeed a labor of love with all the spindles that neither Jim or I like working on as they are extremely difficult and time-consumimg.

The high chair had a center leather strap that acted as a safety measure to keep the baby from slipping out from under the chair. We were able to keep the original strap and incorporate it into the renovation of this oldie. Not 100% sure of the wood though. It didn’t have a lot of knots or movement so it may have been maple, but it was a hard wood to be sure.

The stripping process took an enormous amount of time to get between all those spindles! Jim took the tray off completely and had to replace a missing rung in the back of the chair. Luckily he could pull the back legs apart far enough to install the new rung into the hole and drill out the broken rung remains on the other side to make the new one fit properly. Once stripped and stained, he chose gunstock stain (our new favorite!) for the entire chair. The edging of the tray needed to be repaired since it had been broken right in the middle with a noticeable split. He added a piece and made it work. Once it was all put together with its new and repaired components, it looked beautiful. Who knew this old creepy chair would turn out so good?? (We did!) Lol.

Check out the oak high chair we also refinished by clicking on this link:

Eastlake Lamp Table

Eastlake Table Before
Eastlake Table After
Eastlake furniture is easy to identify by its unique carvings on the legs of tables and other parts of larger furniture.

This Eastlake table is likely early 1900’s and has seen its share of wear over the years. The legs were in pretty good condition, but the top had rings and dark water stains in addition to the usual scratches. At least it hadn’t been painted, since we’ve done a few Eastlake items that had paint and all that detail was hidden beneath the layers of paint. It’s always a joy to see the wood in all its glory on a lovely item of furniture such as this.

Luckily the stains and scratches weren’t too deep and could be sanded out. The top needed the most attention, so once the sanding was done, a new coat of stain brought the century old table back to life. Protected with three coats of polyurethane, the table top was once again renewed and will be well preserved for many years to come. This table was a perfect size to use as an accessory table between two loungers or as a corner table in a living room. Restoration of this table was a true pleasure as the original beauty of the wood was the crowning glory of the renovation.

Tuesday, April 14, 2020

Mid-Century Stendig Chairs Refinished and Re-Caned

Stendig Chair Before
Stendig Chair After
If a picture is worth a thousand words, then these photos are worth many thousands if time were a contributing factor. These are designer “Stendig” chair, made in Czechoslovakia, mid-century modern made with Beechwood, with several unique features; curved arm rests, a compound-curved back, matching curved seats and overall difficult to work on design. The customer wanted them refinished, with new caning to replace the broken cane areas (which are not easy to detect in the photo).

As of this writing, I can truthfully say that these chairs have been the most difficult caning project to date. Jim took them apart and worked on the refinishing. Once that was done, I started the tedious process of caning each of the eight sections (two per chair) of these unique mid-century pieces.

Photo 1 - Channels that
hide back of cane
Photo 2
Top front of chair before
cane removal
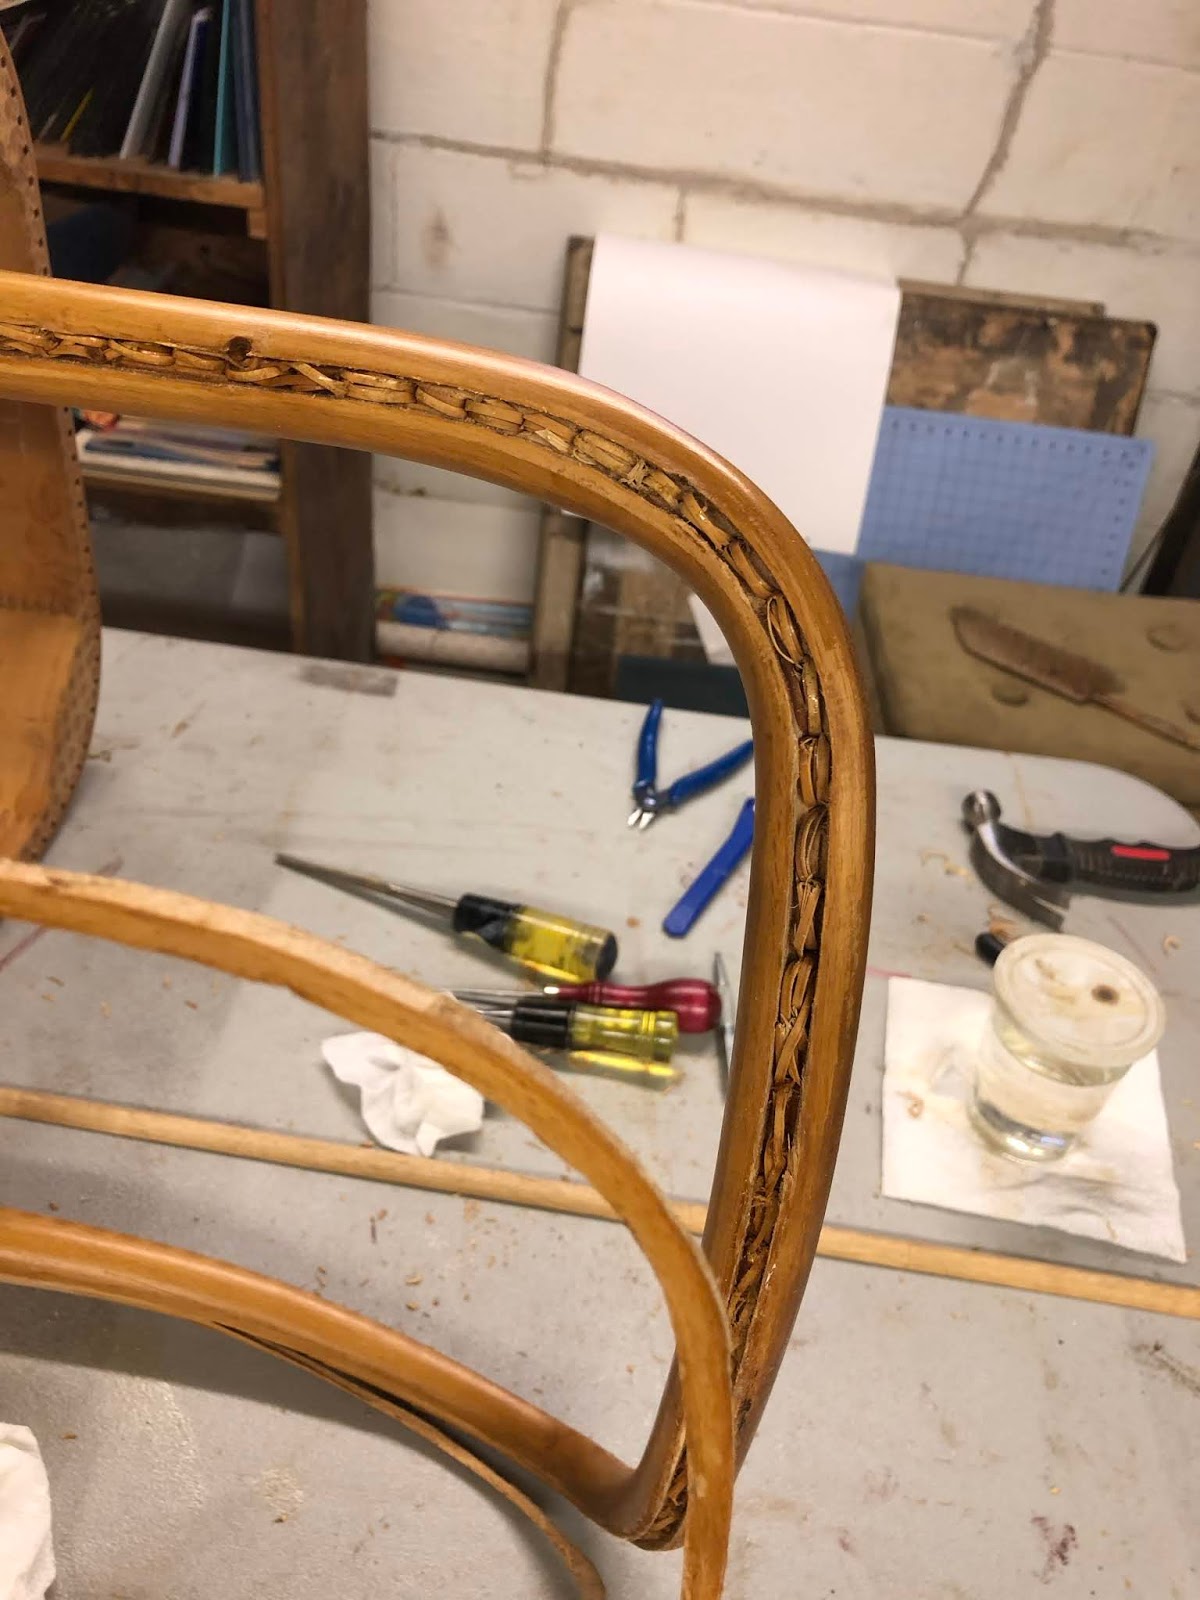
Each chair’s back had a channel that covered up the caning that is normally visible on caned chairs. Since these chairs’ original cane had been “hidden" beneath the channels, they had to be removed first before I could remove the cane from the holes and install the new caning. This proved to be an unexpected twist in the process because I simply had no idea how to accomplish this and no point of reference online or anywhere else, even in a caning forum.

I had done many caned chairs prior to these, but never had I expected the challenge this style of chair would present, not only in the refinishing, which required them to be taken apart, but removing the channels (see photo 1) that covered up the caning on the back of the chair and were glued in place. How do I remove them to access the caning without damaging the chair?? I researched it, but could find no information of how to achieve the removal of these channels, which meant there was only one solution. I had to figure it out myself, so that’s exactly what I did. I snipped off the sheets of caning from all backs, (see photo 2) leaving only the front edging (see photo 3) before I devised a way to remove the channel. For the seats, this was much easier because there was no channel to cover them, so I was able to remove the cane in its entirety, as I had done with many previous cane chairs in the past.

I realized that since the channels were glued in place, I would have to find a way to dissolve the glue so I could gently pry them apart from the chair’s curved border in order to remove it, which would expose the original cane beneath. But how to do that...carefully. Well, a bit if creative thinking and the right tools solved the problem. I figured if I could get to the inside of the holes and gently tap them, I could loosen the channel enough to remove it. The only problem was, since the channel was glued, this would likely break the channel as well as the chair in that area, so there had to be an additional step.

Photo 3
Top  of chair border
only remaining
Photo 4
Using eyedropper filled with
lacquer thinner to loosen
glue on front side of channel
After I had cut the body of the cane off the chair, the only thing left was the edge that filled the holes (which were not visible due to the channel). I carefully snipped them all away and removed as much cane from each hole as I could, using an awl to poke away at the hole to create an opening. This was a long and tedious process in itself. Once all the holes were exposed, I used an eyedropper (see photo 4) and filled it with lacquer thinner, allowing the liquid to fill each hole, which would eventually flow to the underside of the hole and into the glue that held the channel in place.

Once I was assured that I had enough lacquer thinner in each hole, I gently tapped each hole with another, duller awl (see photo 5) so as not to damage the exterior of the curve or the channel. After a lot of dropping, tapping and more lacquer thinner, eventually the channel loosened enough for me to remove it, exposing the caning beneath (see photo 6). Then, finally, I used a drill to clean out the remaining bits of old cane so that the holes would be free of debris to better accept the new cane (see photo 7).

         
Photo 5
Using a dull awl to gently
pound thru holes
that pried channel away
 
Photo 6
Channel removed, exposing
original cane tie-off
on back top of chair
Photo 7
Drilling holes to clean out old cane


Photo 9 First Weave

\
Photo 8
Steps 1-3 tied together
The first one was the “learning” chair, where I used thread to tie the loose strands together to keep them in a somewhat orderly alignment so that when I started weaving, I could work with the strands easily, though the process was anything but easy (see photo 8). The first horizontal weave was very time-consuming, taking one to two days. That was also the hardest part because I had to make sure the chair was tightening exactly enough for the diagonal weaves to look good (see photo 9).

I soon learned that it was impossible to keep the rows straight in a curved chair back, so I “went with the flow” and allowed the chair to evolve as it was woven, and indeed, it wasn’t half bad. Each chair back that followed I go a little bit more confident and found a few more tricks to keep the vertical and horizontal rows aligned so that they were easier to work with. This also made the 5th and 6th steps, the diagonal weaves, flow much better. Photo 10 shows the last diagonal weave going to the upper left corner. The last and final step was binding the cane with a border binding cane that finishes off the top. Then the tie-off finishes the bottom. Many steps with a lot of work and time involved in these chairs, so I enlisted my granddaughter’s help by teaching her a new skill which she learned very quickly.

Photo 10 Last Diagonal Weave
My helper
My cat, Chelsea keeps
me company


Chairs in customer’s home


Saturday, January 4, 2020

Century Old Maple Courtroom Chairs Makeover

Maple Chair Before
Maple Chair After

This is one of two courtroom style chairs that were once owned by a
friend’s grandfather and used in his print shop. We estimate the chairs to be approximately one-hundred years old (possibly older).

He had been wanting to get these chairs refinished for years, but finally got around to it approaching last Christmas as a gift for his wife (it belonged to her grandfather) to surprise her. Evidently he had them hung in his garage for over fifteen years after they had relocated to their current farm house on nine acres of land.

These chairs were very sturdy, made of solid maple which was hard to see beneath so many years of oxidation and grime. It never ceases to amaze me how gorgeous wood is hidden under all that worn finish and dirt. I was pleasantly surprised that once the chairs had been completely stripped and sanded to discover the wood was actually light and could be stained a lighter stain per his request. I have been using “gunstock” stain on a few projects lately and found it is one of my new favorite stain color choices. It is a mid-tone color with warm, rich tones, much like cinnamon and brown sugar (makes me think of cookies). It works well with any type of wood, depending on how light you prefer it to be. I used it on a very long handrail in my own home and it matches the existing railing and woodwork perfectly. If I ever get around to refinishing the stairs and railing, that will be my color choice for stain.

While the chairs were is great shape with a very solid structure, the only thing I had to repair was one of the chairs’ back section (behind the slats) had been popping out of their spots which required the wood to be removed, reshaped and glued before pushing back into place. Once the glue was dry, I gently sanded the area and filled in the small spaces with matching filler. After it was stained and polyurethane was applied, you couldn’t even see where the damage had been. I did it and it took close inspection to see where those spots were broken through. The end result was two lovely refinished chairs in a lighter tone that displayed the beautiful wood grain.