Thursday, January 30, 2014

Stripping Tips

Partially stripped spindle
Stripping furniture presents many unique challenges. It can be very simple, or it can be very difficult, but it's always rewarding to see the final product. It doesn't have to be a daunting task since there are techniques you can use to make it easier, so I've written this article to share with you the tricks of the trade that I've found work best for me, with excellent results. I hope this helps you overcome your fear of refinishing because it's worth it!

When stripping, it's important to protect your skin, since a good quality stripper not only removes the paint or stain from furniture, it can irritate your skin and burn when it makes contact. I recommend you use gloves especially crafted for working with chemicals. If you use the thinner, flexible Nitrile gloves commonly used for painting or staining, the stripper will disolve the rubber and expose your hand to the harsh chemical, causing it to burn. (If it doesn't burn your skin, it's not strong enough to remove the old finish!) To avoid this, use good quality gloves, and if you accidentally get stripping solution on your skin, wash and rinse it immediately! 

If you plan on stripping a large, flat surface, have plenty of stripper on hand, because you're going to need it. I prefer to pour the stripper into a smaller container, then apply it with an inexpensive paint brush. Follow the manufacturer's instructions on how long to leave the stripper on. Depending on how many layers you're removing, it could be from 15 to 30 minutes. The more layers you have to remove, the longer it takes and the more times you'll have to apply new stripper. In warm or hot weather, the chemical dries very fast, so don't try to cover an entire table. Choose a 12" x 12" section and finish that before moving on. Use the correct stripper for your project, since they are not created equally. Buy the best one you can afford, as this will save you time and give you better results. There are strippers specifically created for paint or stain, or both. I prefer the one that does it all. 

Once you have applied the stripper, you will see the paint or varnish bubble and crinkle on the surface. Take a putty knife and gently remove the stripper, going in one direction. You can use a plastic putty knife if you use a good quality stripper. A metal putty knife works well too, but be careful not to scratch the surface as you remove the old finishes. The layers of paint or stain will roll back away from the furniture as you swipe the putty knife across the surface, so you'll also have to use something to wipe the excess stripper/paint onto. I prefer a stiff piece of cardboard, or a thin piece of wood. Scrap off the debris, then swipe it into an empty coffee can. (You cannot reuse this, so dispose of it properly when your project is complete).

After you've removed as much paint/varnish as possible with the stripper, you can then use steel wool, #0, on flat surfaces, or a brass wire brush on curved surfaces, (sold at most home centers or hardware stores) to scrape off the residue left behind. Once you're satisfied that the residue is removed, you're ready to sand. The photo (above left) shows the arm of the chair after the old stain and varnish were removed and the spindle with the original finish. The old finish was so dark, you couldn't see any wood grain. Once the old finish was removed, the wood's natural beauty was revealed.

While working on this chair I also used paint thinner to "loosen" up and moisten the wood prior to applying the stripper, thus I discovered a solution to a dilemma that I'd been having since I first began furniture restoration; easily removing old finish from spindles! By applying the thinner shortly after applying the stripper, these two strong chemicals worked as a team to break through years and years of finish. As you can see in the photo below, together, they "melted" the old varnish right off the chair's leg so that it could easily be wiped away with a rag. Once this task was accomplished, I gently used the brass brush and steel wool to remove the old residue.
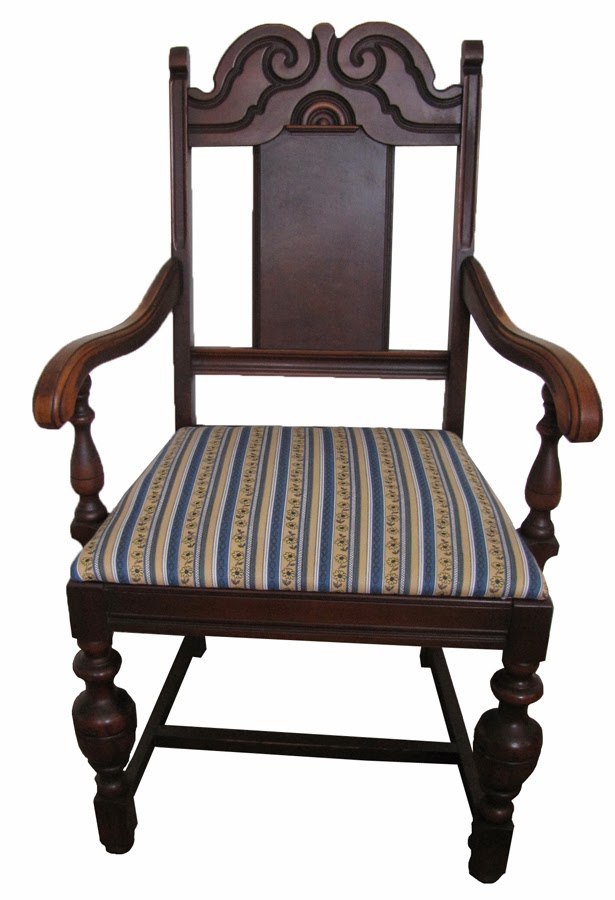
Then it was ready to sand and stain. I chose a red mahogany stain and semi-gloss polyurethane, and reupholstered the seat cushion with a traditional floral print. The hard work paid off since the chair is great!
Removing old finish

Finished Chair

Vintage Dresser Makeover

Dresser Before
Dresser After

I stumbled upon this treasure at an estate sale, hidden in the corner of an attic closet at the top of the stairs. Buried under old games and clothes, this dresser wasn't exactly shouting, "Here I am!" Nonetheless, I spied it and after removing the contents from the top, I knew I had to have it as I saw it as a challenge.

As a child, I remembered decals such as these which I used liberally on my own furniture, much to my mother's dismay. Once they were on, they were on for life, since the adhesive on the back was pretty sticky. I wasn't discouraged since I knew a bit of sanding and stripping would have this little gem in great shape, better than its previous condition.

The right edge of the bottom drawer was missing, so Jim spliced another section into it and then used his router to round the edge, matching it to the original drawers. The dresser was flimsy, so we "beefed" it up and strengthened the sides and bottom, then began the tedious process of stripping and sanding. Once bare, it was ready for primer and ultimately a clean, bright white coat of paint. I replaced the old drawer pulls with stylish knobs that I'd reclaimed from a previous project and painted them pale blue. Viola! The once-old, 1959's era dresser has a new look and a new life.

Check out this dresser: http://finalefurniture.blogspot.com/2015/04/old-painted-dresser-revival.html

Antique China Cabinet

China Cabinet Before
China Cabinet After

A massive oak China Cabinet such as this is always an impressive piece of furniture and requires a great deal of respect and special handling. While in overall great condition, this cabinet needed some love. It had a broken left panel on the right door, held together with tape. It was necessary to carefully separate the wood from the glass so it could be glued back together. The veneer was chipped, so I carefully filled it in and stained it so that it wasn't noticeable. I cleaned the entire surface with boiled linseed oil, which brought out the wood's natural beauty. The glass was original, as you could see the wavy nature of antique glass and in perfect condition. Over the years, someone decided to add a fourth shelf, therefore changing the position of the three original shelves. I left it as it was, figuring that the person who buys it can simply reuse the original holes to reposition the shelves. I recommended using it as a bookshelf since the solid oak shelves would be sturdy enough, but the buyer said she'd rather use it as it was intended, a China cabinet. And why not? This classic China cabinet was from an era gone-by, but with a little TLC, it should last another 100 years.
China Cabinet Before

China Cabinet After

Old Chair, New Seat

Chair Before
Chair After


This was the third chair in a sequence of chairs we refinished for a friend. Using the same striped fabric, it makes a great mate to the other chairs. This one required very little, only a good cleaning and protection with boiled linseed oil. The reupholstered striped fabric is perfect for the period and gives this once-old, neglected chair a new personality.


Seat Before

Seat After

Aging Chair Gets Facelift

Chair Before
Chair After
I acquired this chair from a friend who wanted it refinished. This was one of three dining room chairs that needed a new look. The original cushion was worn and dirty, so I reupholstered the seat with a traditional striped fabric, suitable to the style of the chair. I used boiled linseed oil to give the chair's natural luster a boost. The wood responded well and the results speak for themselves.

With great bones, the newly refinished, reupholstered chair is ready to shine.


Wednesday, January 15, 2014

Finale's Finest

Chair Before
Chair After
This chair is from the 1920's. One of three chairs, this one is my personal favorite. It's made of oak and had a great deal of detail in the framework. It was also dirty and so covered in grime and old varnish, that the only way to bring out its luster was to strip it and apply brand new stain. This was one of three chairs I acquired from a friend who had passed away last October suddenly. It was one of the many pieces he'd kept from family members. I knew the chair was worth the work and got right to it. The stripping process was long, messy and tedious, but I wasn't surprised to see the gorgeous wood that lie beneath the layers of grime. I've included photos of the chair during the restoration process. There was a great deal of detail sanding involved!
Chair After Stripping
Chair After Stain
I chose the printed fabric to coordinate with the other two chairs, featured in the above articles, that have complementary striped fabric. These chairs, while completely different, would make an eclectic group for a sophisticated dining experience.


Chair Seat Before
Chair Seat After

Monday, January 13, 2014

100-Year-Old Fabulous French Doors


French Doors After
These French doors were a rare find. Not only because of how uncommon they are, but how the doors look. Each door has 15 panels of beveled glass. The doors are made of solid oak and are extremely heavy at approximately 2" thick. I estimate that each door weighs in at 100 lbs. I asked an expert the age of these doors and he said they are likely from 1908-1910, over one hundred years old.

French Doors Before
If you know what "alligatoring" is, you'll have a visual of what the doors looked and felt like prior to restoration. The texture of the wood resembled a low-grit sandpaper. When you ran your hand over the surface, it was not smooth. The beautiful wood underneath was buried under years of grime and exposure to the elements. We believe the doors were used as an entryway to a library, study or den. It took a year to restore these doors. Their weight and the amount of work involved was time-consuming, and we wanted to do them justice. These doors will be used in a renovation project for a front entry.
Door Knob Side 1
Door Knob Side 2
Door Latch at Top
Doors Side 1
Doors Side 2
Door Foot Lock

Sunday, December 22, 2013

1944 and 1945 Lane Waterfall Cedar Chests

1945 Cedar Chest Before

1945 Cedar Chest After
I got an unexpected customer, a woman who lives in Kalamazoo (one of my favorite places!) who was in town visiting her parents who lived in St. Clair Shores. She had a cedar chest she wanted stripped, so her daughter could use it for a coffee table. She brought the chest over that same evening. It was a 1945 Lane Cedar chest. She had asked for a darker stain, so after I stripped and sanded it down, I applied walnut, which brought out the dark wood. I then added two coats of semi-gloss polyurethane and made some minor repairs.

Thursday, November 14, 2013

Nightstand Gets Painted Eggshell

Nightstand After
Nightstand Before

This little nightstand was a job for a customer who wanted it to match her dressers, however, the end result didn't match so I suggested painting it. As a traditionalist, I normally lean toward refinishing wood, as opposed to painting it, but sometimes painting is a great solution. This was a great example of paint vs. stain, as the wood didn't accept the stain very well, thus making the wood a great deal darker and no longer matching the dressers. This is caused by absorption, which determines the wood's ability to take on the proper color. When I suggested painting the piece, my customer agreed and purchased an eggshell white that matched her bed. The bottom line was a great little table that received a coat of paint and a brand new look! Be open to your finishes, because you never know how great something will look until you try it!

Here's another nightstand we've painted: http://finalefurniture.blogspot.com/2013/11/nightstand-gets-facelift.html

Side Table Painted Yellow

Table Before
I'm always on the lookout for small tables. I find them to be universal and highly desirable, so when I came across this small cherry table at an estate sale, I knew I found a treasure. I overlooked its shabby facade and saw the potential beauty underneath. I especially liked the "webbed" shelving, which I thought was a great design feature. That it had a shallow drawer made it even more appealing, so I snatched it before someone else discovered it hidden in hidden in a corner of a bedroom.
Table After

All in all, it was in great shape, but the wood was not in the best condition, so I hand-sanded it smooth, then painted it a with Sherwin-Williams "Glisten Yellow" to match the dresser I'd recently finished. It proved to be a great color choice, because the soft butter yellow changed this table from shabby to chic. The brushed nickel knob completes this table's transformation...perfect table for a small room.

Table Before


Wednesday, September 25, 2013

Drexel-Heritage Dressers Jump Into 21st Century

Drexel Heritage Dresser Before
You never know what treasures you'll find at an estate or garage sale. When searching for used furniture, look at the "bones." If it's structurally sound, the rest can be fixed and refinished, revealing a classic, beautiful piece of furniture that is hard to come by. This was a great example of how very important it is to choose the right hardware for any project, as the hardware really makes a piece of refinished furniture shine.

This proved to be a challenging, yet very rewarding job for a client who had purchased these dressers at an estate sale. They were of excellent quality, name-brand furniture, Drexel-Heritage, in great condition, however, my client wanted to get an updated look for these classic pieces, bringing them into the 21st Century.

Drexel Heritage Dresser After
The challenge was twofold; stripping the old stain from two different types of wood and making the new stain blend, as well as replacing the original outdated hardware with new hardware she had selected, that didn't fit the original holes. Not until we had finished stripping the dressers did we realize that the bronze colored hardware she had originally given us wouldn't work. The drawer pulls didn't line up with the surface of the drawers causing the ends of the handles to stick up.

Wednesday, August 21, 2013

1960's End Table

End Table Before
When I first saw this end table in the basement of an estate sale, I walked away from it, at first thinking it was just too ugly to put any effort into. After poking around, I decided to take a closer look and buy it. I'm so glad I did, because once I began sanding away the grime, I uncovered not only a gorgeous end table, but exposed two different types of wood! I decided to use the original handle on the drawer because it lent authenticity to the piece and I
End Table After
really liked it. I chose two stains to bring out the two identities of the wood and show off its grain. The legs once had metal caps on the bottom that were long gone, so I painted them black to differentiate them and give it additional character.

The linear look of the table appealed to me and I ended up using it in my living room, instead of selling it as I had originally planned. (I wished I could find another one and one day while randomly looking at Ebay, I found one...in Chicago! Darn!) I love this retro table and am so glad I kept it. Maybe someday I'll find its match closer to home...