Thursday, September 16, 2021

Antique Chair Updated to 21st Century


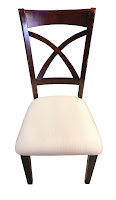
Antique Chair Before

Antique Chair After
Every household has chairs, usually lots of them. There are as many styles chairs as there are other types of furniture, but not many other furniture items are used as much as chairs, therefore they tend to get more wear than other furniture. 

Antique chairs are unique because the materials used in the 1920’s or 1930’s were limited and not as “user friendly” as they are today. This antique cherry chair was in relatively good condition, meaning it had good bones, but was in dire need of refinishing and new fabric. The fabric on this chair was not only very worn and threadbare, but no longer usable and likely had a zillion or more dust mites. 

For this type of project, Jim takes care of the refinishing and restoration process while I handle the new fabric. Jim used a custom mixed stain consisting of 25% mahogany and 75% chestnut, which looked fabulous. When the chair was finished and protected with two coats of polyurethane, I took over and tackled the fabric. I don’t claim to be an expert upholsterer (I’ll leave that to my local expert) but I can handle certain projects. Seat covers is much easier than working with an attached seat because you must allow for the fabric to go around the arms and back of the chair, which is a nail-biting experience. 

This chair originally had horse hair stuffing for the back and worn out springs for the seat. My experience with chair springs isn’t terrific, so I prefer to replace them with a sturdy new wood bottom and 2” of high density foam. The foam is covered with thick batting for extra cush for the tush, and finished with the customer’s fabric of choice. My customer chose a lovely paisley pattern,  definitely a 21st century fabric. With the freshly refinished wood and the new fabric, this chair will last another 125 years.


Thursday, August 12, 2021

Antique Chair Newly Caned


Caned Chair Before

Caning is one of the fun parts of my work as a furniture restorer. It didn’t start out that way. In fact, the first chair I ever caned was kind of sprung on me. A customer had asked if I could cane a chair and I told her honestly, I don’t know but was willing to learn and see what I could do for her. So then it began. 

Caned Chair After
I educated myself by watching a few videos and quickly discovered a few things about caning. One, it isn’t for everyone and not everyone would enjoy the process or even attempt it. Two, there are various types of caning styles and many, many more chair styles, each one individual in how the caning is done. Three, practice makes perfect. Or, if not perfect, a whole lot better with noticeable results.

This little chair’s wood was immaculate and needed no refinishing, but was in need of a new seat. The old seat had a minor tear in it, but this type of damage only gets worse, not better and needed to be replaced. This was strand caning, which means that the caning is done by weaving through the holes surrounding the chair’s seat, using the six-step method by weaving first vertically, then horizontally twice, the third time crossing over the first vertical row, then the diagonal weave, first from the upper right corner to the lower left corner all the way across the chair before you finish with the opposite diagonal weave. (You can see this in the video to the right). 

The final top step is binding the cane by looping cane strands up and through the holes, pulling the cane strands through the holes, locking in the top binding. 

The very last step is securing the bottom strands that hang loose during the process. I wrap each one underneath the tight cane then loop and tie them off, clipping the extra. This is why it’s called strand caning, because you are working with individual strands of canes that are usually about 12-14 feet in length when they come in a tightly wrapped “hank” of 500 feet. It requires soaking and mist spraying while working so the cane remained pliable thought the weaving process.

This was my best chair so far and went together very quickly because I learned a few tricks and techniques along the way. While caning can be a daunting task, it can also be a time where you can relax and enjoy the “flow” of your work. I enjoy listening to audiobooks as I work which passes the time and makes it fun. Now I enjoy the caning process and each time it gets a little easier.

Wednesday, July 7, 2021

Antique Stained Glass Door Revival


Door Interior
Before
This antique door was well over 100 years old and had seen plenty of years of wear and weathering. The cracking was pretty severe and the windows, while amazingly weren’t broken, needed some TLC because the framework was deteriorating and held in by glaze. Unfortunately, upon removing some of the paint we discovered the door was not stainable, so our customer chose a fresh coat of paint.


The stripping process is always the most tedious in any refinishing project, but for doors a lot of the difficulty comes in with the type of paint that was used. The older the door, the harder it is to remove the paint. Milk paint was frequently used back then and with our experience, is quite difficult to remove. We either use a chemical stripper or a heat gun (or both) when we remove the old paint from most projects. 


Sometimes it’s just not possible to remove all the paint so we remove as much as we can then sand it smooth and prep it for paint. A coat of primer is necessary for any paint project whether it has had paint on it previously or not. Especially raw wood projects which always require primer. Once primed, painting flows smoothly. 


Door Interior
After
This door required more work because the customer needed the door knob and hardware moved to the opposite side because of where the door would be located, so it was necessary to remove the old hardware, fill the holes left with wood pieces, dowels and filler, sand it smooth and drill new holes on the other side of the door so that it opens correctly. The new hardware they chose was brass.


This door required refinishing as well as carpentry work. Jim made new moldings for the stained glass panels and replaced the center clear glass. The door was out of square so he made sure all was square and plumb which is necessary for a smooth installation.


As you can see in the photo to the right, once installed, the stained glass looked fabulous, adding charm and character to the kitchen. The color of the glass was not visible from the exterior due to the angle of the photo. Photos below are of the exterior before and after photos.


Door Exterior
Before
Door Exterior
After


Saturday, June 19, 2021

Antique Bench Refinished w/needlepoint

Bench After
 
Bench Before

Although sturdy and strong enough to seat an adult, this antique bench was in dire need of refinishing. The front veneer had peeled off entirely while other areas that had veneer were loose. 

Since this was a natural hardwood, I removed the veneer completely since it looked better without it. The rest of the bench had no veneer and the wood was in great condition, but a bit scratched, mostly on the feet. The legs were a Queen Anne style, commonly used for this style of bench.

Prior to refinishing the bench, I first removed and found it had the original straw and batting, which was commonly used for making cushions one hundred years ago. I replaced that old straw with a 2” foam cushion and a layer of quilt batting for extra seating comfort. 

The bench required stripping, sanding and staining. I chose a mid-tone chestnut stain, which brought out the natural beauty of the wood. Satin polyurethane finished off the freshly stained wood so it remains protected for many years to come. My customer had her own needlepoint seat cover that she had wanted to use to replace the stained, worn old topper. The transformation was incredible, a nice piece of furniture anyone would be proud to own.

Wednesday, June 9, 2021

Metal Bar Stool Makeover

Bar Stool w/caning replaced
 
Bar Stool w/broken cane

Bar stools were popular in the mid-sixties and many are still around with some wear, a testament to their use. This one was unusual because it was made with wood and metal with a caned seat as well as a caned back. 

The back was in great shape, but the seat was broken and the wood had seen quite a bit of wear and fingerprint oils left on the top back. This is not uncommon because that’s the spot that gets the most initial touching when you pull the barstool out to sit in it. 

And boy! These stools were heavy! Made of solid iron, they were weighty and still had many years of use. However, with the broken seats they weren’t safe to sit in, so in addition to Jim’s touching up the wood on back and seat, I needed to replace the caning on two of these four barstools. 

These seats were made with “press in” caning, which means that the caning is purchased as one large section and pressed into the seat in a grove area and is then held in with spline that is pushed into the groove, following a line of glue. The caning must first be soaked for up to two hours along with the spine before it can be installed. You must measure the opening of the spine as well as the space between each cane opening to get the right size for each project. This differs from strand caning, a different process in which the caning is woven through the item with holes surrounding the edge following seven steps from start to finish. That type of caning is much  more time consuming and costly because it’s much more involved. Both types of caning are initially much lighter than the old caning because the old cane was either naturally aged or stained by the manufacturer. I don’t recommend staining because it dries out the caning with is a natural product, therefore letting it age and darken over time is preferable.

Bar Stool New Cushion
Bar Stool Old Cushion

In addition to replacing the broken cane I also made four new cushions which were used for comfort and to protect the caning. I initially took apart one of the cushions and created templates from it so that the new cushions would fit the chairs perfectly. I added cording to the top and bottom edges and finished each cushion with a zipper. 

Each projects brings with it new challenges that present opportunities to put to use the skills we’ve honed over the years as well as learn new skills as they need to be learned. There’s simply no better teacher than experience and giving it the old “college” try. Even better than college, just doing it, as the saying goes. With a completed project comes a certain sense of accomplishment and another skill honed or learned to add to our arsenal of mad skills. 😁

Tuesday, May 25, 2021

Peg Leg Knitting Table Refinished and Repaired

Knitting Table Before
An antique knitting table such as this was useful for storing knitting needles and yard as well as other essentials a knitter would use in her arsenal of creative tools. Somewhere along the line the front left leg broke, thus had a “peg leg” appearance and didn’t stand up on it’s own. Luckily, we were able to repair the broken leg by drilling a hole on the top portion and the broken part of the leg, then glue them back together with a dowel. This is the correct and most durable way to repair a leg such as this one, which isn’t very large to start with.
Knitting Table After

The rest of the cabinet needed some touch up, a knob replacement on the bottom drawer and a completed refinished top that was stripped, sanded, stained and protected with two coats of polyurethane. The entire bottom of the sides was missing, so we replaced that with matching plywood cut to size. It simply won’t do to have your knitting needles fall out and end up on the floor. 

This was the second knitting cabinet we’ve done, but this one was a bit lighter wood than the first one which you can see by clicking on this link: http://finalefurniture.blogspot.com/search?q=knitting+cabinet

It’s nice to have a few projects that we can compare to other projects we’ve done that are similar. These knitting cabinets were commonly used at the turn of the century and have been preserved throughout the years as they can are versatile and can be used as a display cabinet in a hallway or a great storage spot which doesn’t take up a lot of space.

Sunday, May 9, 2021

Mid Century Modern Dressers

Tall Dresser After
Tall Dresser Before

Sometimes I have no words for the furniture that comes to us. This is one of those times. This was a Kroehler dresser set, a classic mid-century modern set that at its creation was probably very beautiful. Somewhere along the line the original hardware was lost (who knows) and replaced with completely different (not matching) hardware in a different finish. 

The original drawer pulls were the ones on the bottom two drawers, The center drawers had “scoopy” handles which were not at all correct for this period and the top large drawer had four knobs, also not matching. To say the least, this dresser had a bunch of mismatched pulls that simply didn’t work.

Long Dresser After
Long Dresser Before
Our customer wanted these dressers refinished and stained, however we realized that once we started stripping it wasn’t stained originally, but painted with a glaze treatment. Plus, there were broken veneered corners that wouldn’t have looked good if filled in and stained, so we suggested paint, which turned out to be the best option for these pieces. 

As much as we prefer exposing the beautiful wood hidden beneath layers of paint, sometimes it’s not possible because when we get painted pieces, it’s usually for a reason. But occasionally we get painted pieces that have gorgeous wood beneath and it takes on a completely different look once stripped and stained.

For these dressers, once the holes created by all the handles were filled in, sanded and smoothed out, painting covered them and they once again had a classic, clean line look common to the mid-century modern furniture people gravitate to. It had gotten an upgrade that worked great for these pieces. We also worked on two nightstands (not pictured) that were a part of this set but we didn’t get the “after” pictures of them. Then our customers decided to get a headboard painted to match the rest of the furniture so now they have a complete set that all matches. This one turned out great!

Tuesday, April 27, 2021

Dining Table Upgrade and New Cushions on Chairs

Dining Table Before
Dining Table
and Chairs After
This lovely Queen Anne dining table had a well-worn top, but was overall in great condition. Our customer had wanted to have the top refinished and the legs painted black. I completely stripped the top in an afternoon and Jim took care of the side edges, preparing them for paint. 

Once it was primed, I painted the side of the table edge while he spray painted the legs. You simply can’t beat the look of spray painting furniture when able to do so. It isn’t possible for everything, but when we can, we chose spraying. Brush painting isn’t too bad though and with black, it is an easy color to blend well with any color stain you decide to use with it.

Chair After


Chair Before
She had purchased the table alone and needed chairs, so she found four chairs separately that matched the table perfectly. The chairs were in great shape, but she wanted the seats reupholstered and chose a black vinyl with a diamond shape, a small rectangle of gold accents to finish off the design. The material was very elegant and made a great seat cover to match the black portion of the table. Even though the chairs and table wasn’t a family at first, when all was done, they got along just fine and made a great addition to this lovely kitchen.

Wednesday, April 21, 2021

Oak Chairs Refinished

Oak Chair After
Oak Chair Before

We restore more chairs than anything else and the reason is simple. Everyone has them and eventually, they get pretty worn, damaged and no longer look good so they will require an overhaul. 

Depending on the amount of damage a chair retains, refinishing can be “lightweight,” meaning a little clean up and perhaps touch-up staining to a total restoration which requires the chair to be stripped down to bare wood (the preferred method), sanded thoroughly, wiped clean and stained with the choice of the customer.

This is one of two identical chairs that needed complete restoration. This one had some water damage on the top, but was overall in pretty good condition. Still strong and not requiring gluing of loose joints, once the stripped and sanding was complete, we applied a fresh coat of English Chestnut stain and two coats of semi-gloss polyurethane. Not only did the refinishing repair the damage, it brought out the luster and beauty of the wood which had been hiding under years of water damage and grime. Never underestimate the power of refinishing a chair! 

You’d be surprised how many people dumpster dive and bring us chairs that someone else had tossed and we made pretty again. The old saying “One man’s trash is another man’s (or woman’s) treasure,” is really true. It’s a shame to thing someone had tossed furniture away only to have it completely turned into a usable treasure, so keep that in mind when you look at an old item of furniture and think, “Is it worth it?” I can tell you with absolute certainty that it is always worth it if the furniture item has good bones. Furniture made of solid wood is built to last a lifetime. And not just the lifetime of a person, but several lifetimes throughout generations if it is taken care of. Maintaining the integrity and classic look of an old piece of furniture, be it a chair, table, dresser or cedar chest is keeping a part of history that we can learn from for generations to come.

Wednesday, April 14, 2021

Antique Eastlake Cabinet Upgrade

Cabinet Before

Cabinet After
Once used as a tall dresser, this antique cabinet was in pretty rough condition prior to restoration. Actually, upon receiving it and getting started on the refinishing process, it sort of, well, fell apart. The piece had seen plenty of use over its sixty-plus years and many of the joints had come unglued, so it made sense to simple separate those loose joints and disassemble it to properly strip, sand and stain it the right way. 

The interior of this cabinet had three adjustable shelves, which had a unique adjustability system. The wood in the rear and front of the cabinet had slots which held small sections of wood that each shelf rested on and were easily removed so that they were easily adjustable to whatever height you needed. 

The bottom drawer was an unremarkable feature of the cabinet, the lovely brass drawer pulls blended into the background. It was also in need of a new bottom since the original one had been damaged and was no longer usable. Once the new bottom was built and installed, it was once again strong and usable. 

The hardware was polished, which included the drawer pulls and hinges. The bottom drawer, once almost invisible, was a focal point, the brass pulls looked like new. The keyhole slots were original, but two out the three were broken and had to be replaced with newly constructed, custom made key slots which looked almost identical to the original. When a piece of an old item of furniture is missing, it’s almost impossible to find that exact piece so a bit of ingenuity and design comes in handy to create a replica. 

The right side of the cabinet did not have glass, but plexiglass that was held closed with a piece of cardboard. Of course this wouldn’t do, so we replaced the plexiglass with glass and added a magnet at the top of the right (opening) door so that it would stay closed. A new stain and three coats of polyurethane to protect the surfaces and this old beauty got a major upgrade. Amazing how beautiful wood that hides beneath years of usage becomes when it is revealed with refinishing. This was indeed a lovely piece of furniture that we enjoyed working on.


Tuesday, March 23, 2021

Oak Teacher’s Desk Revival


Teacher's Desk Before

Remember elementary school? Do you still remember your teacher’s desk? Well, this was once a teacher’s desk that used way back in the day of notebooks (not laptop computers), pencils, typewriters and maybe even an apple on the teacher’s desk. 

Unlike the desks I remember from my early school years, this one had a unique feature; a slide-out, built-in filing cabinet with many cubby holes and slots for letters and other teacher-ish items. I had never seen a desk like this one. And you can imagine how extremely heavy it was!

Teacher's Desk After

The desk top had been destroyed by fire. Our customer thought the top had water damage, but upon closer inspection, it was fire, not water that had destroyed the top. We also noted that the original desk was likely a roll top, which was no longer part of the desk. Unfortunately the top’s damage was so severe, it was not able to be restored. It had to be replaced. 

We generally prefer to use the original pieces of our furniture restoration process, but when that isn’t an option, we rebuild it to resemble as closely to the original design as possible. The burnt top was comprised of border sections surrounding the center sections instead of larger boards simply glued together to create a uniform, single directional top. This was more involved and complex than a directional top and required much more wood in various lengths, but the new top was outstanding when it was done. Jim did a tremendous job in rebuilding the  top to best represent the original one. If I was the teacher, I’d give him an A+!

Tedious would be an understatement in describing the process of refinishing and restoring this desk. Every drawer had to be removed and labeled. The pull-out filing cabinet was its own entity that required even more disassembly and extra steps. The unique part of this little cabinet was that it rotated so that the teacher could easily access the files in the back. It also had its original snap-in alphabetical folders that the teacher probably used to keep track of her students. The handles did not come off, so the stripping and sanding process involved keeping them in place and working around them. The inside of the desk,  as well as the back, also had to be stripped, sanded and refinished. The stain used was golden oak with satin polyurethane to protect the desk for years to come. 

Burnt Top
Newly Built Top

Monday, March 22, 2021

Antique Windsor Chair Refinished


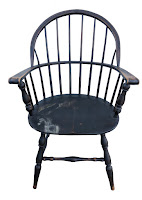
Windsor Chair
Before
This is what is called the “Windsor” Chair. It has the classical round form with spindles on the top and bottom of the chair, with the center split and mounted on a curved flat platform that turns into the top of the armrest. These chairs come in plain or rocking chair styles. 

This chair was over 100 years old and original in its antique styling and manufacturing. It had a center split that had been repaired before we got it, however, the stripping on this type of chair is very intense and takes a long time. (We hate spindles!) Not only did it have spindles, it had two spindle bases, one in the center and one on the bottom seat, therefore making the stripping much more time-consuming. 

Windsor Chair After

One of the most difficult part of refinishing this type of chair is that no power tools can be using when sanding, therefore, everything is hand sanded which adds to the time spent removing the entire old finishing. Some chairs are easier to work on than others. This one was not an easy redo because of the spindles, upper and lower. The chair was made of sturdy walnut, so that’s the end choice color we used to stain it. 

Finished and protected with satin polyurethane, it actually turned out beautiful, despite the splotchy look on the bare wood, which is characteristic of old furniture once stripped. If you ever wondered why chairs cost so much to strip, try your hand at one of these and you’ll understand. It’s a very tedious process and takes many, many hours and lots of patience and of course, the right tools to do the job. The most important tool is patience and tenacity.