Showing posts with label sanded. Show all posts

Wednesday, June 3, 2020

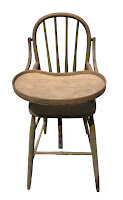
High Chair Before

High Chair After
This is our first high chair restoration. We estimate this height chair was at least 110 years old, based on the owner’s great-grandmother who had used it as a baby. It really look old (and rather creepy) with its dark greenish glaze that sort of, but not completely, covered up the wood. It was indeed a labor of love with all the spindles that neither Jim or I like working on as they are extremely difficult and time-consumimg.

The high chair had a center leather strap that acted as a safety measure to keep the baby from slipping out from under the chair. We were able to keep the original strap and incorporate it into the renovation of this oldie. Not 100% sure of the wood though. It didn’t have a lot of knots or movement so it may have been maple, but it was a hard wood to be sure.

The stripping process took an enormous amount of time to get between all those spindles! Jim took the tray off completely and had to replace a missing rung in the back of the chair. Luckily he could pull the back legs apart far enough to install the new rung into the hole and drill out the broken rung remains on the other side to make the new one fit properly. Once stripped and stained, he chose gunstock stain (our new favorite!) for the entire chair. The edging of the tray needed to be repaired since it had been broken right in the middle with a noticeable split. He added a piece and made it work. Once it was all put together with its new and repaired components, it looked beautiful. Who knew this old creepy chair would turn out so good?? (We did!) Lol.

Check out the oak high chair we also refinished by clicking on this link:

Eastlake Lamp Table

Eastlake Table Before
Eastlake Table After
Eastlake furniture is easy to identify by its unique carvings on the legs of tables and other parts of larger furniture.

This Eastlake table is likely early 1900’s and has seen its share of wear over the years. The legs were in pretty good condition, but the top had rings and dark water stains in addition to the usual scratches. At least it hadn’t been painted, since we’ve done a few Eastlake items that had paint and all that detail was hidden beneath the layers of paint. It’s always a joy to see the wood in all its glory on a lovely item of furniture such as this.

Luckily the stains and scratches weren’t too deep and could be sanded out. The top needed the most attention, so once the sanding was done, a new coat of stain brought the century old table back to life. Protected with three coats of polyurethane, the table top was once again renewed and will be well preserved for many years to come. This table was a perfect size to use as an accessory table between two loungers or as a corner table in a living room. Restoration of this table was a true pleasure as the original beauty of the wood was the crowning glory of the renovation.

Friday, April 10, 2020

Old Hutch, New Paint and Repairs Needed, Badly!

Hutch Before
Cabinet After
An old hutch is not an uncommon item of furniture in many
households. These classic, traditional and much-used cabinets have been around for many years, serving as many uses through generations of families.

This old hutch was originally painted white, but as you can see in the “before” photo to the left, that fresh white paint had long since dulled to a dirty gray with various smudges and markings of orange, green and purple paint, likely left by little fingers. Needless to say, it needed a lot of love, starting with being completely taken apart, section by section since it was literally falling apart.

The doors didn’t have glass, but plexiglass that was barely held in place by the broken door pieces that were coming apart at the top. This alone made the cabinet difficult to transport from the customer’s home to ours. And as you can imagine it wasn’t light, so it had to be handled with care and carried carefully down the steps while watching those flimsy doors.

Once we got it into the workspace, Jim began the tedious process of removing the hardware, cabinets, plexiglass and doors. The sides were also falling off, so he took those off in addition to the doors and carefully marked each section for proper re-assembly. Each piece was then stripped, repaired, shored up and sanded prior to painting. The customer had wanted it to match her recently painted kitchen. Luckily, she still had some paint left over from the kitchen project and gave us the 1/3 gallon of pale gray paint which we used on the interior as well as the exterior of the hutch. The plexiglass was removed and replaced with actual glass. The drawer tracks were all but broken and needed to be rebuilt. The back of the hutch was mostly intact, but needed the horizontal wood slats replaced.

Our customer had asked for the shelves to moved up so she could store her coffee pots and other kitchen appliances, so Jim made each shelf adjustable, which required drilling holes on each side and adding metal pegs on which the shelves would rest. He also added to each shelf a 1-1/4” edge, which added strength as well as aesthetics. The glass door latching device was non-existent, so Jim added durable magnets at the top to keep the glass doors closed. New hinges and new knobs were added and the old hutch looked fantastic. It was not only much prettier, it was stronger and more functional than it had been in a long time.


Monday, January 6, 2020

Painted Cedar Chest Revival

Cedar Chest Before
Cedar Chest After
This is one of many cedar chests we have done, but it is the first one we have refinished that was painted. Personally, I can’t imagine why someone would paint a cedar chest, as the wood itself is too beautiful to cover up. My customer had purchased this painted cedar chest at an estate sale and wanted to see what was hidden beneath ugly green paint. I innerly groaned envisioning someone slapping paint on such a lovely piece of furniture. We had our work cut out for us!

The refinishing process is tedious, but when we get a painted item of furniture that the customer wants stained, it is necessary that every spec of paint is removed, because once it is stained, if not removed, that paint will be visible. Therefore, the stripping and sanding process must be done with intense precision and close attention to detail. It is easy to overlook the small crevices, but they too must be stripped of any and all remnants of paint or any other old finish. That’s where the wood carving tools come in quite handy as they allow us to get into the tiny spots that paint can get trapped.

You never really know what the wood will reveal once the paint has been removed, but as with most cedar chests, this one was was quite beautiful. It had accent strips on the front with wood “buttons” for a bit if decorative flair. It has great lines and a lift-up shelf not the inside. It was also a Lane, so a commonly known brand name that many people have experience with. Upon research, I discovered that Lane cedar chests have the date they were made stamped on the underside of the chest in reverse.  (Therefore if your cedar chest’s serial number is 649010, it was built on January 9, 1946). 

Cedar Chest Before
Cedar Chest After
The inside bottom of the Lane brand cedar chest has a large inset dowel, with a screw that you can turn to release the cedar fragrance. Cedar chests are natural moth repellants, so they are much sought after for precious linens or vintage and antique quilts, to keep them free of these destructive pests and hole-free.

Not all cedar chests have a serial or date stamp on the bottom as there were many manufacturers of cedar chests across the country. Lane is a popular brand that offers a variety of styles and sizes.

Upon completion, this lovely Lane was once again in its original condition, showing off its many tones of wood with that easily recognizable cedar fragrance that we love and moths hate!

Finished Cedar Chest

Check out other cedar chests we have refinished by clicking on these links:
https://finalefurniture.blogspot.com/2019/11/solid-cedar-chest.html
https://finalefurniture.blogspot.com/2016/08/1948-lane-cedar-chest_22.html
https://finalefurniture.blogspot.com/2015/04/elegant-cedar-chest-revival.html
https://finalefurniture.blogspot.com/2013/12/1945-lane-waterfall-cedar-chest.html
https://finalefurniture.blogspot.com/2012/06/my-waterfall-cedar-chest.html

Saturday, January 4, 2020

Century Old Maple Courtroom Chairs Makeover

Maple Chair Before
Maple Chair After

This is one of two courtroom style chairs that were once owned by a
friend’s grandfather and used in his print shop. We estimate the chairs to be approximately one-hundred years old (possibly older).

He had been wanting to get these chairs refinished for years, but finally got around to it approaching last Christmas as a gift for his wife (it belonged to her grandfather) to surprise her. Evidently he had them hung in his garage for over fifteen years after they had relocated to their current farm house on nine acres of land.

These chairs were very sturdy, made of solid maple which was hard to see beneath so many years of oxidation and grime. It never ceases to amaze me how gorgeous wood is hidden under all that worn finish and dirt. I was pleasantly surprised that once the chairs had been completely stripped and sanded to discover the wood was actually light and could be stained a lighter stain per his request. I have been using “gunstock” stain on a few projects lately and found it is one of my new favorite stain color choices. It is a mid-tone color with warm, rich tones, much like cinnamon and brown sugar (makes me think of cookies). It works well with any type of wood, depending on how light you prefer it to be. I used it on a very long handrail in my own home and it matches the existing railing and woodwork perfectly. If I ever get around to refinishing the stairs and railing, that will be my color choice for stain.

While the chairs were is great shape with a very solid structure, the only thing I had to repair was one of the chairs’ back section (behind the slats) had been popping out of their spots which required the wood to be removed, reshaped and glued before pushing back into place. Once the glue was dry, I gently sanded the area and filled in the small spaces with matching filler. After it was stained and polyurethane was applied, you couldn’t even see where the damage had been. I did it and it took close inspection to see where those spots were broken through. The end result was two lovely refinished chairs in a lighter tone that displayed the beautiful wood grain.

Friday, November 8, 2019

Solid Cedar Chest

Cedar Chest Before
Over the many years I have been restoring cedar chests, this is only the second one that was made of solid cedar. Many cedar chests have a decorative outer layer, which is created by carefully piecing many veneer sections together to create a vast style of designs and patterns.
Cedar Chest After

This cedar chest had no veneer, therefore the natural beauty of the cedar could be seen. As you can see, the cedar itself is such a lovely wood that it needs no embellishments. The hardware was made of copper, dulled by age, hiding the color beneath years of oxidation. Our customer had not wanted this cedar chest stained, just left natural and then protected with polyurethane only.

This chest had been painted at one time and the paint had been mostly removed, except for the left front foot. Why anyone would paint a cedar chest is beyond me, but it happens. Cedar is a natural moth repellant, so it makes for an excellent place for storing linens, quilts and seasonal items.

For this cedar chest, we removed the hardware prior to sanding the exterior to remove any remaining old finish, then filled the holes with a medium-tone wood filler. There had been a few gouges, other than that the exterior was in pretty good condition. All hardware was removed and polished. The oversized tacks were treated with black patina so that they would contrast well with the brass. Since it was being use as a coffee table as well as a storage chest, we replaced the worn interior hinge with a friction lid hinge, which is adjustable, so that it doesn’t fall on tiny fingers when it is being opened and closed. Once it was sanded and gouges filled, it received two coats of satin polyurethane and looked better than new.

Check out other cedar chests we have refinished by clicking on these links:

https://finalefurniture.blogspot.com/2016/08/1948-lane-cedar-chest_22.html
https://finalefurniture.blogspot.com/2015/04/elegant-cedar-chest-revival.html
https://finalefurniture.blogspot.com/2013/12/1945-lane-waterfall-cedar-chest.html
https://finalefurniture.blogspot.com/2012/06/my-waterfall-cedar-chest.html
https://finalefurniture.blogspot.com/2020/01/painted-cedar-chest-revival.html

Cedar Chest Before Open
Cedar Chest After Open


Wednesday, September 4, 2019

Tiger Oak Chair Refinished


Tiger Oak Chair Refinished
Tiger Oak Chair Before
This very old chair was one of the most unusual chairs I had ever refinished. I nicknamed it “The Bulky Chair,” because it has very manly characteristics, with wide armrests and a sturdy frame. The original caning was still intact, so I left it alone. Hidden under man-years of oxidation which causes the finish to darken, was a beautiful tiger oak finish, waiting to be visible.

I began by painstakingly removing the old stain and varnish (always a messy job) which took almost a week with a few hours per day dedicated strictly to this chair among other ongoing projects. The right armrest had a large ring stain on it which took a lot of patient sanding to remove as the stain had penetrated into the fibers of the wood.

It looked like a black paint can had been left there and had soaked into the armrest, thus leaving a dark ring which would not come off after stripping alone. After tedious sanding, starting with 80 grit and working up to 220 grit, I was able to remove the unsightly ring. I simply couldn’t leave it there, as it would have been visible even after the new stain was applied. It’s always best to remove marks that have been left whenever possible because it makes for a much cleaner finish. The hard work paid off!

The nature of chairs, with various sizes and surfaces, generally require a lot of hand sanding, especially when there are spindles. Because of the spiral legs on this chair, I used sandpaper exclusively, since curves such as these could not be sanded with a power sander. As you could imagine, this took a great deal of time.

I chose chestnut gel stain, which proved to be a great choice as it brought out the gorgeous tones of the wood. I let it dry for a day, then finished it off with two coats of satin polyurethane, waiting a day between each coat. So after about ten days, the chair was completely refinished.

Made of a unique style of tiger oak, this chair was a great candidate for refinishing. The seat was easily removable and made of black leather, adding to the “manly” style and size of the chair’s design. I believe this is a one-of-a-kind chair, much like the German Rocking Chair I had refinished many years ago. You can read about that chair by clicking on this link: https://finalefurniture.blogspot.com/2012/06/antique-secretary-desk-german-rocking.html

Monday, September 2, 2019

Drop Leaf Table Painted

Drop Leaf Table Before
Drop Leaf Table After

Every so often we get a unique job such as this drop leaf table. It was small, pretty and in need of a new look. The request was to paint the legs a soft white and paint the top black. This was a dramatic change for the white, yet worn table.

The unique feature of this table was that the center spindles opened up to support the leaves when the table was opened. This made the table easy to store as it was only ten inches wide when the leaves were down. Then when needed, easily opened to accommodate a few chairs and have tea time in ten minutes. I realized after I had begun working on this little gem that one of the bottom sections of a spindle was broken, held together with tape and painted over.

In order to repair the break and do it right, I removed the top from the legs along with all the hinges. This way I was able to reach the hard to get to places to properly prep the table for painting. It required a bit of stripping, a lot of sanding and three coats of spray paint on the legs and three coats of brush on paint for the top. I also cleaned the hinges and screws on my polishing wheel. I believe if you are going to take a piece of furniture apart, cleaning the hardware is part of the restoration process. It looks so much better than using the rusty hinges (or other hardware) and makes it easier to install.

TIP: A trick I’ve learned is after removing the rust from the screws, I scrape each screw along the edge of a bar of soap. This little extra step makes the screws easier to re-install as the soap acts as a lubricant without damaging the wood or the metal. To do a restoration right, it’s well worth the many steps involved since the results will be obvious and appreciated.

Drop Leaf Table Finished and Open

Tuesday, July 30, 2019

Antique Oak Buffet Refinished

Buffet Before
Buffet After
A lovely antique buffet made of tiger oak was an absolute joy to refinish and restore. Our customer wanted this old beauty to be lighter so to match her dining table and chairs, also tiger oak. This piece, refinished with lighter stain, really brought out the lovely pattern in the woodgrain, enhancing its natural beauty.

This buffet was comprised of two main components; the bottom with drawers and doors and the top which was a beveled mirror framed by curved oak pieces that matched the overall design of the buffet. Lots of craftsmanship went into the construction of this fine piece, therefore it deserved the best refinishing treatment possible. Each piece was carefully stripped, sanded and stained, then preserved with two coats of satin polyurethane. As always, we take the time to polish all the hardware so it too sparkles and shines, as does the newly refinished buffet. The hardware was all in tact and original, made of solid brass, the “jewelry” or “bling” of the furniture.

That beautiful beveled mirror really added so much elegance to this buffet. The interior was reinforced with a few nails (to secure the bottom panel) and the shelf was reinstalled upon delivery. This was one of our favorite pieces as it shows just how rewarding the restoration process can be.

Friday, July 26, 2019

Maple Plant Stand

Plant Stand Before
Plant Stand After
Once in a while we get a small job, such as this solid maple plant stand, which was custom made by my customer’s husband. This plant stand resembled a giant chess piece and was made from three solid pieces of maple, which must have been cut from the actual tree, using each section as a whole piece as there were no splices within the piece. While smaller by comparison to most jobs we do, it was nonetheless very time-consuming to sand down to the bare wood. This was due to the nature of the hardwood itself as well as the finish used, which was varnish. I estimate it was made sometime in the 1960’s by the color and style, but I’m not sure. I used my favorite tool, my orbital sander for the top and bottom and a small hand sander for the posts in between.

Unfortunately, the hand sander wasn’t adequate to smooth the grain sufficiently to make it smooth enough to stain, so I ended up using the orbital sander on its side to get access to the sides. It took a long time and by the time I was done, my right hand was quite sore from holding the sander with one hand and supporting the object with the other hand. I chose Varathane Walnut stain which brought out the natural tones and colors of the beautiful maple. After two coats of satin polyurethane, it was done. Short and not too simple, but nice looking when completed.

Friday, July 12, 2019

Antique Table and Chairs Whitewashed and Painted

Antique Table Before
Antique Table After
This antique table had been in the customer’s family for generations, however, she wanted an updated look for her lake house and decided that lighter and brighter would accomplish that. I recommended painting the chairs and legs and then using a “whitewash” technique for the table top. This was not an entirely new experience for me, as I had done something similar with a teak table and chairs set. However, this one was slightly and required a few additional steps. The table top was stripped and the legs got a better-than-average sanding, Next step was two coats of primer on the legs, then two coats of Sherwin-Williams "Pure White" paint. This table had a unique feature; the leaf extensions pulled out from each side then lifted up to the same level as the rest of the table. Because of this feature, the underside of these extensions had to be painted white to match the legs, since you could see them when the extensions were being used.

Tuesday, June 18, 2019

Very Old Pie Safe

Pie Safe Before
Pie Safe After

This pie safe was very, very old. My customer had told me it belonged to her great-great grandmother and had originally come from West Virginia. She believes it dates back to the mid-1800’s. It is one of the oldest pieces of furniture we have restored and refinished so far. (Another one is a steamer trunk, also from the mid-1800’s which will hopefully be done this month, so stay tuned!)

This pie safe had been through many, many years and oh, the stories it could tell if it could speak! It had been around during the civil war, the great depression and had paralleled the election and death of many presidents as well as welcoming many children, grandchildren and great-grandchildren to this world.

While it had “good bones,” it needed a great deal of work and of course, time. The top was bent and warped, the metal and body had been painted numerous times and was literally “caked” on, so it made sense to take this oldie apart and restore each piece separately as this allowed better access to the metal work and gave Jim a chance to straighten out and repair a few things, such as the broken bottom drawer and bent, warped top.

After removing a few layers of paint from the body, Jim painstakingly began a 7-week process of removing all the paint from the tin, which had a lovely pattern which was all but hidden beneath that paint. He chose to use a drill bit that matched the size of the holes to remove the paint which had seeped into each hole, then used a wood carving tool to remove the rest. This was a very long, tedious process, but it was the only way to do it right. Once done, he had to prime then paint the metal and let it dry completely before I could paint the body.

The customer had originally wanted the pie safe stripped and stained, but once the old paint was removed, the wood used to create this pie safe wasn’t stain-worthy, so we opted for painting it white with copper spray paint for the metal inserts which had a beautiful circular design, practically invisible under all that paint. The copper was an excellent choice, as it highlighted the beautiful paint color, Sherwin-Williams "Cotton White.” For a finishing “fun” touch, I selected polka dot knobs to replace the old wooden ones to add a touch of whimsy.

After this old beauty was done, the results were absolutely stunning, one which will go into our “Finale Hall of Fame,” for sure. Definitely a great and beautiful item of furniture which will be lovingly used for many years to come.


Monday, June 17, 2019

Ship’s Wheel Stripped

Ship's Wheel Before
Ship's Wheel After Stripping

Every once in a while we get an unusual job, not your everyday furniture. This teak ship’s wheel was such a job. He had also brought two other small things, a cup holder and a t.v. remote (or cell phone) holder. The customer had wanted this ship’s wheel to match his boat, so he wanted it stripped only. He would take care of the staining.

I started with the wheel lying flat on the table, then decided it would be easier to work on in an upright position, so I had Jim cut a small hole in my work table and I used this to position the ship’s wheel in it and spun it as needed to get into all the small areas on the spindles. It turned out to be a great idea as it helped me access areas that would otherwise have been very difficult to reach otherwise. This ship’s wheel took a full three days of detailed, time-consuming hand-stripping and sanding to remove the worn, peeling polyurethane.

The wheel had no stain on it, just polyurethane, but had begun to wear off and in some areas had suffered water damage. While sanding, I focused on those areas, but after it was to be stained, it would cover those areas completely. When I had completed the sanding, I took an old toothbrush and used brass cleaner to remove the oxidation from the center, which was made of solid brass. It look great when all that oxidation was removed and with a bit of elbow grease and brass polish, it shined up and looked brand new. This final touch made the ship’s wheel look great.

Ship's Wheel hole in Table


Sunday, May 19, 2019

Antique Rocking Chair w/caning

Rocking Chair After
Rocking Chair Before
This antique rocking chair was quite wobbly and needed the caning replaced. This chair had been made using "strand" caning, a different style than the push in caning which is held in place by using a spline. Unlike spline caning, this chair's construction was designed for using strand caning because of the holes surrounding the border of the back and seat.

First things first. After I removed the original, damaged caning, Jim took care of the broken and loose joints by taking the chair apart, then gluing it back together so it would be strong enough to endure the caning process, which required a lot of pulling and pushing through the strengthened holes. Then I sanded the old finish and stained it with walnut stain. Once the stain had dried, I sprayed the first coat of semi-gloss polyurethane so it would have some protection for caning. Then came the "fun" part.

I had done spline caning before, but this was the first time I had done "strand" caning and I have to tell you, it was extremely time-consuming work as you have to draw each strand of cane through the holes, secure the cane with pegs and work your way throughout the entire chair, first going front to back, then side to side, then the weaving starts. There are six (or seven) steps involved in this type of caning, the last steps are the diagonal weave, which creates the "holes" that define the design. It is tedious work, but if you follow the steps in the instruction booklet, you can do this yourself. I also watched a YouTube video put out by the manufacturer that we had purchased the chair kit from and found it extremely useful and referred to the video as well as the booklet many times during the process. The finished product was a lovely antique chair that will look elegant as it graces the parlor of a sitting room, hopefully for another century.


Monday, March 25, 2019

Antique Dresser With A "Secret"

Antique Dresser Before
Antique Dresser After
We love antiques. We love the look and feel of them as well as working with them, because unlike mass-produced furniture you tend to see in today's market, antiques have a unique profile, form and structure that is lacking in "modern" furniture. This specific dresser has a great story as well as a unique feature that was discovered after we brought it home.

The photos on the left and lower right are the dresser as we had seen it in the antique store (top) and after we got it home (bottom right). We had purchased the dresser right here in Marine City in December, 2015. Jim and I were

Thursday, December 13, 2018

Two Night Stands

Maple Night Stand Before
Walnut Night Stand After

This lovely maple table, one of the two I refinished, was in pretty good condition to start with, just needed to be stripped and stained with walnut to match the other furniture in the bedroom it was to be used in.

Spindles are always a lot of work and this one was no different. The spindles were time consuming to strip and I had to make sure all the old finish was entirely removed before I could sand it for the final time to properly prep it for staining.

Monday, November 26, 2018

Antique Parlor Chair

Parlor Chair Before
Parlor Chair After
This little antique parlor chair was in excellent condition except for the seat, which was dented inward from being used. The stripping process took a great deal of time because the chairs by their nature have a lot of surface area that requires a lot of hard work to strip. When spindles are involved, it takes even longer.

Spindles are done by using a toothbrush dipped in stripper and then dipped in lacquer thinner and lots of brushing over and over to remove both stripper and lacquer thinner, which melts the stripper. This is quite a messy process that is time consuming as well as tedious.

Once all the goop was removed, I used steel wool dipped

Wednesday, October 31, 2018

Old Rocker Makeover

Chair Before
Chair After

This rocker had a great structure, but the fabric was shot and needed to be replaced. It had also been used as a scratching post for a couple of cats, so the fabric on the backside was pretty torn up. My customer had asked for the chair to be refinished in addition to replacing the old, worn and torn fabric with fabric she had left over from a previous reupholstering job I had done for her dining room chairs. (See link below).
http://finalefurniture.blogspot.com/2018/06/french-dining-chairs-reupholstered.html

After removing the old fabric, as I had suspected, the chair had been stuffed with horsehair on the

Thursday, October 11, 2018

Old Toy Chest Makeover

Toy Chest Before
Toy Chest After

Every so often I get a piece of furniture that is unique, completely different from other pieces I normally get such as tables and chairs. This piece was one of those interesting furniture items that I love because I can really feel my creative juices flowing at the prospect of making it look great.

An older gentleman and his wife who reside here in Marine City brought this to me to be restored. He told me it was used as a toy chest in Hamtramck and had bought it for his grandson. This man was a retired antiques dealer who has traveled across the country (in an RV), buying and selling antiques. He saw this unique piece and felt compelled to buy it for $75.00, but knew it needed more work so he brought it to me. I was thrilled!

Country French Table

Table Before Refinishing
Table After Refinishing

Tables are probably the most common refinishing jobs we acquire and most of the time we refinish and stain the entire table. Sometimes we paint tables. For this table, we combined both techniques, using stain and paint to create a harmonious new look, a perfect facelift.

This table had been stored in a barn for many years until someone had started working on the top, stripping off most of the paint. The base, however, still had a few layers of paint on it. For this table there were at least two, maybe three coats of paint, which required a great deal of time to remove. Wood carving tools were used to get into the "nooks and crannies" of the surface as it was quite porous, therefore it had absorbed all the original white paint. Since the top would be stained, it was necessary to remove every spec of paint. If you don't remove all the paint, it will still be visible when you apply stain, especially dark stain as in this table, which was stained dark walnut.

Since the original casters were well worn, we replaced them with new black rubber casters. The sides and base were painted antique white, which completed the "Country French" look the customer had wanted to achieve. This table had great bones and needed a bit of creative elbow grease to bring it back to life. Mission accomplished!

We had also done a dining room set using the same technique, combining paint and stain in the same way. Check out this blog post to see that: https://finalefurniture.blogspot.com/2017/02/from-amish-to-amazing.html