Wednesday, August 6, 2014

Bookshelves Go Black

Bookshelf Before
Bookshelf After
This was another large job we did for a Grosse Pointe client. She loved this old set, but wanted an updated look with fresh paint. She had been to Africa many times and wanted the bookshelves, desk, parson's table and chair to match the decor of her room. I suggested she go with black and she agreed. I also suggested to remove the gold accent corners as these only dated the pieces.

Once we got the furniture home, it was a long process of sanding every surface prior to painting. She had chosen a Sherwin-Williams black, which in theory looked like it was a perfect match, but when thinned to be painted, the end result was purple! Yikes! Luckily we noticed it before Jim painted the entire set.

Desk After

Desk Before
Quick thinking was needed here as we'd already begun the painting process and couldn't delay. We ended up replacing the paint with a Home Depot Behr paint, which was absolutely perfect. Black paint is a great choice when you want to repaint furniture as it is classy and matches most decor, however, the down side is that it's difficult to work with since the absence of light makes it hard to paint all the corners, and this set had many of those.

It's also difficult to photograph black furniture since the absence of light also makes it hard to capture details. If you use a flash, you get a "hot" spot in the photograph. I took the "before" photos outdoors and the "after" photos at my client's home, which wasn't the ideal place to photograph, but you get the picture. No pun intended.
Chair After
Parson's table and chair
Parson's table after


1960's Bedroom Set

Night Stand Before
Night Stand After
This was a large furniture job for a client in Grosse Pointe. This bedroom set included a nightstand (pictured left and right), a tall dresser, a low dresser, a mirror (not pictured) and a headboard. This was a popular 1960's, Early American style set. I actually had a nightstand very similar to this one as a child. It was popular back then.

My client wanted to keep the same finish and use the same handles. I started with the low dresser, then the tall dresser, nightstand and headboard and finished with the mirror. I spent two or three days removing the tarnish from the handles, then polishing them until they looked new once again. I love the shiny new brass finish revealed after all that detail work.

There are always surprises when you remove the factory finish from furniture and this set was no exception. The wood was pine, but because various sections of board were used, there was a great deal of color variation. Personally, I love this look as you can really see the wood grain, which tends to be hidden with a factory treatment. This is the beauty of hand-finished products; seeing the gorgeous wood beneath.
Low Dresser Before
Low Dresser After


Headboard Before
Headboard After

Tall Dresser Before
Tall Dresser After

Antique Cabinet

Cabinet After
Cabinet Before
This little gem was a project for a former co-worker. She had wanted to use it for the bathroom in her cottage. She had acquired the cabinet from a friend. After seeing the potential, she decided to have it refinished. It had been worked on previously, but because of the construction, I could see that it was indeed an antique, maybe sixty or seventy years old. The exterior was in need of refinishing, otherwise it had good bones.

She wanted to maintain the look, so after stripping and sanding, I used a pecan stain, which was perfect. It retained the original color, yet with a brand new, updated look. She had ordered new knobs, but they didn't arrive prior to the completion, so I just photographed it with the old knobs, but polished the hinges and other hardware. I love little projects such as this, that serve a big purpose!

Tuesday, August 5, 2014

Tiny End Table

Tiny Table Before
Tiny Table After
I came across this tiny table at a local garage sale. It was exactly what I had been looking for to use as a side table next to my chair while I watch t.v. It's extremely lightweight and at only 20-1/2" x 12", it was the perfect size. It was in pretty good shape, but I decided to refinish it anyway, just because I had a specific color in mind for the completed project.

It was a one day strip/sand job that took most of my afternoon, but once I had completed stripping and sanding it, I was able to stain it the same day. The legs were a bit loose, so I glued them together and let it sit over night. The next day the legs were secure and the table looked beautiful! I was so fortunate to have found the exact size table for the spot I needed to put it. You never know when you'll find that one special piece of furniture! I love this little beauty.

Yard Sale End Table Revival

End Table Before
End Table After
I got lucky with this little table. I needed an end table for the living room and couldn't seem to find one that worked in size. The previous one dollar garage sale Ikea table wasn't tall enough, so when I got this table at a yard sale, I knew I had finally found the right one. I'm glad I didn't pay much for it because it turned out to be quite difficult to strip. For whatever reason, there seemed to be endless amounts of lacquer on this table, requiring a LOT of coats of liquid stripper and more labor than I thought possible for such a small item! Wow! My arms were killing me after I had completed the top only and I still had the legs to do. Geez.

Thursday, June 19, 2014

Dressers Painted Black

Dresser Before
Dresser After
I found this little treasure at an estate sale along with another dresser (at bottom, which also had a special design detail at the lower edge). I especially loved the top drawer, which was slightly longer than the other three and had a great curvy top, reminding me of an Art Deco style. The dresser was pine, and while the wood was in great shape and would have look good stained, I chose black paint instead.

I knew the two dressers would look great painted black, as long as I could find matching knobs. As always, a full stripping was necessary before priming and painting. I was fortunate to find online sixteen knobs that were light gray porcelain with a "crackled" look. This was the detail needed to link the two different style dressers together so that they made a matched set. It never ceases to amaze me how much paint changes the look and feel of a piece of furniture. In this case, choosing the right paint linked two totally separate pieces together as a matched set.
Dresser Before
Dresser After

Oak Mantel Stained Darker

Mantel Before
This beautiful oak mantel was quite challenging because of the intricate design with fluted sides and so much detail in the top. There was also a hearth, which I took no photos. (Unfortunately, I didn't get a vertical photo of the mantel before I began stripping it.) My customer wanted a darker finish, so the first step was to completely strip the wood surface of its coating, which proved to be time-consuming and labor intensive work.
Mantel After
The process was to first completely remove the old polyurethane with a strong gel stripper, first using a large brass brush, then going into the grooves with a smaller brass brush, then finally gently scrubbing the surface with a #0 steel wool before the final coat of sanding with a 200 grit piece of sandpaper.

It was a couple of days before I was ready to apply the stain, which was "General Stain Java Gel," the customer's choice. I had not worked with a gel stain before and found that not only was the stain spectacular to use, it had a "cherry" fragrance,  not the typical "chemical" odor you expect from a chemical stain. It was thick and easy to work with and left a deep, rich finish after two applications. The end result was an elegant, rich darker mantel which the customer loved!

Thursday, March 6, 2014

Tiny Antique Chair


Antique Chair Before
Antique Chair After
A nice woman had contacted about a small chair she had wanted refinished. The chair had been caned at one time, but had since been reupholstered, a seat had replaced the caning. The replaced seat cushion had been done a very long time ago. She said the chair was very old, but didn't know how old. I told her I guessed it was from the 19th Century because of its structure and the way it was put together.

She simply wanted the seat cushion fabric replaced and the wood refreshed. I removed the old seat and replaced the fabric with a lovely paisley tapestry fabric I had left over from a previous job. It was the perfect color and texture for this chair. I completely sanded and stripped the wood and made minor repairs to the bottom rails (they were a bit wobbly) and then stained the chair with red mahogany. Once complete, this little chair became a real beauty.

My customer was thrilled! She also purchased another chair from me and I supplied her with additional fabric so that the two chairs, while different in design, had the same seat so they could be used as a pair. This was a fun project as I'm always pleased to make my customers smile.

Antique Chair Seat Before
Antique Chair Seat After


Tuesday, February 11, 2014

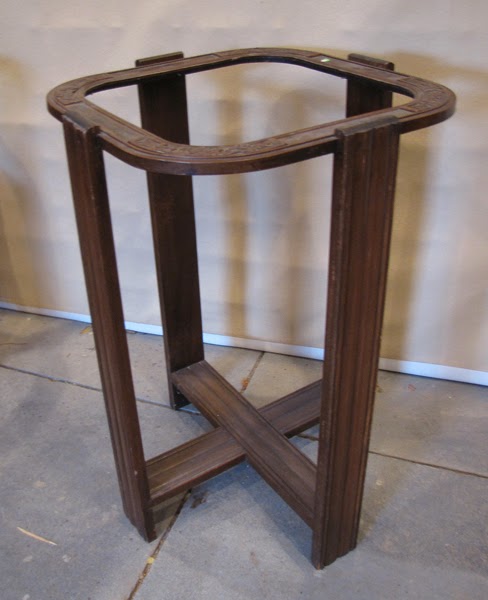
Peace Sign Mosaic Table


Table After Paint & Mosaic


Table Before Painting & Mosaic
I wasn't sure exactly what I had wanted to do with this table, but as I studied it, a plan took shape in my mind. The wood was nothing special, so I decided on painting it gloss black. Next, it needed a top. At one time there may have been a piece of glass in there, but it was long gone. After I replaced the top with a section of wood to fit the square-round shape, my idea became concrete. I would apply mosaic to the center and turn this old, worn out relic into a work of art.

As with all projects, it was necessary to first sand all the surfaces. I lightly sanded the entire table then primed it and painted it gloss black. It was the right choice as black lends itself to the most creative of choices for other applications. It also made my mosaic detail easy since I had decided on using mirror and cobalt blue glass.

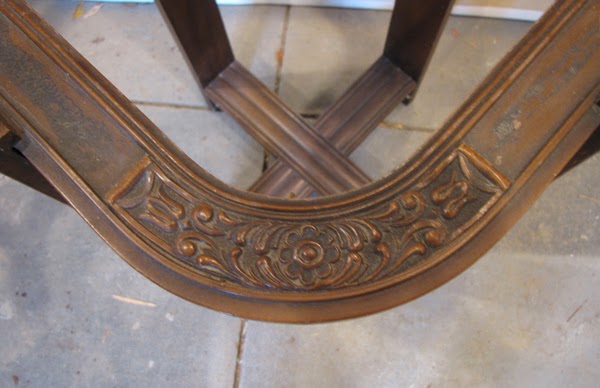
Corner Before Painting
Corner After Painting
As the design took shape, I knew it needed a detail in the center so I selected a peace sign, an inspiration from my seven year old granddaughter. It was perfect. To complete the project, I painted the corner detail flowers with blue and white paint to accentuate the design, which was hidden until the paint revealed the hand-crafted detail that someone took a great deal of time to do a long time ago. The once worn and ugly table had been successfully turned into a usable work of art. I think you'd agree that this table took on an entirely different transformation and it only took two weeks!

Table Top Before
Table Top After


Widdicomb Table

Widdicomb Table Before
Widdicomb Table After
This unique table was a special job I received shortly before Christmas. The client had extra tables he didn't need, but really wanted this one. Unfortunately it had been painted black, which covered up the gorgeous wood that lie beneath. He had started removing the paint, but didn't feel comfortable finishing it, so he called me. Of course I could take care of it!

He delivered it on a cold, snowy day. After he got it into the garage, I knew this table would be outstanding when it was done. I told him I'd have it done in a week, or possibly less. I got started sanding the table that afternoon and by the end of the day, it was ready for new stain. He wanted to go darker, so I suggested walnut. He loved the idea and agreed it would look good. While I applied the stain, I was amazed at how gorgeous the wood was. This table was made of solid oak, about 1-1/2" thick and had some weight to it. I applied two coats of semi-gloss polyurethane to protect the surface. The transformation was complete only a few days later, so I contacted my customer and assured him he would not recognize his table.

He picked it up the following Saturday and was astounded with the results. I mean, look at it! He was torn because his original plan was to eliminate some of the extra tables he had collected, but when he saw this one, he was undecided. Either way, he loved the way it tuned out. Ironically, later that evening, I received a text from him saying that if I wanted a good recommendation, he'd gladly give me one because he decided to sell the table on eBay and it sold only ten minutes after he listed it for $2,500!! I'd say it was the right choice. I love satisfied customers. It just makes my day!!
Widdicomb Table Before
Widdicomb Table After

Special Dresser Gets A Makeover

Dresser Before
Dresser After
This dresser belonged to my friend's mother who passed away in 2008. My friend had to put it in a storage unit after her brother passed away last October. She needed to empty the storage unit and asked if I was interested in this dresser. "Of course!" I told her. I liked the retro design and style of this piece, so I brought it home and began sanding it with the intention of staining it a shade or two darker.

Unfortunately, the wood wouldn't accept the stain and the piece got severely discolored. Before adding more stain and making it worse, I quit while I was ahead and made the executive decision to paint it instead. As much as I prefer staining to paint, at times it's the best solution, as it proved to be with this dresser. I chose semi-gloss white and after priming, I got busy painting it bright white. It was a good fit because it gave this old 1950's style dresser a fresh, clean and brand new appearance. I decided to have fun with it and add colorful polka dot knobs. The transformation was complete and the dresser was now a usable, yet smaller scale piece of furniture that functions well.

Dresser After


Monday, February 10, 2014

Furniture Goes to the Navy!

China Cabinet Before
China Cabinet After
I'm always up to a challenge, and this job was no different. I received a
call from a client who had an antique China cabinet and matching buffet she wanted painted a dark navy blue. When I arrived at her house, she showed me the two pieces, which were lovely, but worn out and tired looking. A new coat of paint was just what the doctor ordered!

She told me she wanted a very dark, almost black navy, so I gave her the Sherwin-Williams color palette so she could choose the color. She selected #6244, Naval. It was the deepest navy blue they offered. I told her I agreed it was the right color. She preferred a "high gloss" finish, which I also thought would be a perfect choice that would complement the original brass hardware.

The process was a long, tedious one which involved a lot of preparation. We removed all the hardware, which would have to be polished. All drawers had to be removed since they'd be painted separately. There was a broken center bottom molding on the buffet, which had to be repaired and reinstalled. Other than minor repairs, the furniture was in great shape.


Buffet Before
Buffer After
The next step was sanding all the surfaces smooth. Jim took care of this while I painstakingly removed the molding, glass and filigree wood inside of the China cabinet's doors. The glass was held in place with 1/4" trim molding and attached with 5/8" nails. Luckily there weren't a lot of nails, but the ones I removed were difficult, as I didn't want to damage the molding. I carefully slid a thin metal putty knife between the interior of the door and the molding and gently pried the molding forward, revealing each nail. When I was certain I could grab the nail, I used my vice grips and tugged, until all nails were out, then carefully peeled the molding away from the edge. This took over an hour for just two doors. After I had removed the molding, I then marked each edge so that reassembly would be easy. (When working on this type of job, it's important to think ahead!)