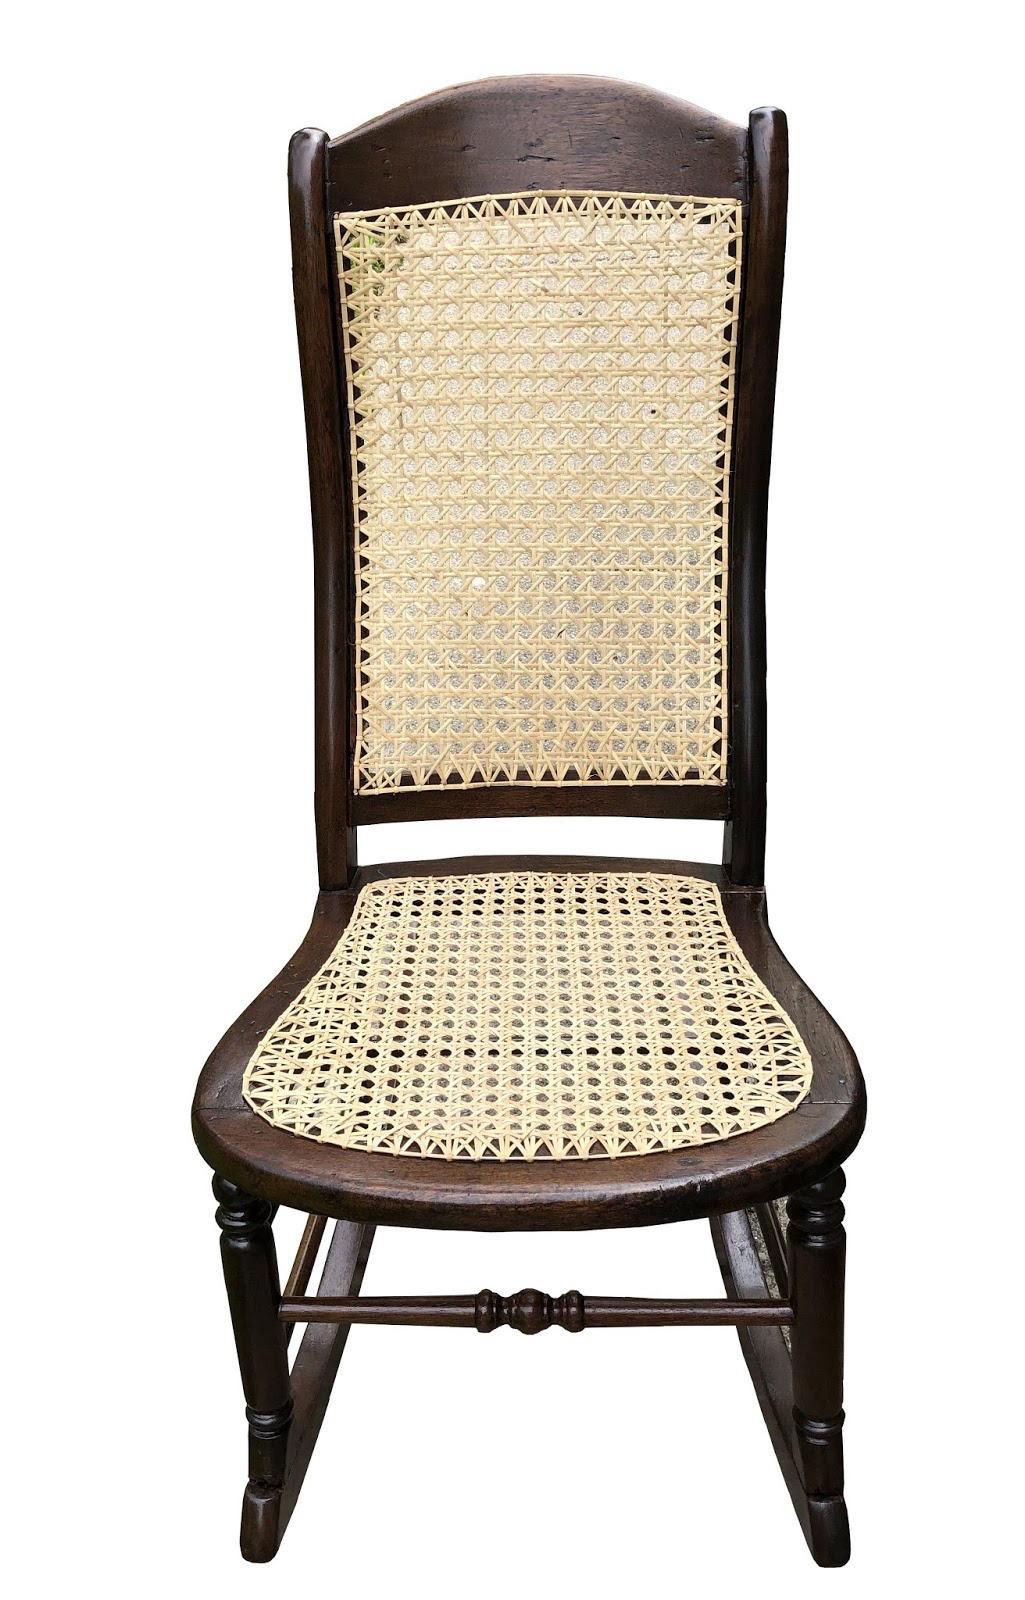
Sunday, May 19, 2019

Antique Rocking Chair w/caning

Rocking Chair After
Rocking Chair Before
This antique rocking chair was quite wobbly and needed the caning replaced. This chair had been made using "strand" caning, a different style than the push in caning which is held in place by using a spline. Unlike spline caning, this chair's construction was designed for using strand caning because of the holes surrounding the border of the back and seat.

First things first. After I removed the original, damaged caning, Jim took care of the broken and loose joints by taking the chair apart, then gluing it back together so it would be strong enough to endure the caning process, which required a lot of pulling and pushing through the strengthened holes. Then I sanded the old finish and stained it with walnut stain. Once the stain had dried, I sprayed the first coat of semi-gloss polyurethane so it would have some protection for caning. Then came the "fun" part.

I had done spline caning before, but this was the first time I had done "strand" caning and I have to tell you, it was extremely time-consuming work as you have to draw each strand of cane through the holes, secure the cane with pegs and work your way throughout the entire chair, first going front to back, then side to side, then the weaving starts. There are six (or seven) steps involved in this type of caning, the last steps are the diagonal weave, which creates the "holes" that define the design. It is tedious work, but if you follow the steps in the instruction booklet, you can do this yourself. I also watched a YouTube video put out by the manufacturer that we had purchased the chair kit from and found it extremely useful and referred to the video as well as the booklet many times during the process. The finished product was a lovely antique chair that will look elegant as it graces the parlor of a sitting room, hopefully for another century.


Sunday, May 12, 2019

Bloodwood Rocking Chair

Bloodwood Rocking Chair Before
This chair was the rocking chair version of a chair I had done previouslyhttp://finalefurniture.blogspot.com/2018/10/sturdy-cherry-chair.html This chair was identical to the first one, except for it being a rocking chair. I made an interesting discovery while stripping this chair. I  thought the first chair was made of cherry, thus the extreme reddish tones and variations of color throughout the chair.
Bloodwood Rocking Chair After
for the same person. You can read about that chair by clicking on this link:

This rocking chair had even more differential color tones in red, yellow and gold, so after some research, I was able to identify the true wood as bloodwood, an exotic hardwood grown in Brazil and Australia. I had never actually worked with bloodwood, but was familiar with it just by working with various woods over the last seven years. As you can see by the “before” and “after” photos, the old stain was hiding the glorious colors and tones of this unique wood.

The stripping process was tedious and very time consuming for this rocking chair, but necessary to expose the beauty beneath. Once stripped and thoroughly sanded, I chose red mahogany stain, as I did for the first chair which brought out the natural beauty. It seemed like the best choice as it worked well before. As with the first chair, I applied two coats of semi-gloss polyurethane for a smooth, even finish.


Monday, March 25, 2019

Antique Dresser With A "Secret"

Antique Dresser Before
Antique Dresser After
We love antiques. We love the look and feel of them as well as working with them, because unlike mass-produced furniture you tend to see in today's market, antiques have a unique profile, form and structure that is lacking in "modern" furniture. This specific dresser has a great story as well as a unique feature that was discovered after we brought it home.

The photos on the left and lower right are the dresser as we had seen it in the antique store (top) and after we got it home (bottom right). We had purchased the dresser right here in Marine City in December, 2015. Jim and I were

Thursday, December 13, 2018

Two Night Stands

Maple Night Stand Before
Walnut Night Stand After

This lovely maple table, one of the two I refinished, was in pretty good condition to start with, just needed to be stripped and stained with walnut to match the other furniture in the bedroom it was to be used in.

Spindles are always a lot of work and this one was no different. The spindles were time consuming to strip and I had to make sure all the old finish was entirely removed before I could sand it for the final time to properly prep it for staining.

Tuesday, December 11, 2018

Antique Mahogany Table Makeover

Mahogany Table Before

We've done plenty of tables since we started restoring furniture, but this by far was one of the most unique antique tables. This was a lovely "sewing table" with fluted edges on the top shelf and beading on the edge of the lower shelf. Unfortunately its structure was quite wobbly, because the points of
Mahogany Table After
attachment were very delicate and the legs were spindly and thin, which affected the overall stability. The only thing we could do to shore then up was add a few pin nails on the back side of the legs at the attachment point between the two shelves.

This table was in great overall condition, but the row of beading on the bottom shelf had beads missing, which needed to be replaced. I searched online for the right size replacement beads and discovered a few things. The first, beads such as the ones on this table are difficult to find, plus I was not able to get furniture beads in a dark

Monday, November 26, 2018

Antique Parlor Chair

Parlor Chair Before
Parlor Chair After
This little antique parlor chair was in excellent condition except for the seat, which was dented inward from being used. The stripping process took a great deal of time because the chairs by their nature have a lot of surface area that requires a lot of hard work to strip. When spindles are involved, it takes even longer.

Spindles are done by using a toothbrush dipped in stripper and then dipped in lacquer thinner and lots of brushing over and over to remove both stripper and lacquer thinner, which melts the stripper. This is quite a messy process that is time consuming as well as tedious.

Once all the goop was removed, I used steel wool dipped

Monday, November 19, 2018

Antique Dresser with Mirror

Antique Dresser Before
Antique Dresser After New Stain
Throughout the years we have done a good variety of dressers, each one different, with its own personality. Some of the dressers were tall, others were long and low with plenty of drawers. 

This antique dresser had three spacious drawers and a great looking mirror, with wood that was in excellent condition featuring a unique scroll design. The mirror itself had some age marks, but I always feel that this element adds to the character of the piece. 

The top of the dresser had

Wednesday, October 31, 2018

Old Rocker Makeover

Chair Before
Chair After

This rocker had a great structure, but the fabric was shot and needed to be replaced. It had also been used as a scratching post for a couple of cats, so the fabric on the backside was pretty torn up. My customer had asked for the chair to be refinished in addition to replacing the old, worn and torn fabric with fabric she had left over from a previous reupholstering job I had done for her dining room chairs. (See link below).
http://finalefurniture.blogspot.com/2018/06/french-dining-chairs-reupholstered.html

After removing the old fabric, as I had suspected, the chair had been stuffed with horsehair on the

Thursday, October 11, 2018

Old Toy Chest Makeover

Toy Chest Before
Toy Chest After

Every so often I get a piece of furniture that is unique, completely different from other pieces I normally get such as tables and chairs. This piece was one of those interesting furniture items that I love because I can really feel my creative juices flowing at the prospect of making it look great.

An older gentleman and his wife who reside here in Marine City brought this to me to be restored. He told me it was used as a toy chest in Hamtramck and had bought it for his grandson. This man was a retired antiques dealer who has traveled across the country (in an RV), buying and selling antiques. He saw this unique piece and felt compelled to buy it for $75.00, but knew it needed more work so he brought it to me. I was thrilled!

Country French Table

Table Before Refinishing
Table After Refinishing

Tables are probably the most common refinishing jobs we acquire and most of the time we refinish and stain the entire table. Sometimes we paint tables. For this table, we combined both techniques, using stain and paint to create a harmonious new look, a perfect facelift.

This table had been stored in a barn for many years until someone had started working on the top, stripping off most of the paint. The base, however, still had a few layers of paint on it. For this table there were at least two, maybe three coats of paint, which required a great deal of time to remove. Wood carving tools were used to get into the "nooks and crannies" of the surface as it was quite porous, therefore it had absorbed all the original white paint. Since the top would be stained, it was necessary to remove every spec of paint. If you don't remove all the paint, it will still be visible when you apply stain, especially dark stain as in this table, which was stained dark walnut.

Since the original casters were well worn, we replaced them with new black rubber casters. The sides and base were painted antique white, which completed the "Country French" look the customer had wanted to achieve. This table had great bones and needed a bit of creative elbow grease to bring it back to life. Mission accomplished!

We had also done a dining room set using the same technique, combining paint and stain in the same way. Check out this blog post to see that: https://finalefurniture.blogspot.com/2017/02/from-amish-to-amazing.html

Wednesday, October 10, 2018

Bloodwood Chair

Chair Before Refinishing
Chair After Refinishing

Strong, sturdy and comfortable, this chair was somewhat of a surprise to my customer who thought it was an oak chair. After stripping, I discovered that it was not oak, but actually made from exotic bloodwood, found in Brazil and Australia. This wood is unique in that when the tree that it comes from is cut, you can see red “blood” dripping on the cut piece, hence the name. It is a hardwood with lots of color and movement. In addition to the run that runs through this wood, there are also yellow and gold shades, which complement the luscious red tones. It’s a gorgeous chair to be sure.
The stripping process revealed a lot of red in the wood, which had already been seeping through the old, worn surfaces, especially around the arms.

With the natural red tones of this chair, golden oak stain which was what my customer had originally requested, would not have worked. I opted for red mahogany, which not only brought out the chair's natural color, but worked well with the varied tones which gave the chair the exotic look that it deserved.

After using the red mahogany stain, I finished it with two coats of semi-gloss polyurethane so that this chair will last for many years to come.

Update as of May 12, 2019: I just finished the “sister” chair for this one, except it was a rocking chair. You can read about it here: http://finalefurniture.blogspot.com/2019/05/bloodwood-rocking-chair.html

Antique Spindle Table

Antique Spindle Table Before
Antique Spindle Table After

In restoration, spindles are simply not our favorite things to refinish for obvious reasons; they are a LOT of work. This table, however, required only a sand "touch up," for the legs. Only the top was stripped and sanded down to bare wood, then stained with golden pecan stain and finished off with three coats of semi-gloss polyurethane.

The legs were lightly sanded and touched up with walnut stain, since they were originally made from walnut, so keeping the stain original was the right choice. Likely this table dates back to the early twentieth century, or late nineteenth century judging by its design and the many spindles used to create it. You can usually spot an older piece of furniture by the screws, how it it assembled and the way the wood is connected.

There are other telltale signs, such as the natural patina of the wood, which as it ages, can become dull, the finish almost completely gone as was the case with this table. This is a plus because it makes the tedious job of sanding less time consuming than removing all that old finish which can take days. All in all this little table looked completely different once the top was refinished and the legs were refreshed with a bit of stain and new polyurethane.

This table had a lovely burled maple with a center point pattern. This designed is achieved by cutting the tree section in quarters, then matching the four sections so they meet in the center to create a unique and harmonious, gorgeous table top. Never doubt the value that refinishing an antique can bring to your old furniture. If you own it, you already have the value in the furniture. It's always worth saving a piece such as this.