Friday, August 30, 2024

1940’s Waterfall Dresser Refinished

Waterfall Dresser After
Waterfall Dresser Before
This was a lovely waterfall dresser that had sustained some burn damage on the top right side. Other than that, it was in pretty decent condition. It also had a matching round mirror (not pictured) that we refinished, in addition to the dresser. I decided not to include it in comparison, since the "before" photo didn't include the mirror, as it was already detached. 

Jim was able to minimize the damage of the burn mark on the top with careful sanding. With veneer you can't sand too much or you will completely remove the veneer down to the bare wood. In furniture such as this, it's not an easy fix so better to keep the sanding to a minimum. Jim decided to paint the center curved section of the front top drawer and the backing since originally it had some kind of painted feature which had long since worn away. It looked better than leaving it stained with an uneven, unattractive color. It also matched the new hardware very well. The plastic back section of the original knobs were broken, so out customer had decided to replace them with new hardware. 

Our photo on the top left is the "before" version, which shows a bit of the top. Since our customer had to order the hardware and it took a few weeks to get it, we were unable to get an "after" photo of this dresser, so the one you see on the right was supplied by the customer. However, they posted the refinished dresser along with the mirror on our Facebook page, so here it is. It looks pretty good!

Dresser with Mirror


Saturday, August 24, 2024

1932 Cedar Chest Refinished and Restored

Cedar Chest After
Cedar Chest Before
This is a vintage 1932 Lane cedar chest, with a walnut exterior. The top had been covered with material a foam because whoever had used it previously had done some real damage to the original top. Once Jim removed the foam top, what he saw was startling. 

The wood top had been completely unusable. It was covered with the glue that had been holding the foam in place and the fabric was attached with large tacks. Evidently whoever had done this wanted to cover the top and make it an effective seating area, which is not a bad way to go if you don't have the resources to refinish and restore the piece of furniture. After discussion the possibilities with the customers, they decided to replace the veneer with new veneer (good choice) and it looked great. Jim ordered a walnut veneer that had a self-stick feature which is a great way to go since you do not require adhesive to attach it.

Of course the entire cedar chest had to be stripped, sanded and refinished. Once that was done and the new veneer had been installed, he stained the entire cedar chest with English Chestnut stain (this year's most popular stain!) It turned out terrific. The new walnut veneer was the cherry on top of this hope chest which is once again a lovely, usable and beautifully finished piece of furniture. 


Old Cedar Chest Top (before new veneer) 


Dining Room Chairs Re-Upholstered

Chair After
 
Chair Before

This set of four dining room chairs had outdated fabric, though it was still in pretty decent condition. The chairs were made in 1996, so the fabric was original. Not bad for 28 years old. However, my customer had wanted to update the material and chose a cream color, which looked very nice with the oak wood. 

Luckily the wood needed only a little bit of cleaning and touch-up, but nothing else. It was in really great condition. When you take care of your furniture, it shows. It also shows if furniture has not been taken care, of or had been badly used or abused. Each piece tells its own story.

For these chairs I had to invest in a new, long-nose pneumatic stapler because the backrest area of the chairs' top and bottom areas were hard to reach with my regular stapler. The long nose stapler is something I had been wanting to purchase sooner or later because there have been times recently where having one would have been pretty handy. I also found out the the staples are a completely different type that I had been using. Once I got all the stapler/staples issues figured out, I could proceed with my project of working on these four chairs.

Upon first seeing these chairs, I was unaware how to remove the back as there were no visible screws, nails or other fasteners. Once I removed the seat, it was a matter of using a flat screwdriver and loosening the bottom and hammering it upward to "lift" the back right out and pull if away from the groove at the top that it was pushed into. Once the backrest was out, I had to remove all those staples. One aspect of furniture restoration and refinishing that is time-consuming and painful is removing the original staples. After a while my right shoulder gets pretty sore, so I try not to do them all at once.

Installing the new fabric was not too difficult as I wrapped it around the backrest and stapled the inside edge so that the staples couldn't been seen. The top and bottom were a bit trickier because of the way it had to be lifted up and into, then hammered back into its original groove at the top. It was essential to line it up perfectly and hammer it in without breaking or splitting the wood. I decided to work on one chair at a time, completing the backrest first and then the seats. Each seat received new foam because the old foam was very worn out and not supportive at all. I also topped off the seat with a bit of quilt batting.

Because of the pattern, I wanted to make sure it lined up at the back of the seat and the bottom of the backing so it looked like a continuous line of material. I accomplished this by putting the seat in position once the backrest was installed then actually installing a couple of screws from the seat's underside to make sure the seat would end up where it was supposed to. Once that was secured, I placed the fabric on the cushion and lined it up with the backrest. 

I tacked the sides so that the fabric would stay in the right position, then proceeded to attach the seat fabric. It worked beautifully. After the material was secured, I finalized attaching it to the seats and finished off the seats' underside with chambray, the black fabric used as a dust cover in most chairs. For these type of chairs it serves as a finished look. The new fabric is very nice and updated as well as durable. I recommended my customer use Scotchguard to protect it from potential stains and she agreed.

Sunday, July 28, 2024

Antique Eastlake Dresser Makeover

Dresser After
Dresser Before
This is a great example of a perfect "before" and "after" photo of an old, beat up dresser that had seen better days and lots of wear. It is an Eastlake style dresser made of solid oak. The top was pretty much destroyed and needed replacement. There's only so much you can do with refinishing and restoration. Sometimes a total replacement is required, such as in the top. 

Jim made a brand new top using sassafras wood, which has a similar wood grain as oak, which matched perfectly with this dresser. He opted to paint it using chalk paint and treated with wax, which protects the finish and makes it easy to clean. He chose a lovely brushed brass for the drawer pulls which looks stunning with the new color.

This dresser has four large drawers and two smaller ones at the top. Each drawer bottom has been replaced since many were either missing or not operative any longer. The drawers were constructed with dovetail joints, so it was made well as new, but as the years pass by, it got its fair share of use and likely, neglect over time. What you see in the "before" photo it the way it looked when we got it home. The "after" photo is what it looked like once it was complete. 

This dresser is also for sale, asking $375.00. It is solid wood and will make a nice addition to your bedroom.

Saturday, July 27, 2024

Classic Dresser Upgrade

Dresser After Painting
with new top
Dresser Before Painting
and worn out top
Jim rescued this cute little dresser from the depths of someone's garage to make it pretty again. It was the perfect flip dresser that has three spacious drawers and dovetail joints. This is a desirable feature in dressers.

This dresser had a durable structure, except for the top, which was in rough shape, so Jim made a brand new top and stained it with English Chestnut stain, which complements the blue chalk paint.

The new hexagon shaped drawer pulls are nickel, which work well with the blue color.

This dresser is for sale, asking $375.00. The measurements are 40" wide x 18-1/4" deep x 33-1/2" tall. Please contact me if you are interested in purchasing this dresser.

Friday, July 19, 2024

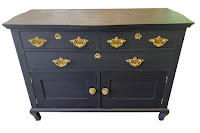
Antique Dresser Freshly Painted "In The Navy" Blue - for Sale!

Dresser After Painting
FOR SALE!
Dresser Before
What you see here is an original antique oak dresser that has been completely modernized with paint, but retaining its original look by reusing the hardware. The frills on the door fronts were removed for a streamlined, clean look. 

First it was stripped, sanded and then painted in a lovely dark shade called "In The Navy." Jim chose to paint this dresser with chalk paint, which requires a finishing treatment of waxing upon completion of painting. The was protects the paint and makes it strong and durable and easy to take care of as it provides a hard finish to the paint, protecting the wood. We've used wax paint on several projects and they always look terrific.

The original hardware was brass, so he cleaned and polished it, making it pop on the newly painted color. The interior drawers were stained and the bottom compartments behind the doors was painted in a light color. Although its primary function was a dresser, this lovely renovated piece of furniture can also be used as a buffet since it has plenty of storage for silverware and plates below and behind the doors. If you wanted a coffee bar, it could be used for that as well. And of course, its original use as a dresser will still suffice. 

This piece is currently for sale. Asking price is $425.00, so please get it touch with us if you are interested!

Thursday, July 4, 2024

Tavern Chairs' Revival

Chair After
Chair Before
A set of four chairs that very much looked like they'd be at home in a 19th Century English Tavern, had been neglected for a long time and needed life breathed back into them. This photo shows the worst of the four, since it looked like it had been left out in the weather. It was in pretty rough shape. 

The original seat and back were black vinyl, with upholstery tacks surrounding the seat area and sides of the top. The seats were torn and the foam was destroyed. Time to renew.

There was a lovely medallion carving in the center of the back, which was almost invisible prior to refinishing. Made of solid (and I mean SOLID) oak, these chairs must have weighed 40 lbs. each. This made the refinishing and reupholstery project tough, because of how many times needed to move the chairs to complete the work.

To save time, Jim removed the black vinyl and got to work. He opted to take them apart so he could access the areas that needed to be re-glued and repaired and that's the best and proper way to do it. Apart, he sanded the pieces down to bare wood then stained them with English Chestnut stain.  Once the new stain was applied, the chairs were put together and "brought back to life." The final step was sprayed the polyurethane, and wow! The chairs were beautiful and that beautiful flower medallion just popped! 

Once he was done working his magic, it was time for me to work mine. The chairs needed new fabric. My customer and I agreed gray would be a nice color. The old padding was not usable, so each chair got new foam and batting on the seats. As I stated before, these chairs were HEAVY! Since adding material requires a lot of moving the chair around, it was necessary to lift them up to put on my work table then down again on the floor for stapling and then up on the table again to continue other parts. You get the picture. 

The curved back portion of the chair was trickier than it first looked, because each chair needed a template which I had to create from the chair's measurements instead of using the old material, since it was so distorted and badly damaged it was unusable. Upholstery has many challenges, one being sometimes you simply do not know what is involved until you get into it. Such was the case with the backs. Once I figured out that part, measuring the material properly was crucial, because if the measurement was incorrect, it wouldn't fit. 

I created templates out of card stock, which gave me the precise size of each fabric section. I had to line up the top edges of the curved portion of the top prior to stitching, so that once it was pulled into position, it would fit snugly to the bottom edge before I could attach the underside with staples. This required a lot of lifting, turning, more lifting, more turning, etc. Good body mechanics is essential when doing this heavy lifting.

The last step in the process was adding the double welt cord around the seat to finish it off with a polished, professional look. I used hot glue on the double welt cord, as it is the most effective way to attach welt cord, but I also like to reinforce welt cord with tiny nails to make sure it doesn't move over time. Needless to say I was extremely happy to finish these heavy, but lovely, tavern chairs.


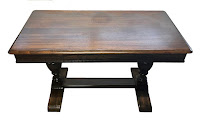
Oak Dining Table Makeover

Dining Table After
Dining Table Before
A classic oak dining table never goes out of style. One of the more popular tables we refinish are like this very one. Due to time and use, this table had seen some wear for many years and needed a lot of TLC. Basically in great condition, this solid oak table needed to be stabilized prior to refinishing. Some of the original wood components of the table were missing or broken, so Jim reconstructed them to stabilize the table. 

At some point wheels had been added, but they were metal and rusting, so Jim replaced them with new rubber wheels. Traditionally, wheels aren't recommended for dining tables, but sometimes they are useful when the person plans on moving the table's location.

The color had been faded, showing its wear. Our customer chose a lovely stain color, English Chestnut, which worked quite well for the table as well as the chairs it came with.  He used satin polyurethane to give the surface a durable finish and it looked great once it was done.

The chairs and table were not an original set, but once they were finished, the wood actually matched very well. The chairs will appear in a separate blog post titled, "Tavern Chairs' Revival." 

Saturday, June 15, 2024

Antique Rocking Chair Revival

Rocking Chair After
Rocking Chair Before
This lovely antique rocking chair had belonged to the original owner of the Mariner Theater and had likely been stored for many decades before seeing the light of day. It had never been worked on, thus had the original leather seat and horsehair and straw stuffing under the leather seat. 

Needless to say, it was pretty nasty. The springs needed to be re-tied, but were in decent shape, meaning they were not rusted. It's an old chair, I estimate at least 150-175 years old based on the construction and the materials used as well as the design and wood, which was solid mahogany.

I removed the seat and the straw and horsehair, which was quite the job. It was pretty nasty, filled with dirt and who knows what else. Then I worked on the springs, removing all the old ties and webbing that barely held those springs in place. The previous upholsterer used only nails to secure the spring ties so it took several hours to remove all the nails that were imbedded into the chair's seat. After everything was removed, I gave it a thorough cleaning so Jim could work on refreshing the stain. First he gave it a good cleaning and the water was black. 

All those years of grime showed up in the water. Once it was cleaned and he touched up the stain, the chair looked really good, its natural beauty coming through. There was no damage on any part of this chair, all details were still in tact including the hard-carving on the back panel. The front arm detail was carved into the curve and the feet were ball and claw, a traditional detail commonly used in the nineteenth century.

Once the chair was cleaned up, secured new webbing to the underside of the chair and I attached the springs securely with waxed thread to the webbing. Then I re-tied the springs using the eight-way tie method which is the proper way to tied springs for upholstery. Next step was attaching the burlap over the springs to hold them securely in place. A layer of Dacron was positioned over the burlap, building up the "crown" of the seat. Two layers of raw cotton were the next step before the final step of the 1" foam which made a nice crown and gave this chair a soft, comfortable sitting area. The original chair was very flat, without much stuffing, therefore it was hard and not very comfortable. With the new padding, it was quite soft and easy to sit on. 

The final feature was a leather panel which was sewn by using four 13" section, stitched together in the center then I added an accent top stitch on each side of the seams for a decorative finish. The bronze tacks created a nice contrast to finish off the chair. This was not one of my easier projects, but definitely one of the most rewarding finished products.

Sunday, June 9, 2024

Antique Desk Refinish

Desk After
Desk Before
A beautiful antique walnut desk used by our customer's grandfather for his practice as a physician. It had been kept near a window and had a little sun damage, but other than that it was in great shape. 

The top was a bit worn as it had been used for many years. But overall, this desk/table served a great purpose for the owner's business use. In front is a drawer which is difficult to see in the photographs, but it was a nice feature of this lovely piece of furniture. 

Jim stripped it down to bare wood and sanded it carefully, maintaining the original details at the bottom edge. It had a sturdy base with two sidebar supports which made this desk a very stable piece of furniture. He chose dark walnut stain and satin polyurethane for protection. This makes a great family heirloom and can be used for many more years to come, serving the future generations well.


Tuesday, May 21, 2024

Octagon Sorrento Table with Inlaid Wood

Table Before

A small table with a big personality! What a beautiful work of art this was! This table was comprised of thousands of tiny pieces of inlaid wood to create a pointed star design in the center that extends outward in overlapping chevrons. Each section uses contrasting colors of wood tones in beautiful variations, complementing the overall design. The design really draws you in, begging for a close-up view. 

Table top after
The border also more dimension and each border is made up of a different design, some of the tiniest pieces measuring 1/8" x 1/8" in continuous lines that circle the gorgeous centerpiece.  The pedestal itself complemented the tabletop with its own unique detailed design (It's difficult to see that detail in this photo).

We believe the origin of this table is from Naples, Italy in a "Sorrento" style. This type of inlaid wood is known for its inlay wood tradition originating from Naples,  dating as far back as the 15th century. This unique, high specialized craft of art of inlay is made by inserting different materials into wood. This technique creates highly intricate designs and the process requires precision, patience and determination as well as attention to detail. Sorrento is the hub of the Italian inlay furniture and is known for its exquisite craftsmanship with woodworking. Some of these tables can cost upwards from $2,500 to $11,000, depending on design and size.

Once Jim had the table sanded, he used a natural stain since it didn't require a color change. The beautiful original colors of the surface are the true star of this show making it a true work of art.

Antique Chair Revival

Chair After
Chair Before
This chair was a challenge. Not only because there was a lot of fabric to replace, the chair was also very heavy. My estimate for this chair was that it was made in the late 1920's to early 1930's, based on the original material of which I found a small scrap on either side of the arm padding. The wood was cherry.

Once I removed all the sections of the chair, (you start on the back, which is the last section added to a chair) I removed the seat stuffing, which consisted of horse hair and straw. This is another clue as to the age of this chair. Prior to modern-day foam and fiber fill, upholsterers used horse hair and straw for the seat. Once I removed the nasty chair stuffing, it exposed the springs. The seat springs were in pretty good shape, but needed some overall tightening and re-tying, but not a complete eight-way tie. The back of the chair also had springs, which were in good condition. 

The chair had the original webbing on the underside, but the most recent upholsterer attached new webbing to the bottom to strengthen the integrity of the springs without removing the springs. I usually remove the chair's springs and replace the webbing when necessary, but this chair was in good enough shape with the original springs, thus needed a bit of extra tying. Once the springs were secured, I covered them with premium muslin instead of burlap. This allowed me to really pull and tighten the springs to keep them in place for the next step, which is adding the padding. Since this particular chair had a bit of wood showing, I touched up the wood with matching stain and used satin polyurethane to protect it. This is done prior to adding material.

The first layer of padding was a section of raw cotton, which comes on a large roll and can be pulled apart and placed directly on the chair's seat. The next layer was a 1" section of premium foam, then another layer of raw cotton. All these seat toppers were finished with another section of muslin which holds everything together and gives the chair its "crown," where it is higher in the middle section. The springs were held tightly and the bounce was perfect.

Fabric was next. My customer chose a lovely Kelly Ripa Home fabric with a nice design. After careful measuring, I covered the seat first with the material. Once I was satisfied with the seat, I chose to do the arms next. I stapled foam to the top of the arms and Dacron to the sides. This formed a nice cushion to support the arms without a lot of bulk. Using the chair's arms for measurement, I cut the right amount of material to each arm, attaching it from the back side to the front of the arm then pulling it back before attaching it to the back of the chair. I chose to do the arms prior to doing the interior back so that I had easy access to it. 

The back proved challenging because this chair was fairly large, so a generous section of fabric was required to cover it. I wrapped the fabric around to the back of the chair, curving at the top edges instead of the original style which was made with side inserts and welting. Each upholsterer does things a little differently. Once the fabric was firmly in place, the buttons were next. I made each button using a button kit that covers the metal button fixtures with the same fabric as the rest of the item. 

The buttons are pulled through the thick front to the back using extra long needles, then tied off in the back of the chair through the webbing. This is a tricky procedure because you are going through about 6"-8" of material and padding to reach the back. I use a strong waxed thread for added strength. I chose to put the buttons in a different configuration than the original (personal choice) which I felt matched the design of the chair better.  

After the buttons were in place, I stapled and nailed "curve ease" to the back edge of the chair so that I could attach the fabric, then it gets hammered it in place to cover the hardware that attaches it. I glued double welting to the arm fronts for clean finish. Once the entire chair was done, I stapled chambray to the underside. This is a "dust cover" to protect the chair from dirt and debris that can enter from the underside of the seat. It's a good way to finish off a chair. I love the way it turned out and boy, was it comfortable!