Showing posts with label stripped. Show all posts

Friday, November 19, 2021

Very Old Rocking Chair Gets a “Boost"

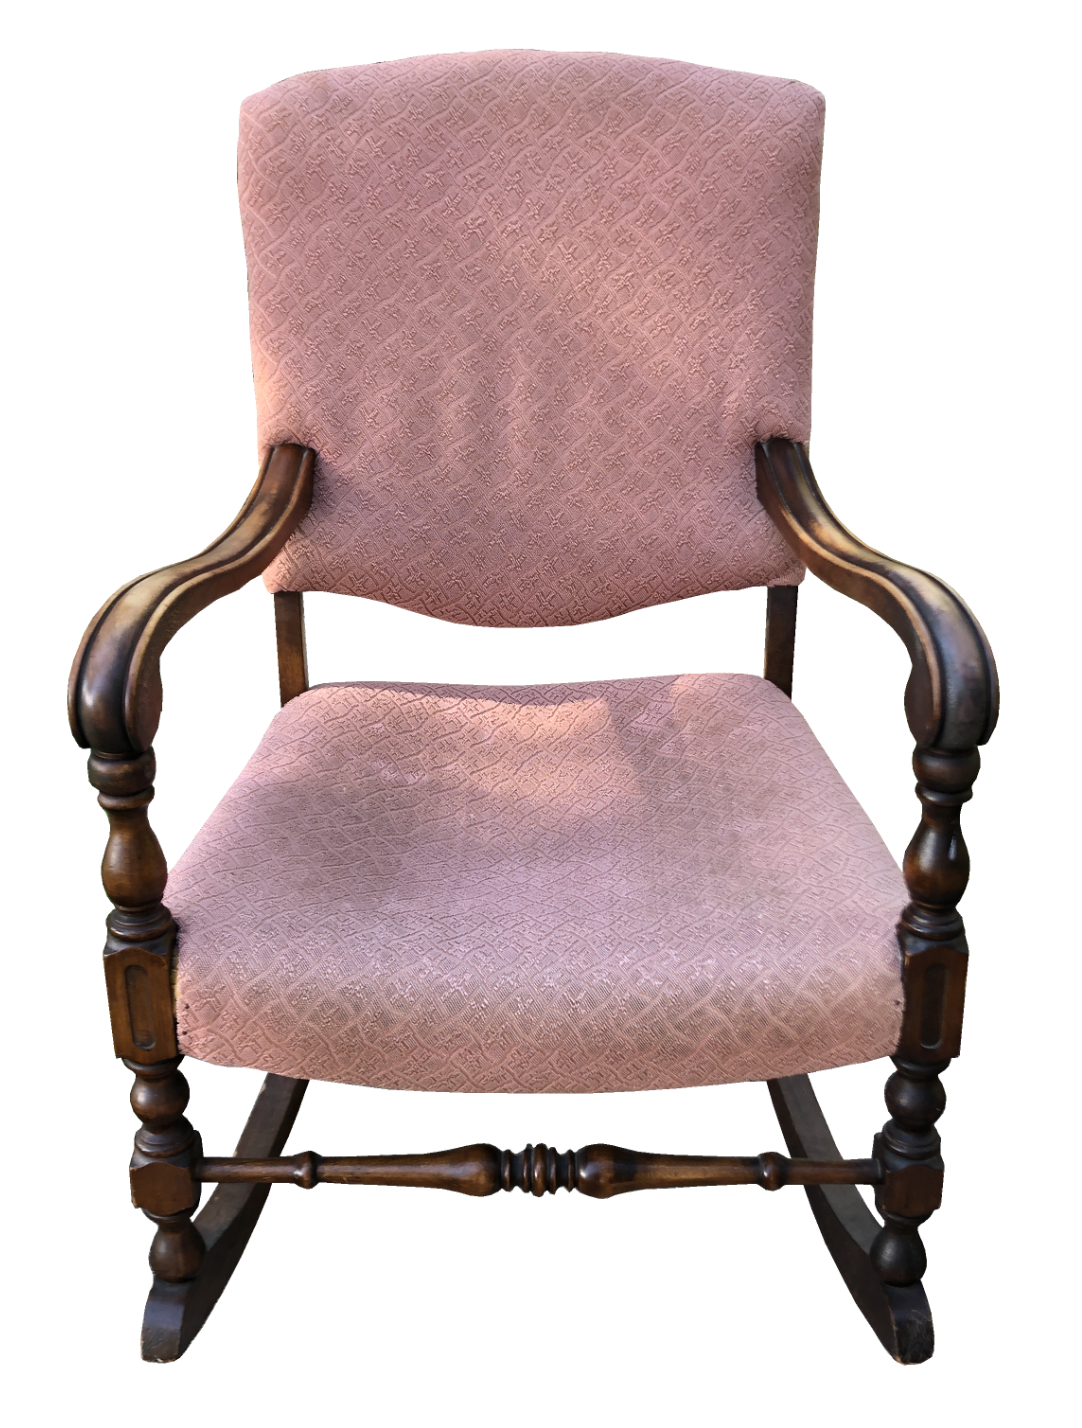
Rocking Chair Before
Saggy seat!

This rocking chair was estimated to be about 150 years old. My customer’s grandmother had installed the pink fabric (seen on the photo on the left) in the 1930’s, so it definitely had seen a lot of wear since then, which was over 80 years ago. Unbelievably, the fabric had maintained its overall condition, with no rips or other damage, but the seating itself had sunken in the center. Sagging happens over time, no matter how the chair had been originally constructed. And this one was reupholstered over 80 years ago, so sagging was not unusual. The upholstery work was done very well with unseen nails and tiny stitches. Quality lasts.

Rocking Chair after
Higher padding in the seat
Since my customer had wanted the chair refinished in addition to replacing the worn, outdated fabric, the first step was to remove the old fabric and all the padding, webbing and dust cover that’s beneath the seat. Once the fabric and padding, etc. was removed, the tedious task of stripping was the next step.

Chairs have a lot of surface area, therefore they take a long time to strip and refinish, because you must remove all the original stain prior to sanding and re-staining it. (See video at bottom). The detail in this chair with its dowels on the front arms and across the front crosspiece took the most amount of time, but the rockers themselves were also a challenge because they were harder to reach because of their location beneath the chair. I spent five long afternoons to remove all the finish, sand and re-stain the chair. Two coats of polyurethane applied over 24 hours was the final step prior to moving ahead with installing the new fabric. 

Unfinished 
Rocker

Prepping the chair for fabric is essential and involves replacing the original webbing with new webbing, making sure it’s nice and taut so the seat is built with a strong foundation. This chair had seat and back webbing, as well as front and back fabric on the backing. The seat area of the chair had some damage. It was broken on one side and the webbing had come apart, causing the sagging seat. I repaired the damage before installing the new webbing.

New Webbing
After Refinishing
After the webbing has been secured with staples on the folded edges, the next step is covering it with burlap. This strengthens the seat even further. (See photo on right). I then put a fitted piece of high density foam on the burlap, covered it with nice, thick cotton batting and finished it with Dacron, stapling everything in place. Last is the fabric. In this case, I was installing directional fabric. This means the fabric is installed in the “up” direction. Most fabric manufacturers have a line on the border side, with an arrow that points to the top of the fabric. This is vital, because the last thing you want is to get the fabric fitted perfectly only to find out it is upside-down!! Ugh!

The most difficult part of putting fabric on any chair with arms, is making sure you cut the fabric towards the arms with a “Y” cut. This gives you enough fabric to wrap it around each arm before folding and tucking the fabric securely next to either side of the arms prior to securing it with staples. It’s a long, labor-intensive process and should not be rushed. Installing the fabric properly requires concentration with no distractions so that you can focus on what you’re doing. If not, you may make costly mistakes. 

I got lucky with this chair, because the back of the arms had a screw and were removable, so that I could slide the fabric beneath it, which made the installation nice and clean with no cut lines required. Not all chairs have that option, in which case you have to make those tricky cuts, but sometimes you get lucky. After I finished the front, making sure the fabric was tightly wrapped and secured to the back, I adding the final piece of fabric, folding the edges and finished it with piping. 


Tuesday, November 9, 2021

Amish Oak Table and Chairs Painted and Stained

Dining Table Before
(without leaves)
 
Dining Table and Chairs
Painted w/Stained Top
This lovely oak table came with two leaves and six chairs. Our customer had wanted a different, updated look so we suggested painting combined with keeping the table top woodgrain, but staining it little darker. 

They had originally envisioned an antique white, but after reviewing their décor choices, settled on latté, which is exactly as it sounds, a coffee color with a generous amount of cream added for that perfect flavor, or in this case, color combination. 

Prepping furniture for paint, especially chairs, takes patience and time. Mainly because it is all done by hand. You can’t use a power sander for chairs (except minimally) and spend hours scuffing up all the surface area to prepare it for first primer then two coats of paint. You also can’t skimp on the prep work as it directly effects the outcome of the project. 

We stripped and stained the table top, which had minor scratches, a rich, dark walnut to bring out the beautiful wood tones. The table’s pedestal base was painted to match the chairs, all done in latté. While some people simply do not like to paint furniture, there are times when painting is a nice choice. But by no means are you limited to using only paint. The combination of using paint and stain marries two distinct styles into a well-blended upgrade to outdated furniture without sacrificing the original integrity. 

The chairs, having many spindles, take a great deal of time to prep for painting. Chairs, period, are one the most time-consuming of all furniture projects, because there's so much surface area on a chair. Plus, the more detail (hence, spindles), the longer it takes to prep them. It’s also why chairs can be costly to refinish (or paint). All those surfaces need the same amount of attention and prep time. Ultimately, you have many colors in both stain and paint to choose from for your perfect furniture project.


Thursday, October 14, 2021

Antique Mahogany Secretary


Secretary Before
The art of letter writing is almost a lost art. With the influx of everything
Secretary After

instantaneous with text messaging, e-mail and FaceTime, who wants to take the time to hand write anything? Yet, there’s something appealing to putting pen to paper and feel the words as they appear on your page. This antique mahogany secretary had been in the family for many years and had likely been witness to many such letters. It was probably used for bill paying, keeping track of household expenses and storing those stationary items to keep them accessible when you needed them. Because it was used quite a bit over the years, it was quite worn and needed refinishing. It’s hard to see in the picture, but the “after” photo shows new knobs, which were glass. (Unfortunately they don’t photograph very well.)


Secretary Inside After
Secretary Inside Before

Mahogany is one of my favorite woods to restore. It has such lovely patterns and tones that are rich with color and movement. This is a dream to strip and stain as it takes the new stain quite well. The interior also needed to be stripped, which is quite tedious because it had to come apart, otherwise you can’t reach those little cubby holes where envelopes are kept. It’s time-consuming work, no doubt about it. These things simply take a lot of time. 

There are no shortcuts to quality work. This piece, like many of that period, was a perfect size for a small office and a tidy way to keep track of those pesky papers you don’t want cluttering up your table. After it was stripped, sanded and re-stained then protected with two coats of polyurethane, it was once again a lovely piece of furniture that will be useful for many generations to come.

Thursday, September 16, 2021

Antique Chair Updated to 21st Century


Antique Chair Before

Antique Chair After
Every household has chairs, usually lots of them. There are as many styles chairs as there are other types of furniture, but not many other furniture items are used as much as chairs, therefore they tend to get more wear than other furniture. 

Antique chairs are unique because the materials used in the 1920’s or 1930’s were limited and not as “user friendly” as they are today. This antique cherry chair was in relatively good condition, meaning it had good bones, but was in dire need of refinishing and new fabric. The fabric on this chair was not only very worn and threadbare, but no longer usable and likely had a zillion or more dust mites. 

For this type of project, Jim takes care of the refinishing and restoration process while I handle the new fabric. Jim used a custom mixed stain consisting of 25% mahogany and 75% chestnut, which looked fabulous. When the chair was finished and protected with two coats of polyurethane, I took over and tackled the fabric. I don’t claim to be an expert upholsterer (I’ll leave that to my local expert) but I can handle certain projects. Seat covers is much easier than working with an attached seat because you must allow for the fabric to go around the arms and back of the chair, which is a nail-biting experience. 

This chair originally had horse hair stuffing for the back and worn out springs for the seat. My experience with chair springs isn’t terrific, so I prefer to replace them with a sturdy new wood bottom and 2” of high density foam. The foam is covered with thick batting for extra cush for the tush, and finished with the customer’s fabric of choice. My customer chose a lovely paisley pattern,  definitely a 21st century fabric. With the freshly refinished wood and the new fabric, this chair will last another 125 years.


Wednesday, July 7, 2021

Antique Stained Glass Door Revival


Door Interior
Before
This antique door was well over 100 years old and had seen plenty of years of wear and weathering. The cracking was pretty severe and the windows, while amazingly weren’t broken, needed some TLC because the framework was deteriorating and held in by glaze. Unfortunately, upon removing some of the paint we discovered the door was not stainable, so our customer chose a fresh coat of paint.


The stripping process is always the most tedious in any refinishing project, but for doors a lot of the difficulty comes in with the type of paint that was used. The older the door, the harder it is to remove the paint. Milk paint was frequently used back then and with our experience, is quite difficult to remove. We either use a chemical stripper or a heat gun (or both) when we remove the old paint from most projects. 


Sometimes it’s just not possible to remove all the paint so we remove as much as we can then sand it smooth and prep it for paint. A coat of primer is necessary for any paint project whether it has had paint on it previously or not. Especially raw wood projects which always require primer. Once primed, painting flows smoothly. 


Door Interior
After
This door required more work because the customer needed the door knob and hardware moved to the opposite side because of where the door would be located, so it was necessary to remove the old hardware, fill the holes left with wood pieces, dowels and filler, sand it smooth and drill new holes on the other side of the door so that it opens correctly. The new hardware they chose was brass.


This door required refinishing as well as carpentry work. Jim made new moldings for the stained glass panels and replaced the center clear glass. The door was out of square so he made sure all was square and plumb which is necessary for a smooth installation.


As you can see in the photo to the right, once installed, the stained glass looked fabulous, adding charm and character to the kitchen. The color of the glass was not visible from the exterior due to the angle of the photo. Photos below are of the exterior before and after photos.


Door Exterior
Before
Door Exterior
After


Saturday, June 19, 2021

Antique Bench Refinished w/needlepoint

Bench After
 
Bench Before

Although sturdy and strong enough to seat an adult, this antique bench was in dire need of refinishing. The front veneer had peeled off entirely while other areas that had veneer were loose. 

Since this was a natural hardwood, I removed the veneer completely since it looked better without it. The rest of the bench had no veneer and the wood was in great condition, but a bit scratched, mostly on the feet. The legs were a Queen Anne style, commonly used for this style of bench.

Prior to refinishing the bench, I first removed and found it had the original straw and batting, which was commonly used for making cushions one hundred years ago. I replaced that old straw with a 2” foam cushion and a layer of quilt batting for extra seating comfort. 

The bench required stripping, sanding and staining. I chose a mid-tone chestnut stain, which brought out the natural beauty of the wood. Satin polyurethane finished off the freshly stained wood so it remains protected for many years to come. My customer had her own needlepoint seat cover that she had wanted to use to replace the stained, worn old topper. The transformation was incredible, a nice piece of furniture anyone would be proud to own.

Tuesday, May 25, 2021

Peg Leg Knitting Table Refinished and Repaired

Knitting Table Before
An antique knitting table such as this was useful for storing knitting needles and yard as well as other essentials a knitter would use in her arsenal of creative tools. Somewhere along the line the front left leg broke, thus had a “peg leg” appearance and didn’t stand up on it’s own. Luckily, we were able to repair the broken leg by drilling a hole on the top portion and the broken part of the leg, then glue them back together with a dowel. This is the correct and most durable way to repair a leg such as this one, which isn’t very large to start with.
Knitting Table After

The rest of the cabinet needed some touch up, a knob replacement on the bottom drawer and a completed refinished top that was stripped, sanded, stained and protected with two coats of polyurethane. The entire bottom of the sides was missing, so we replaced that with matching plywood cut to size. It simply won’t do to have your knitting needles fall out and end up on the floor. 

This was the second knitting cabinet we’ve done, but this one was a bit lighter wood than the first one which you can see by clicking on this link: http://finalefurniture.blogspot.com/search?q=knitting+cabinet

It’s nice to have a few projects that we can compare to other projects we’ve done that are similar. These knitting cabinets were commonly used at the turn of the century and have been preserved throughout the years as they can are versatile and can be used as a display cabinet in a hallway or a great storage spot which doesn’t take up a lot of space.

Sunday, May 9, 2021

Mid Century Modern Dressers

Tall Dresser After
Tall Dresser Before

Sometimes I have no words for the furniture that comes to us. This is one of those times. This was a Kroehler dresser set, a classic mid-century modern set that at its creation was probably very beautiful. Somewhere along the line the original hardware was lost (who knows) and replaced with completely different (not matching) hardware in a different finish. 

The original drawer pulls were the ones on the bottom two drawers, The center drawers had “scoopy” handles which were not at all correct for this period and the top large drawer had four knobs, also not matching. To say the least, this dresser had a bunch of mismatched pulls that simply didn’t work.

Long Dresser After
Long Dresser Before
Our customer wanted these dressers refinished and stained, however we realized that once we started stripping it wasn’t stained originally, but painted with a glaze treatment. Plus, there were broken veneered corners that wouldn’t have looked good if filled in and stained, so we suggested paint, which turned out to be the best option for these pieces. 

As much as we prefer exposing the beautiful wood hidden beneath layers of paint, sometimes it’s not possible because when we get painted pieces, it’s usually for a reason. But occasionally we get painted pieces that have gorgeous wood beneath and it takes on a completely different look once stripped and stained.

For these dressers, once the holes created by all the handles were filled in, sanded and smoothed out, painting covered them and they once again had a classic, clean line look common to the mid-century modern furniture people gravitate to. It had gotten an upgrade that worked great for these pieces. We also worked on two nightstands (not pictured) that were a part of this set but we didn’t get the “after” pictures of them. Then our customers decided to get a headboard painted to match the rest of the furniture so now they have a complete set that all matches. This one turned out great!

Wednesday, April 21, 2021

Oak Chairs Refinished

Oak Chair After
Oak Chair Before

We restore more chairs than anything else and the reason is simple. Everyone has them and eventually, they get pretty worn, damaged and no longer look good so they will require an overhaul. 

Depending on the amount of damage a chair retains, refinishing can be “lightweight,” meaning a little clean up and perhaps touch-up staining to a total restoration which requires the chair to be stripped down to bare wood (the preferred method), sanded thoroughly, wiped clean and stained with the choice of the customer.

This is one of two identical chairs that needed complete restoration. This one had some water damage on the top, but was overall in pretty good condition. Still strong and not requiring gluing of loose joints, once the stripped and sanding was complete, we applied a fresh coat of English Chestnut stain and two coats of semi-gloss polyurethane. Not only did the refinishing repair the damage, it brought out the luster and beauty of the wood which had been hiding under years of water damage and grime. Never underestimate the power of refinishing a chair! 

You’d be surprised how many people dumpster dive and bring us chairs that someone else had tossed and we made pretty again. The old saying “One man’s trash is another man’s (or woman’s) treasure,” is really true. It’s a shame to thing someone had tossed furniture away only to have it completely turned into a usable treasure, so keep that in mind when you look at an old item of furniture and think, “Is it worth it?” I can tell you with absolute certainty that it is always worth it if the furniture item has good bones. Furniture made of solid wood is built to last a lifetime. And not just the lifetime of a person, but several lifetimes throughout generations if it is taken care of. Maintaining the integrity and classic look of an old piece of furniture, be it a chair, table, dresser or cedar chest is keeping a part of history that we can learn from for generations to come.

Wednesday, April 14, 2021

Antique Eastlake Cabinet Upgrade

Cabinet Before

Cabinet After
Once used as a tall dresser, this antique cabinet was in pretty rough condition prior to restoration. Actually, upon receiving it and getting started on the refinishing process, it sort of, well, fell apart. The piece had seen plenty of use over its sixty-plus years and many of the joints had come unglued, so it made sense to simple separate those loose joints and disassemble it to properly strip, sand and stain it the right way. 

The interior of this cabinet had three adjustable shelves, which had a unique adjustability system. The wood in the rear and front of the cabinet had slots which held small sections of wood that each shelf rested on and were easily removed so that they were easily adjustable to whatever height you needed. 

The bottom drawer was an unremarkable feature of the cabinet, the lovely brass drawer pulls blended into the background. It was also in need of a new bottom since the original one had been damaged and was no longer usable. Once the new bottom was built and installed, it was once again strong and usable. 

The hardware was polished, which included the drawer pulls and hinges. The bottom drawer, once almost invisible, was a focal point, the brass pulls looked like new. The keyhole slots were original, but two out the three were broken and had to be replaced with newly constructed, custom made key slots which looked almost identical to the original. When a piece of an old item of furniture is missing, it’s almost impossible to find that exact piece so a bit of ingenuity and design comes in handy to create a replica. 

The right side of the cabinet did not have glass, but plexiglass that was held closed with a piece of cardboard. Of course this wouldn’t do, so we replaced the plexiglass with glass and added a magnet at the top of the right (opening) door so that it would stay closed. A new stain and three coats of polyurethane to protect the surfaces and this old beauty got a major upgrade. Amazing how beautiful wood that hides beneath years of usage becomes when it is revealed with refinishing. This was indeed a lovely piece of furniture that we enjoyed working on.


Tuesday, March 23, 2021

Oak Teacher’s Desk Revival


Teacher's Desk Before

Remember elementary school? Do you still remember your teacher’s desk? Well, this was once a teacher’s desk that used way back in the day of notebooks (not laptop computers), pencils, typewriters and maybe even an apple on the teacher’s desk. 

Unlike the desks I remember from my early school years, this one had a unique feature; a slide-out, built-in filing cabinet with many cubby holes and slots for letters and other teacher-ish items. I had never seen a desk like this one. And you can imagine how extremely heavy it was!

Teacher's Desk After

The desk top had been destroyed by fire. Our customer thought the top had water damage, but upon closer inspection, it was fire, not water that had destroyed the top. We also noted that the original desk was likely a roll top, which was no longer part of the desk. Unfortunately the top’s damage was so severe, it was not able to be restored. It had to be replaced. 

We generally prefer to use the original pieces of our furniture restoration process, but when that isn’t an option, we rebuild it to resemble as closely to the original design as possible. The burnt top was comprised of border sections surrounding the center sections instead of larger boards simply glued together to create a uniform, single directional top. This was more involved and complex than a directional top and required much more wood in various lengths, but the new top was outstanding when it was done. Jim did a tremendous job in rebuilding the  top to best represent the original one. If I was the teacher, I’d give him an A+!

Tedious would be an understatement in describing the process of refinishing and restoring this desk. Every drawer had to be removed and labeled. The pull-out filing cabinet was its own entity that required even more disassembly and extra steps. The unique part of this little cabinet was that it rotated so that the teacher could easily access the files in the back. It also had its original snap-in alphabetical folders that the teacher probably used to keep track of her students. The handles did not come off, so the stripping and sanding process involved keeping them in place and working around them. The inside of the desk,  as well as the back, also had to be stripped, sanded and refinished. The stain used was golden oak with satin polyurethane to protect the desk for years to come. 

Burnt Top
Newly Built Top

Monday, March 22, 2021

Antique Windsor Chair Refinished


Windsor Chair
Before
This is what is called the “Windsor” Chair. It has the classical round form with spindles on the top and bottom of the chair, with the center split and mounted on a curved flat platform that turns into the top of the armrest. These chairs come in plain or rocking chair styles. 

This chair was over 100 years old and original in its antique styling and manufacturing. It had a center split that had been repaired before we got it, however, the stripping on this type of chair is very intense and takes a long time. (We hate spindles!) Not only did it have spindles, it had two spindle bases, one in the center and one on the bottom seat, therefore making the stripping much more time-consuming. 

Windsor Chair After

One of the most difficult part of refinishing this type of chair is that no power tools can be using when sanding, therefore, everything is hand sanded which adds to the time spent removing the entire old finishing. Some chairs are easier to work on than others. This one was not an easy redo because of the spindles, upper and lower. The chair was made of sturdy walnut, so that’s the end choice color we used to stain it. 

Finished and protected with satin polyurethane, it actually turned out beautiful, despite the splotchy look on the bare wood, which is characteristic of old furniture once stripped. If you ever wondered why chairs cost so much to strip, try your hand at one of these and you’ll understand. It’s a very tedious process and takes many, many hours and lots of patience and of course, the right tools to do the job. The most important tool is patience and tenacity. 

Monday, March 1, 2021

Maple Table Makeover

Refinished Table

Nothing says family more than a large dining room table. And, because we love our tables, we use them a lot! Therefore, they take a lot of abuse and as a result, get worn, scratched and marred with the passage of time. This is a very large maple dining table with a leaf that showed signs of wear on the surface. 

Luckily there weren’t any super deep gouges, so it was doable to strip, sand and stain the table and bring back its glory. Choosing a newer, darker stain, mocha, brought out the natural woodgrain and tones of the table which seemed hidden by the wear previous to refinishing. Finished off with three protective coats of satin polyurethane, this worn out table was once again a shining star, ready for many family meals.
Table Before Refinishing


Friday, January 15, 2021

Checkerboard Antique Card Table


Card Table Before

Card Table After

Every once in a while we get a totally unique piece of furniture that is one in a million. One of the many aspects of furniture restoration is the wide variety of items that come our way. It’s always a surprise! At times the surprise comes when we see it. Other times the surprise comes after we remove the years and years of grime to reveal the beauty beneath it. This antique card table with a checkerboard center was such a piece.

It’s hard to know origins of furniture, such as how old an item is, where it was made, what kind of wood is was made from. We have seen mostly oak, walnut, cherry and even some more exotic woods such as bloodwood and olive wood. At times we’ve seen wood we can’t easily identify. With this unique table we quickly realized it was made of many types of wood combined to create a work of art which ended with a center design in a checkerboard or chess table.

However, it was completely covered with years of grime, dirt and who knows what else. Hidden away in a garage for over thirty years, this table was likely overlooked and became part of the back storage of the space it occupied until my customer yanked it out with the intention of getting it refinished. It looked like a major undertaking since there were many pieces of wood missing that would have to be replaced as well as all that grim removed with stripper and carefully sanded so that none of the wood would be destroyed in the process. And yes, each piece of wood you see has been individually placed into the table! This alone makes it a highly unique work of art. 

Once stripped, the gorgeous wood beneath was exposed. It was comprised of maple, bird’s eye maple, walnut and mahogany. Since many of the original tiny pieces were missing, it was necessary to cut and carefully place each missing piece in its place so that it blended in with the table and look as if they were always there. As you can imagine, this was a very time-consuming process. After all those missing pieces were installed and glued, it was then stained and protected with four coats of strong polyurethane so it will hold up for another one hundred years at least. A timeless beauty can say, “Checkmate.”

Card Table Before
Card Table After

Oak Dresser Hidden by Green Paint


Dresser After Stripping

Dresser Before Stripping

This little dresser is similar to a few others we’ve done that had the same overall look and design. However, this one was painted green. In our experience, sometimes when a piece of furniture is painted, there’s a good reason for it. Upon stripping this little dresser, we discovered that one of the drawers had a “patch,” which meant that someone had added a different type of wood that didn’t match the original oak that was used when it was built.

Luckily we were able to apply the stain so that it covered the entire piece in a way that looked as it would have looked originally. Likely, it had never been stained, just painted after it was built. It was old though.

When painting furniture, it usually doesn’t matter if wood styles are mixed because the paint covers it all evenly. But when a person wants something stripped and stained, refinished per se, if the wood is patched with non-original wood, this results in a variance of stain colors since different types of wood accept stain differently. 

A good example would be if you apply a dark stain to a light wood such as pine, it would certainly darken the original raw wood but wouldn’t be as dark as if you used the same stain on walnut, which is a darker wood to begin with. It’s always easier to go darker upon refinishing/restoring but much harder to go lighter. Not to say that it isn’t possible to do this as it all depends on the type of wood that was stained originally. Sometimes you simply don’t know what the raw wood will look like until it is stripped as years and years tend to oxidize the wood, making it darker than the original stain. Most of the time the wood, when stripped and completely sanded, is much lighter than the old finish. This allows for plenty of stain choices as it is fun to experiment with how the various stains draw out the wood’s original beauty. This is one of the most rewarding aspects of refinishing...seeing the final results when applying the stain. Ah, it’s pretty once again!

Friday, November 6, 2020

Antique 19th Century Caned Chairs

Antique Chair After
 
Antique Chair Before

Here we go with more chairs! This time it was a set of four (4) chairs, all in need of TLC. These chairs dated back to the late 1800’s, so they were 19th century chairs that had seen a lot of use, therefore a lot of wear and tear, literally. 

Originally the chairs had caned seats, but over time they likely broke and someone decided to cover the seat with stamped leather, or rather, a leather-look-alike that seemed more like a heavy paper between layers of very thin leather. Broken and no longer able to seat a person, it was high time to remove the leather “fix” and replace it with the original woven caning. But first, the chairs all needed to be stripped, which for this type of chair is very time-consuming because (you guessed it), spindles. Yup, spindles are what takes a long time to strip because there are many of them and they are rounded, making them inaccessible from one angle, therefore it’s necessary to rotate the chair continuously while stripping. 

A chemical stripper was the best option for these (compared to a heat gun), because it melts away the old, worn finish and reveals the wood beneath. Once all the old finish is removed, the chairs are then cleaned up by using soft rags (usually old t-shirts, which are excellent for this) and wiping away the residue left by the stripper with lacquer thinner or acetone. This is a necessary step prior to sanding or your sandpaper will clog up with the residue, making it difficult to remove. 

Starting with 100 grit sandpaper, the chair is prepared to accept the next grit, 150, until the final sanding, which is done with 220 grit. Once all surfaces are sanded, the chair is wiped with lacquer thinner on a clean cloth, allowed to dry, then it is ready for stain. This entire process (for this type of chair) can take from several hours to a few days. Again, spindles are a lot of work, therefore more tedious and time-consuming than flat surface chairs. Once the stain is applied with either a soft cloth or a brush, or both, you wipe away the excess stain, then enjoy the amazing transformation from raw wood to beautifully restored, refinished wood. 

We used "special walnut" on these chairs. The new stain brought out all that gorgeous woodgrain, which had been hidden by years of oxidation that happens over time. Once the chairs had dried from staining (we allow 24-48 hours), the first coat of polyurethane was applied. For these chairs we used a water-based semi-gloss, durable and easy to clean up after. That first coat protects the stain and prepares the wood for the remaining two coats that finish the chair. It is necessary to lightly sand between each coat of poly with a high grit sandpaper to give it “tooth,” which makes just rough enough to accept the next layer of polyurethane. Once the third coat was applied, the chairs were done and ready for the last and final step, install the new caning. 

These chairs had “press-in” caning, cane that comes in pre-woven sheets and cut to size, then installed and kept in place with spline. It’s necessary to soak the cane and spline for at least an hour (or longer) so that it is pliable enough to work with, otherwise it cracks and breaks. Caning “wedges" are used to “press” the edge of the cane into the pre-cut 1/4” groove in the chair. The chairs had a closely woven cane originally, so we chose the same style to keep it original.

It’s necessary to choose the right size of spline, which is based on the width of the opening, so that it keeps the cane in place while completely filling the groove. If the cane is too loose, it will not keep the cane taut. It’s a tricky process because once you have pressed all the cane into the groove, you glue it slowly, allowing the glue to run into the groove, starting in the back of the chair. Once it is glued, you push the spline into place, tapping it with a hammer as you go. If the spline has been adequately soaked, it will bend easily around curves. If not, it can break, especially if those curves are tight. 

Luckily these chairs’ curves were fairly wide, so it wasn’t too difficult to bend them around the edge. Once you reach the back where you started, make a small pencil mark and cut the spline to match the starting point at an angle and tap it with a hammer in place. After all the spline is installed around the entire seat, hammer the spline so that it is level with the top of the chair. There will be caning strands popping out that were left over from the placement after the spline is installed, so they must be trimmed off. I use a sharp chisel and snap them away by tapping on a hammer close to the spline, which removes the excess. You can also use snippers. This completes the caning process. Allow the cane to dry at least 24-48 hours before you sit on the chair.

Tuesday, October 27, 2020

Little Black Chess Piece Table

Chess Piece
Table Before
This little gem is another furniture item to add to our collection of painted black tables. As like the previous posting, our customer had envisioned this table being stripped and stained, but like the last table the wood beneath the gray paint was simply not stainable. It was splotchy and had absorbed the paint into the wood grain. There were two coats of paint on this table, black then gray on top of the black. It was also never primed, which contributed to the discoloration of the
Chess Piece
Table After

wood, making it not stainable. 

So, black was chosen once again as the color choice because it is popular for modern life and matches everything. This little gem was only about 16” in diameter and only about 24” tall, so not very big but big enough to keep a lamp or set down a cup of coffee. 

Needless to say the stripping process was intense and took a couple of days to remove all that paint enough for it to be properly primed and prepared to receive the new paint, which for this table we chose to spray on since it was late summer. We generally can’t paint in the colder months because it’s just too cold and the spray painting doesn’t work very well in cold weather. The finished black table was outstanding and made a huge difference. I told Jim I think the table looked like a large chess piece because of the interesting detail on the underside of the top, lending it a chess piece look. Very cute and very functional, this little chess piece table is once again a nice addition to the customer’s room.

Table Re-painted in Beautiful Black


Table Before
We mostly prefer stripping furniture to reveal the beautiful wood beneath and then stain it as it would have been done naturally, but it doesn’t always work out that way and there’s a good reason why the furniture was painted instead of being stained. This antique folding table was a prime example of why painting is better than stain as it would not accept stain. The reason was that it was made up of different types of wood and most of the paint had penetrated the wood’s surface, therefore making it not stain-worthy. Luckily our customer understood the situation and opted for paint instead.
Table After

We stripped this table as we do most other furniture items with stripper and plenty of elbow grease. Once the table was completely stripped, each area then gets carefully sanded to remove as much rough surface as possible. This prepares the piece for the next step, primer. Any time you have raw wood, primer is a must do as raw wood will soak up all the paint if it is not primed first. You can purchase paint with primer in it, but we prefer these processes to be kept separate because we find it gives us better results and a smoother finished surface. 

You generally don’t need polyurethane on a painted item unless it will be used outdoors, but then you would be better off using outdoor paint. Adding polyurethane or lacquer to a painted item will over time turn it yellow. Just a little piece of advice to keep in mind...

While we can paint furniture in any color the customer chooses, as this is a personal preference, but black seems to be the most popular colors because it is neutral and versatile and looks great when accompanied with brass accents such as this table’s feet. We always clean the hardware and additional accents such as brass feet on tables or hinges, because it finishes the piece nicely, giving it “bling,” as well as a fresher look. 

This table had two fold-out leaves, which doubled its size, making it a great table to use when you need more seating. Its compact size made it easy to store when not being used for a dining table and can instead be used as an accessory table. The classic black was a great choice and kept the original integrity of the table in addition to giving it a fresh, new appearance that will look great for decades.

Tuesday, October 6, 2020

Antique Oak High Chair


High Chair Before
    The very nature of a chair’s construction makes it quite time consuming
High Chair After

to work on. When a chair has spindles with curves and detail, the time spent stripping is even more time consuming than a relatively simple style. But the very best part of restoring any chair is the finished product, which always amazes me because of the drastic difference between how it comes to us and how it looks when it is restored. Yup, chairs are a lot of work, but the outcome is always worthwhile and successful.     

    A high chair such as this one was once used for a great-grandfather whom would have been seated in while his mother fed him mashed carrots. Needless to say if this chair could speak, oh what stories it would tell! Unfortunately, the most obvious story was that it was in need of restoration and repair. The seat was held together by panty hose (which works well in a pinch!)

    The center portion of the seat had split directly in the center as well as a minor split closer to the side. Therefore in addition to refinishing, it needed to be repaired first. The best way to achieve this and do it properly, was to take it apart, partially. Once it was separated all the way, it was cleaned and re-glued, then clamped overnight so that the glue would do its job and mend the splits. If this is done properly, the glue will hold for many years to come (providing a high school student that had long since outgrown the chair didn’t intend to sit on it!)

    After the chair was strong and secure again, the slow and tedious process of stripping and sanding was next. There are no shortcuts when it comes to stripping a chair, any chair. It simply takes a long time because chairs have a LOT of surface area. This chair had such pretty grain that had been hiding under many years of use. When this is stripped and sanded away, that original grain shines through, giving the chair a new life by revealing its original beauty. We selected “gunstock” stain and a satin finish for this high chair. I absolutely love the way the chair turned out! Once again structurally sound and the gorgeous wood revealed, this chair is ready for another century of being a family heirloom.

Check out the other high chair we’ve done by clicking on this link: https://finalefurniture.blogspot.com/2020/06/height-chair-before-height-chair-after.html